This hot water pump adopts the motor made of 50W400 grade high quality cold rolled silicon steel, which is stamped by high speed punch press. It has the advantages of low stator iron loss and low self-heating. The motor winding is designed for hot water pump, high temperature resistance and anti-aging. The winding has water resistance, and adopts 3CR13 stainless steel blade shaft, high temperature resistant bushing and other high quality accessories to enable it to operate for a long time at high temperature, and can be used with frequency converter, so as to automatically adjust according to the amount of water used. This hot water pump is the ideal choice for your hot water equipment, which can operate stably and efficiently, providing you with a lasting hot water supply.
The product is a three-phase AC 380V (tolerance + / - 5%), 50HZ (tolerance + / - 1%) power supply submersible pump. With water quality requirements: water temperature is not higher than 20 °C; solid impurities content (mass ratio) is not more than 0.01%; PH value (pH) is 6.5-8.5; hydrogen sulfide content is not more than 1.5mg/L; chloride ion content is not more than 400mg/L. The electric pump adopts closed or water sealed wet structure, before use must be submersible motor inner cavity filled with clean water to prevent empty, and then tighten the water and air bolts, otherwise not to use. Its work should be completely immersed in water, immersion depth is not more than 70 meters, the distance between the bottom of the pump and the bottom of the well is not less than 3 meters. Well water inflow quantity should be able to meet the electric pump water output and continuous operation, the output water quantity should be controlled at 0.7-1.2 times of the rated flow. The well should be vertical, the electric pump can not be used horizontally or inclined, only vertically placed. The electric pump must be equipped with cables and external overload protection device as required. It is strictly prohibited to conduct no-load test under no water condition.

| แบบอย่าง | อัตราการไหล (ลบ.ม./ชม.) | ศีรษะ (ม.) |
ความเร็วในการหมุน (เปลี่ยน/จุด) |
ปั๊มน้ำ(%) | ทางออก เส้นผ่านศูนย์กลาง (มม.) |
ใช้ได้ดี เส้นผ่านศูนย์กลาง (มม.) |
เรตติ้ง power(KW) |
เรตติ้ง แรงดันไฟฟ้า(วี) |
เรตติ้ง ปัจจุบัน(ก) |
ประสิทธิภาพมอเตอร์ (%) | power factorcosφ | หน่วย ขนาดรัศมีสูงสุด (มม.) |
ข้อสังเกต | |||||||||
| 300QJ200-40 | 200 | 40 | 2900 | 76 | 150 | 300ข้างบน | 37 | 380 | 77.8 | 85.0 | 0.85 | 281 | ||||||||||
| 300QJ200-60 | 60 | 55 | 115 | 85.5 | 0.85 | |||||||||||||||||
| 300QJ200-80 | 80 | 75 | 154.1 | 86.0 | 0.86 | |||||||||||||||||
| 300QJ200-100 | 100 | 90 | 183.8 | 86.5 | 0.86 | |||||||||||||||||
| 300QJ200-120 | 120 | 100 | 204.3 | 86.5 | 0.86 | |||||||||||||||||
| 300QJ200-140 | 140 | 125 | 249.5 | 87.5 | 0.87 | |||||||||||||||||
| 300QJ200-160 | 160 | 140 | 277.8 | 88.0 | 0.87 | |||||||||||||||||
| 300QJ200-180 | 180 | 160 | 317.5 | 88.0 | 0.87 | |||||||||||||||||
| 300QJ200-200 | 200 | 185 | 367.2 | 88.0 | 0.87 | |||||||||||||||||
| 300QJ200-240 | 240 | 220 | 436.6 | 88.0 | 0.87 | |||||||||||||||||
| 300QJ320-30 | 320 | 30 | 2900 | 77 | 200 | 300ข้างบน | 45 | 380 | 94.6 | 85.0 | 0.85 | 281 | ||||||||||
| 300QJ320-60 | 60 | 90 | 183.8 | 86.5 | 0.86 | |||||||||||||||||
| 300QJ320-90 | 90 | 125 | 249.5 | 87.5 | 0.87 | |||||||||||||||||
| 300QJ320-120 | 120 | 160 | 317.5 | 88.0 | 0.87 | |||||||||||||||||
1, well submersible pump for clean water pump, prohibit the new well, pumping sediment and muddy water,
2, well water pump voltage grade of 380/50HZ, the use of other voltage grades of submersible motors need to be customized. The underground cable must use waterproof cable, must be equipped with starting equipment, such as distribution box, start not ready should have commonly used motor comprehensive protection function, such as short circuit overload protection, phase protection, undervoltage protection, grounding protection, idling protection, in case of abnormal conditions, the protection device should be timely action trip.
3, the installation and use of the pump must be reliably grounded, prohibit the push and pull switch when the hands and feet are wet, the installation and maintenance of the pump must be cut off the power supply, the use of the pump place to set up "to prevent electric shock" obvious signs:
4, down the well or before installation, the motor cavity must be filled with distilled water or non-corrosive clean cold boiling water, tighten the / water bolt, the pump on the ground test run, must be to the pump chamber water lubrication rubber bearings, instant start not more than a second, see whether the steering is the same as the steering instructions. When the pump is upright, pay attention to safety, prevent overturning injury.
5 อย่างเคร่งครัดตามบทบัญญัติของลิฟท์ปั๊ม ช่วงการไหลของการใช้งาน เพื่อป้องกันการไหลต่ำหรือแรงสูบน้ำยกสูง แบริ่งแรงขับและส่วนอื่น ๆ ของการสึกหรอ มอเตอร์โอเวอร์โหลดถูกเผา
6 หลังจากปั๊มลงบ่อแล้ว การวัดความต้านทานของฉนวนมอเตอร์กับพื้นไม่ควรน้อยกว่า 100M หลังจากเริ่มสังเกตแรงดันและกระแส ให้ตรวจสอบฉนวนของขดลวดมอเตอร์ว่าเป็นไปตามข้อกำหนดหรือไม่ อุณหภูมิตำแหน่งเก็บปั๊มถ้าน้อยกว่าจุดเยือกแข็ง ควรทำให้น้ำในช่องมอเตอร์แห้ง ป้องกันความเสียหายของน้ำแข็งในโพรงมอเตอร์ที่เกิดจากอุณหภูมิต่ำ
The pump part is mainly composed of pump shaft, impeller, shunt shell, rubber bearing, check valve body (optional) and other components. The motor part is mainly composed of base, pressure regulating diaphragm, thrust bearing, thrust plate, lower guide bearing seat, stator, rotor, upper guide bearing seat, sand discharging ring, water inlet section, lead cable and other components. The main characteristic of this product is that the motor is a water-cooled submersible three-phase asynchronous motor, and the motor cavity is filled with water to cool the motor and lubricate the bearing. The pressure regulating diaphragm at the bottom is used to adjust the expansion-contraction pressure difference in the body caused by the change of the temperature rise of the motor. In order to prevent the sand particles in the well water from entering the motor, two oil seals are installed at the upper end of the motor shaft extension, and a sand discharging ring is installed to form a sand discharging structure. In order to prevent the pump shaft from jumping when starting, the pump shaft and the motor shaft are connected together through a coupling, and a thrust bearing is installed at the bottom of the motor. The lubrication of the motor and the pump bearing is realized through water lubrication. The stator winding of the motor is made of high-quality well motor winding wire, with high insulation performance. The pump is designed by computer CAD, with simple structure and good technical performance.

(1)การเตรียมการก่อนการติดตั้ง:
1. ตรวจสอบว่าปั๊มจุ่มตรงตามเงื่อนไขการใช้งานและขอบเขตที่ระบุในคู่มือหรือไม่
2. การใช้โอบีหนักๆ ที่มีเส้นผ่านศูนย์กลางเท่ากับเส้นผ่านศูนย์กลางภายนอกสูงสุดของปั๊มจุ่ม วัดว่าเส้นผ่านศูนย์กลางภายในของหลุมเจาะสามารถใส่ปั๊มจุ่มได้หรือไม่ และวัดว่าความลึกของหลุมตรงตามข้อกำหนดในการติดตั้งหรือไม่
3. ตรวจสอบว่าหลุมเจาะสะอาดหรือไม่ และน้ำในบ่อมีความขุ่นหรือไม่ ห้ามใช้ปั๊มไฟฟ้าแบบจุ่มเพื่อล้างโคลนปั๊ม Welor และน้ำทราย เพื่อหลีกเลี่ยงความเสียหายที่เกิดกับปั๊มไฟฟ้าแบบจุ่มก่อนวัยอันควร
4. ตรวจสอบว่าตำแหน่งของแคลมป์ติดตั้งหัวเชื่อมนั้นเหมาะสมหรือไม่และสามารถทนต่อคุณภาพของยูนิตทั้งหมดได้หรือไม่
5. ตรวจสอบว่าส่วนประกอบของปั๊มจุ่มเสร็จสมบูรณ์และติดตั้งอย่างถูกต้องตามแผนภาพการประกอบในคู่มือหรือไม่ ถอดตัวกรองออกและหมุนข้อต่อเพื่อดูว่าหมุนได้อย่างยืดหยุ่นหรือไม่
6. คลายเกลียวสกรูน้ำและเติมน้ำสะอาดที่ไม่กัดกร่อนลงในช่องมอเตอร์ (หมายเหตุ ต้องแน่ใจว่าได้เติมน้ำไว้) จากนั้นขันสกรูน้ำให้แน่น หลังจากฉีดน้ำเป็นเวลา 12 ชั่วโมง ความต้านทานของฉนวนของมอเตอร์ไม่ควรน้อยกว่า 150M Q เมื่อวัดด้วยโต๊ะเขย่า 500V
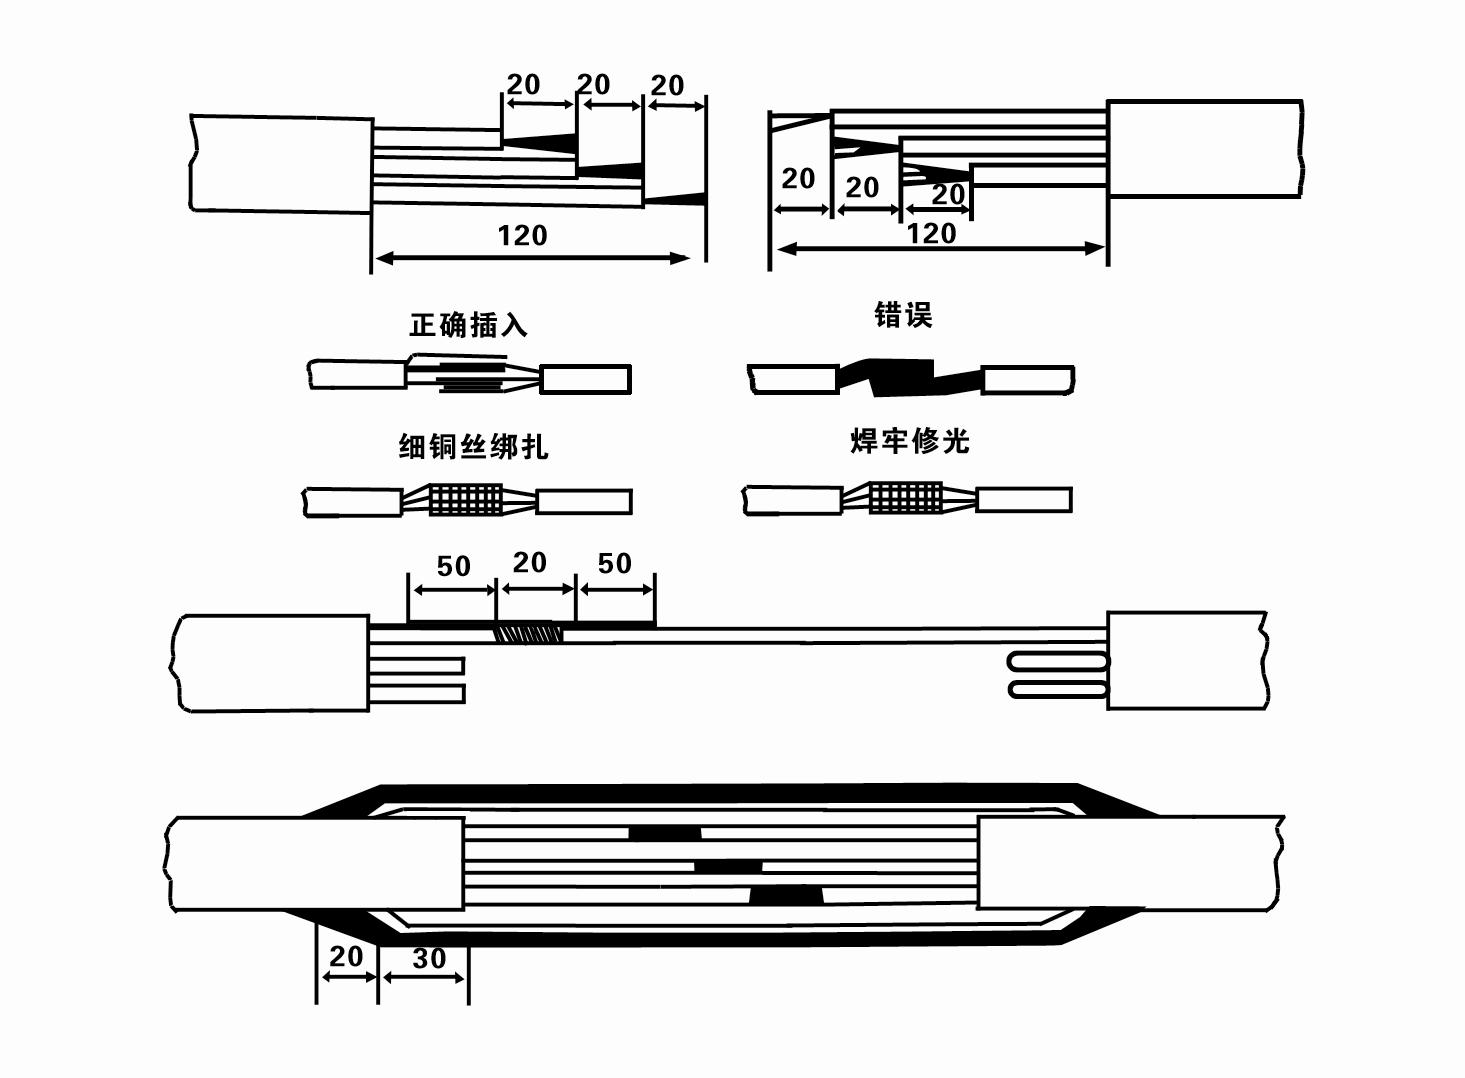
7. Cable joint, cut off a 120mm rubber sleeve from one end of the outgoing cable and the matching cable with an electrician's knifethen stagger the length of the three core wires in a stepped shape, peel off a 20mm copper core, scrape of the oxide layer on theoutside of the copper wire with a knife or sand cloth, and insert the two connected wire ends in palirs.After tying the layer tightly with fine copper wire, solder it thoroughly and firmly, and sand of any. burrs on the surface. Then, forthe three joints, use polyvester insulation tape to wrap them in a semi stacked manner for three lavers. Wrap the two ends of thewrapping layer tightywith nyion thread,and then use a semi stacked method to wrap the tape for three layers. Wrap the outellayer with high-pressure insulation tape for three layers. Finally, fold the threestrands together and repeatedly wrap them for fivelayers with high-pressure tape. Each layer must be tightly tied, and the interlayer joints must be tight and fimm to prevent water frompenetrating and damaging the insulation, After wrapping, soak in water at room temperature of 20 ’c for 12 hours, and measurethe insulation resistance with a shaking table, which should not be less than 100M Ω
แผนภาพกระบวนการเดินสายไฟที่แนบมามีดังนี้:
8. ใช้มัลติมิเตอร์เพื่อตรวจสอบว่าสายไฟสามเฟสเชื่อมต่ออยู่หรือไม่ และความต้านทานไฟฟ้ากระแสตรงมีความสมดุลโดยประมาณหรือไม่
9. ตรวจสอบว่าความจุของวงจรและหม้อแปลงไฟฟ้าโอเวอร์โหลดหรือไม่ จากนั้นเชื่อมต่อสวิตช์ป้องกันการโอเวอร์โหลดหรืออุปกรณ์สตาร์ท ดูตารางที่ 2 สำหรับรุ่นเฉพาะ จากนั้นเทถังน้ำลงในปั๊มน้ำจากทางออกของปั๊มน้ำเพื่อหล่อลื่นแบริ่งยางในปั๊ม จากนั้นวางปั๊มไฟฟ้าจุ่มตั้งตรงและมั่นคง เริ่มต้น (ไม่เกินหนึ่งวินาที) และตรวจสอบว่าทิศทางการบังคับเลี้ยวสอดคล้องกับป้ายบังคับเลี้ยวหรือไม่ ถ้าไม่เช่นนั้นให้สลับขั้วต่อของสายสามเฟสสองตัวใดก็ได้ จากนั้นติดตั้งตัวกรองและเตรียมลงบ่อ หากใช้ในโอกาสพิเศษ (เช่น คูน้ำ คูน้ำ แม่น้ำ สระน้ำ สระน้ำ ฯลฯ) ปั๊มไฟฟ้าจะต้องต่อสายดินอย่างเชื่อถือได้
(2) อุปกรณ์และเครื่องมือติดตั้ง:
1. โซ่ยกหนึ่งคู่รับน้ำหนักเกินสองตัน
2. ขาตั้งที่มีความสูงในแนวตั้งไม่น้อยกว่าสี่เมตร
3.เชือกแขวน 2 เส้น (ลวดสลิง) ที่รับน้ำหนักได้มากกว่า 1 ตัน (สามารถรับน้ำหนักปั๊มน้ำครบชุดได้)
4. ติดตั้งแคลมป์ (เฝือก) สองคู่
5. ประแจ ค้อน ไขควง เครื่องมือและเครื่องมือไฟฟ้า ฯลฯ
(3) การติดตั้งปั๊มไฟฟ้า:
1. แผนภาพการติดตั้งของปั๊มไฟฟ้าแบบจุ่มแสดงในรูปที่ 2 ขนาดการติดตั้งเฉพาะแสดงในตารางที่ 3 "รายการขนาดการติดตั้งของปั๊มไฟฟ้าแบบจุ่ม"
2. ปั๊มจุ่มไฟฟ้าที่มีส่วนหัวน้อยกว่า 30 เมตร สามารถยกเข้าบ่อได้โดยตรงโดยใช้ท่อและเชือกลวดหรือเชือกปออื่น ๆ ที่สามารถรับน้ำหนักเต็มเครื่องจักร ท่อน้ำ และน้ำในท่อได้
3. ปั๊มที่มีหัวมากกว่า 30 เมตร ใช้ท่อเหล็ก และมีลำดับการติดตั้งดังนี้
1.ใช้แคลมป์จับปลายด้านบนของส่วนปั๊มน้ำ (ขณะนี้มอเตอร์และปั๊มน้ำเชื่อมต่ออยู่) ยกด้วยโซ่แขวน แล้วค่อย ๆ มัดเข้ากับบ่อจนกระทั่งใส่แคลมป์บนหัวหลุมแล้วถอดออก โซ่แขวน
2) ใช้แคลมป์อีกคู่ในการยึดท่อ ยกด้วยโซ่แขวนให้ห่างจากหน้าแปลน 15 ซม. แล้วลดระดับลงอย่างช้าๆ ระหว่างหน้าแปลนท่อและหน้าแปลนปั๊มใส่แผ่นยางเข้าที่ และขันท่อให้แน่นและปั๊มให้เท่ากันด้วยสลักเกลียว น็อต และแหวนรองสปริง
3. ยกปั๊มจุ่มขึ้นเล็กน้อย ถอดแคลมป์ที่ปลายด้านบนของปั๊มน้ำออก มัดสายเคเบิลเข้ากับท่อน้ำให้แน่นด้วยเทปพลาสติก แล้วค่อยๆ มัดลงจนกระทั่งแคลมป์วางอยู่ที่หัวหลุมผลิต
④ใช้วิธีเดียวกันในการผูกท่อน้ำทั้งหมดเข้ากับบ่อ
⑤หลังจากเชื่อมต่อสายเคเบิลนำออกเข้ากับสวิตช์ควบคุมแล้ว จะเชื่อมต่อกับแหล่งจ่ายไฟสามเฟส
(4) สิ่งที่ควรทราบระหว่างการติดตั้ง:
1. หากพบปัญหาการติดขัดในระหว่างกระบวนการสูบน้ำ ให้หมุนหรือดึงท่อน้ำเพื่อผ่านจุดติดขัด หากมาตรการต่างๆ ยังไม่ได้ผล โปรดอย่าฝืนปั๊มลงเพื่อหลีกเลี่ยงความเสียหายต่อปั๊มไฟฟ้าใต้น้ำและบ่อน้ำ
2. ระหว่างการติดตั้งควรวางแผ่นยางไว้ที่หน้าแปลนของแต่ละท่อและขันให้แน่นเท่ากัน
3.เมื่อปั๊มน้ำลงบ่อควรวางตรงกลางท่อบ่อเพื่อป้องกันไม่ให้ปั๊มวิ่งชนผนังบ่อเป็นเวลานานทำให้ปั๊มสั่นสะเทือนและมอเตอร์กวาดและไหม้ .
4. กำหนดความลึกของปั๊มน้ำถึงก้นบ่อตามสภาพทรายและตะกอนของบ่อ อย่าฝังปั๊มไว้ในโคลน ระยะห่างจากปั้มน้ำถึงก้นบ่อโดยทั่วไปไม่น้อยกว่า 3 เมตร (ดูรูปที่ 2)
5. ความลึกในการป้อนน้ำของปั๊มน้ำควรอยู่ห่างจากระดับน้ำแบบไดนามิกถึงโหนดน้ำเข้าไม่ต่ำกว่า 1-1.5 เมตร (ดูรูปที่ 2) มิฉะนั้นลูกปืนปั๊มน้ำอาจเสียหายได้ง่าย
6. การยกปั๊มน้ำต้องไม่ต่ำเกินไป มิฉะนั้น จะต้องติดตั้งวาล์วประตูบนท่อส่งน้ำของหลุมผลิตเพื่อควบคุมการไหลของปั๊มที่จุดไหลที่กำหนด เพื่อป้องกันไม่ให้มอเตอร์ทำงานหนักเกินไปและไหม้เนื่องจากอัตราการไหลที่สูง
7. เมื่อปั๊มน้ำทำงาน น้ำที่ส่งออกควรต่อเนื่องและสม่ำเสมอ กระแสควรจะคงที่ (ภายใต้สภาวะการทำงานที่กำหนด โดยทั่วไปไม่เกิน 10% ของกระแสที่กำหนด) และไม่ควรมีการสั่นสะเทือนหรือเสียงรบกวน หากมีความผิดปกติควรหยุดเครื่องเพื่อหาสาเหตุและกำจัดทิ้ง
8. เมื่อติดตั้ง ให้ใส่ใจกับการตั้งค่าสายดินของมอเตอร์ (ดูรูปที่ 2) เมื่อท่อน้ำเป็นท่อเหล็กให้ดึงออกจากแคลมป์หลุมผลิต เมื่อท่อน้ำเป็นท่อพลาสติกให้เดินออกจากเครื่องหมายกราวด์ของปั๊มไฟฟ้า
After installation of the underwater pump, it is necessary to recheck the insulation resistance and three-phase continuity of the switch, and check whether the connection between the instrument and the starting equipment is wrong. If there is no problem, you can start the test machine. After starting, observe whether the indication reading of each instrument is correct. If the rated voltage and current specified on the nameplate are exceeded, observe whether the pump has any noise or vibration. If everything is normal, it can be put into operation. Four hours after the first operation of the pump, it should be turned off and the thermal insulation resistance of the motor should be quickly tested, and its value should not be less than 0.5 megaohm. After stopping the pump, it should be restarted after an interval of five minutes to prevent the water column in the pipeline from completely reversing, resulting in the motor burning due to excessive current. After the pump is put into normal operation, in order to prolong its service life, it is necessary to check regularly whether the supply voltage, working current and insulation resistance are normal. If the following conditions are found, the machine should be stopped immediately to eliminate the fault:
1 the current exceeds 20% under the rated working condition.
2 the dynamic water level drops to the inlet section, resulting in intermittent drainage.
3 the underwater pump vibrates violently or emits huge noise.
4 the supply voltage is lower than 340 volts.
5 a fuse is burned.
6 the water pipe is damaged.
7 the thermal insulation resistance of the motor to the ground is less than 0.5 megaohm.
When disassembling the device, it is necessary to untie the cable bundle and remove the pipeline part and the line protection plate. Remove the drain bolt and exclude all water in the motor chamber. Remove the filter element and loosen the screw on the coupling fixed to the motor shaft. Unscrew the bolt connecting the water inlet section and the motor, and separate the pump and the motor (pay attention to placing the device horizontally when separating to prevent the bending of the pump shaft). The sequence of disassembling the pump is as follows: (see Figure 1) water inlet section, impeller, water inlet shell, impeller. Check the valve body, and use a special tool to loosen the cone sleeve fixed to the impeller when removing the impeller. In the process of disassembly, avoid bending the pump shaft and damaging various components. The disassembly process of the motor is as follows: (see Figure 1) put the motor on the platform, and remove the nuts on the screw (pull rod bolt), base, shaft head lock nut, thrust plate, key and lower guide rail - bearing seat, bolt, and then remove the rotor (be careful not to damage the wiring harness), and finally remove the connecting parts and upper guide bearing seat. Unit assembly: before assembly, the rust and dirt of each component should be cleaned, and the sealant should be coated on each mating surface and fastener, and then assembled in the opposite order of disassembly (the movement of the motor shaft after assembly is about one millimeter), after the assembly is completed, the coupling should be flexibly rotated, and then the filter element should be placed for testing. Each time the underwater electric pump has been used for one year, or less than one year but has been immersed for two years, it must be disassembled and inspected in accordance with Article 5 and replace the worn parts.
1. ใส่น้ำในช่องมอเตอร์ออก (โดยเฉพาะในฤดูหนาวเพื่อป้องกันไม่ให้มอเตอร์เป็นน้ำแข็ง) และมัดสายเคเบิลให้ดี
2, store in an indoor room without corrosive substances and gases, with a temperature below 40 °C.
3 การใช้งานในระยะยาวควรคำนึงถึงการป้องกันสนิมของปั๊มจุ่ม
- ใบพัด
- ปลอกเพลา
- ยางหุ้มเพลา
-
แหวนซีล
01 ปริมาณน้ำจากบ่อลึก
02 การจ่ายน้ำในอาคารสูง
03 น้ำประปาภูเขา
04 หอคอยน้ำ
05 การชลประทานการเกษตร
06 การชลประทานในสวน
07 ปริมาณน้ำในแม่น้ำ
08 น้ำในประเทศ


