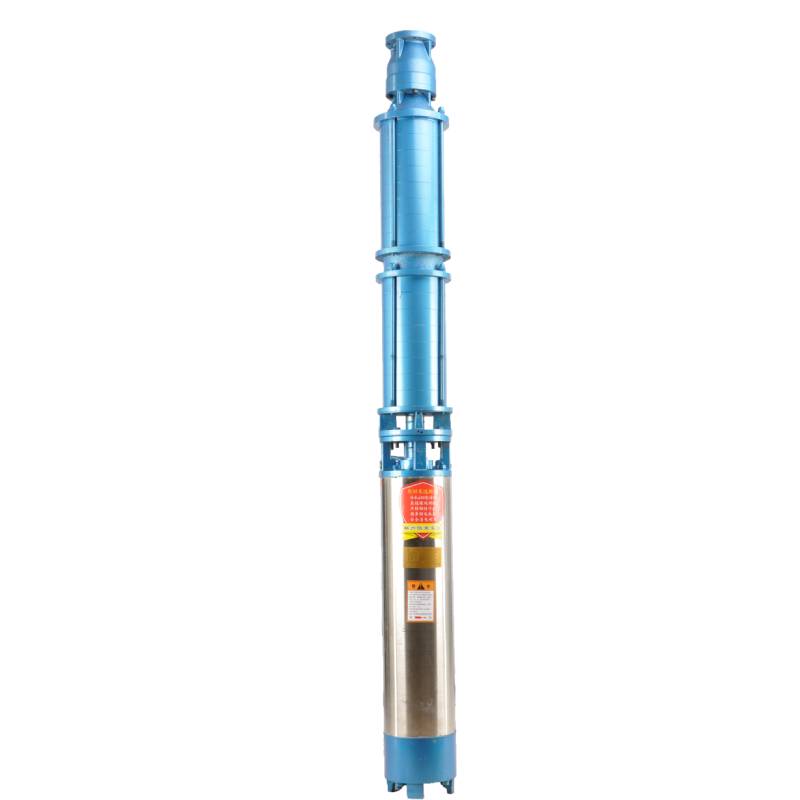
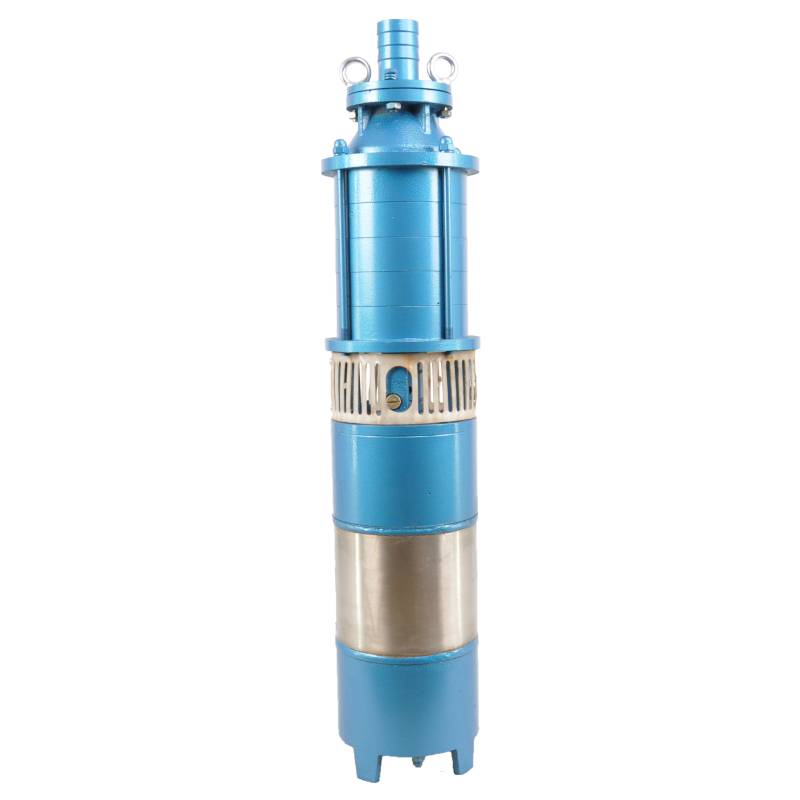
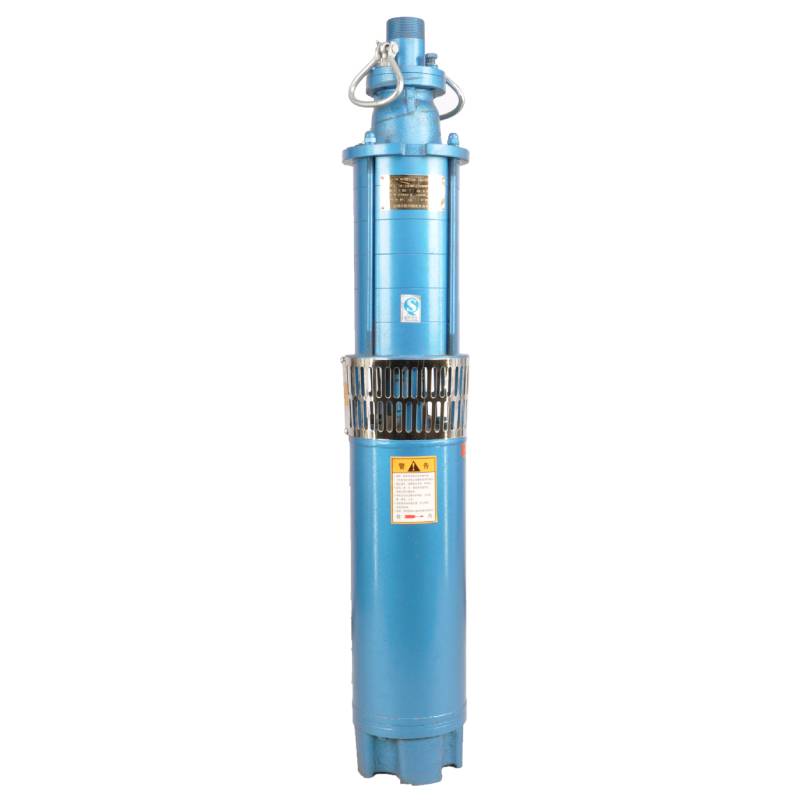
QS sērijas zemūdens elektriskā sistēma ir jauna veida apūdeņošanas un drenāžas iekārtas. Šīs sērijas sūkņi ir vertikāli, izmantojot radiālu pozitīvo un negatīvo virzošo lāpstiņu dizainu, mazu tilpumu, vieglu svaru, augstu pacēlumu, vieglu uzstādīšanu un pārvietošanu, vieglu apkopi un darbību.
Plūsmas diapazons 5-50m3/h, pacēlums 5-800m.
The product is equipped with three-phase AC 380V (tolerance is ± 5%), 50 Hz (tolerance is ± 1%) power supply. Water quality requirements are:
(1) water temperature shall not be higher than 20 °C;
(2) cieto piemaisījumu saturs (masas attiecība) nedrīkst būt lielāks par 0,01 %;
(3) PH vērtība (pH) ir 6,5-8,5;
(4) sērūdeņraža saturs nedrīkst būt lielāks par 1,5 mg/l;
(5) hlorīda jonu saturs nedrīkst būt lielāks par 400 mg/l. Motors ir slēgta vai ar ūdeni pildīta mitra konstrukcija.
Pirms lietošanas iegremdējamā motora iekšējais dobums ir jāpiepilda ar tīru ūdeni un jāpievelk ūdens iesmidzināšanas un gaisa izplūdes skrūves, pretējā gadījumā to nedrīkst izmantot. Lai strādātu, iegremdējamajam sūknim jābūt pilnībā iegremdētam ūdenī, ievietošanas dziļums nedrīkst pārsniegt 70 metrus, un attālums starp iegremdējamā sūkņa dibenu un akas dibenu nedrīkst būt mazāks par 3 metriem. Akas ūdens plūsmai jāatbilst iegremdējamā sūkņa ūdens ieplūdes un nepārtrauktas darbības prasībām, un iegremdējamā sūkņa ūdens jauda jākontrolē 0,7–1,2 reizes lielāka par nominālo plūsmu. Akai jābūt vertikālai, un zemūdens sūkni nevar izmantot horizontāli vai slīpi, bet tikai vertikāli. Iegremdējamajam sūknim jābūt saskaņotam ar kabeļiem un pēc vajadzības jāaprīko ar ārējām pārslodzes aizsardzības ierīcēm. Iegremdējamo sūkni ir stingri aizliegts pārbaudīt bez ūdens slodzes.
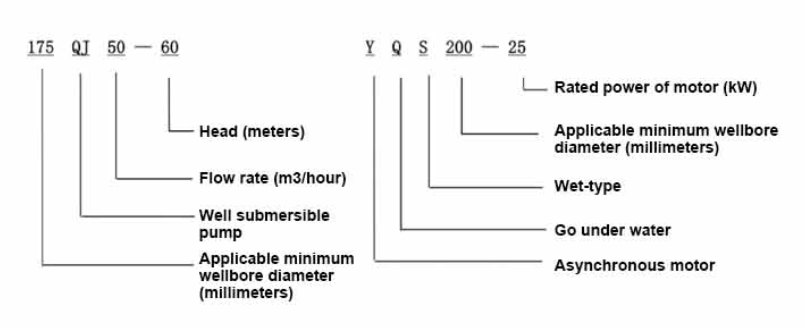
| 200 QS iegremdējamā sūkņa veiktspējas tabula Nestandarta pielāgotas sērijas |
||||||||
| modelis | modelis | |||||||
| QS5-70-2,2KW | QS10-52-4KW | |||||||
| QS5-90-3KW | QS10-70-5,5KW | |||||||
| QS5-108-4KW | QS10-90-7,5KW | |||||||
| QS5-126-5,5KW | QS10-108-7,5KW | |||||||
| QS5-144-5,5KW | QS20-40-4KW | |||||||
| QS5-160-7,5KW | QS20-54-5,5KW | |||||||
| QS5-180-7,5KW | QS20-65-7,5KW | |||||||
| QS10-36-2,2KW | QS20-81-7,5KW | |||||||
| QS10-54-3KW | QS32-13-2,2KW | |||||||
| QS10-70-4KW | QS32-26-4KW | |||||||
| QS10-90-5,5KW | QS32-52-7,5KW | |||||||
| QS10-108-5,5KW | QS40-39-7,5KW | |||||||
| QS10-126-7,5KW | QS40-13-4KW | |||||||
| QS10-140-7,5KW | QS40-26-5,5KW | |||||||
| QS15-38-3KW | QS50-13-4KW | |||||||
| QS15-54-4KW | QS50-26-5,5KW | |||||||
| QS15-65-5,5KW | QS50-39-7,5KW | |||||||
| QS15-81-5,5KW | QS63-12-4KW | |||||||
| QS15-100-7,5KW | QS63-24-7,5KW | |||||||
| QS20-30-3KW | QS80-11-4KW | |||||||
| QS20-45-4KW | QS80-22-7,5KW | |||||||
| QS20-60-5,5KW | QS10-88-7,5KW | |||||||
| QS20-75-7,5KW | QS10-105-7,5KW | |||||||
| QS20-81-7,5KW | QS40-52-11KW | |||||||
| QS10-198-15KW | QS50-60-11KW | |||||||
| QS10-160-9,2KW | QS65-30-9,2KW | |||||||
| QS15-180-15KW | QS80-28-9,2KW | |||||||
| QS10-180-11KW | QS125-15-7,5KW | |||||||
1, akas iegremdējamais sūknis tīra ūdens sūknim, aizliedz mazgāt jaunu aku, sūknējot nogulsnes un dubļainu ūdeni,
2, akas ūdens sūkņa sprieguma pakāpe 380/50 HZ, citu zemūdens motoru sprieguma pakāpju izmantošana ir jāpielāgo. Dziļurbuma kabeļiem ir jāizmanto ūdensnecaurlaidīgs kabelis, tiem jābūt aprīkotiem ar palaišanas aprīkojumu, piemēram, sadales kārbu, palaišanai nav jābūt gatavai, jābūt kopējai motora visaptverošai aizsardzības funkcijai, piemēram, aizsardzībai pret īssavienojumu pārslodzi, fāzes aizsardzībai, aizsardzībai pret zemu spriegumu, zemējuma aizsardzībai, tukšgaitas aizsardzībai, neparastu apstākļu gadījumā aizsargierīcei jābūt savlaicīgai darbībai.
3, sūknim uzstādīšanas un lietošanas laikā jābūt droši iezemētam. Aizliegts rokās un kājās slapjš push-pull slēdzis. Pirms sūkņa uzstādīšanas un apkopes, strāvas padeve ir jāatslēdz. Uzstādīts vietā, kur tiek izmantots sūknis, tam jābūt skaidri norādītam "novērst elektriskās strāvas triecienu". Pirms nolaišanas akā vai uzstādīšanas motora dobums ir jāpiepilda ar destilētu ūdeni vai tīru aukstu ūdeni, kas nav kodīgs, un pieskrūvējiet ūdens / iztukšošanas skrūvi.
4, kad sūkņa vietējā intervija darbojas, sūkņa kamerā jāielej ūdens, lai ieeļļotu gumijas gultni. Tūlītējais starta laiks nedrīkst pārsniegt vienu sekundi, pārbaudiet, vai virziens ir tāds pats kā stūrēšanas instrukcijā. Kad sūknis ir stāvus, pievērsiet uzmanību drošībai, nepieļaujiet apgāšanos un savainojumus.
5, stingri saskaņā ar sūkņa pacelšanas noteikumiem, plūsmas izmantošanas diapazonu, lai novērstu zemas plūsmas vai lielas pacelšanas sūknēšanas spēku, vilces gultni un citas nodiluma daļas, motora pārslodze sadedzināta 6, pēc sūkņa nolaišanas akā, motora mērījums pret zemi izolācijas pretestību nedrīkst būt mazāks par 100M, pēc sākuma, lai novērotu spriegumu un strāvu, pārbaudiet motora tinumu izolāciju, vai tā atbilst prasībām; sūkņa uzglabāšanas vietas temperatūra, ja tā ir zemāka par sasalšanas punktu, ir jāizžāvē motora dobuma ūdens, lai novērstu motora dobuma ūdens ledus bojājumus, ko izraisa zema temperatūra.
The pump part is mainly composed of pump shaft, impeller, guide housing, rubber bearing, check valve body (optional) and other components. The motor part mainly includes base, pressure regulating diaphragm, thrust bearing, thrust plate, lower guide bearing seat, stator, rotor, upper guide bearing seat, sand discharging ring, water inlet section, lead cable and other components. The main characteristics of this product are that the motor is a water-immersed three-phase asynchronous motor, and the motor cavity is filled with water to cool the motor and lubricate the bearing. The pressure regulating film at the bottom is used to adjust the pressure difference of the water body in the cavity caused by the temperature rise of the motor. In order to prevent the sand from entering the motor, the upper end of the motor shaft extension is equipped with two oil seals and installed a sand discharging ring, forming a sand prevention structure. At the same time, in order to prevent the pump shaft from jumping when starting, the pump shaft is connected with the motor shaft by a coupling, and the thrust bearing is installed under the motor. The lubrication of the whole product is water lubrication, and the motor stator winding is made of high quality submersible motor winding wire with high insulation performance. In addition, the pump is designed by computer CAD, with simple structure and excellent technical performance.

(1) Sagatavošana pirms uzstādīšanas:
1. Pārbaudiet, vai iegremdējamais sūknis atbilst lietošanas nosacījumiem un darbības jomai, kas norādīta rokasgrāmatā.
2. Izmantojot smagu obiektu, kura diametrs ir vienāds ar iegremdējamā sūkņa maksimālo ārējo diametru, izmēra, vai urbuma iekšējais diametrs atbilst iegremdējamajam sūknim, un izmēra, vai urbuma dziļums atbilst uzstādīšanas prasībām.
3. Pārbaudiet, vai akas urbums ir tīrs un vai akas ūdens ir duļķains. Nekad neizmantojiet iegremdējamo elektrisko sūkni, lai mazgātu wellor sūkņa dubļus un smilšu ūdeni, lai izvairītos no priekšlaicīgiem iegremdējamā elektriskā sūkņa bojājumiem.
4. Pārbaudiet, vai metināšanas galviņas uzstādīšanas skavas novietojums ir piemērots un vai tas var izturēt visas vienības kvalitāti.
5. Pārbaudiet, vai iegremdējamā sūkņa sastāvdaļas ir pabeigtas un pareizi uzstādītas saskaņā ar montāžas shēmu rokasgrāmatā. Noņemiet filtra sietu un pagrieziet savienojumu, lai redzētu, vai tas griežas elastīgi.
6. Atskrūvējiet ūdens skrūvi un piepildiet motora dobumu ar tīru, nekodīgu ūdeni (piezīme. noteikti uzpildiet to), pēc tam pievelciet ūdensskrūvi. Pēc 12 stundu ūdens iesmidzināšanas motora izolācijas pretestība nedrīkst būt mazāka par 150M Q, mērot ar 500V kratīšanas galdu.
7. Cable joint, cut off a 120mm rubber sleeve from one end of the outgoing cable and the matching cable with an electrician's knifethen stagger the length of the three core wires in a stepped shape, peel off a 20mm copper core, scrape of the oxide layer on theoutside of the copper wire with a knife or sand cloth, and insert the two connected wire ends in palirs.After tying the layer tightly with fine copper wire, solder it thoroughly and firmly, and sand of any. burrs on the surface. Then, forthe three joints, use polyvester insulation tape to wrap them in a semi stacked manner for three lavers. Wrap the two ends of thewrapping layer tightywith nyion thread,and then use a semi stacked method to wrap the tape for three layers. Wrap the outellayer with high-pressure insulation tape for three layers. Finally, fold the threestrands together and repeatedly wrap them for fivelayers with high-pressure tape. Each layer must be tightly tied, and the interlayer joints must be tight and fimm to prevent water frompenetrating and damaging the insulation, After wrapping, soak in water at room temperature of 20 ’c for 12 hours, and measurethe insulation resistance with a shaking table, which should not be less than 100M Ω
Pievienotā kabeļa elektroinstalācijas procesa shēma ir šāda: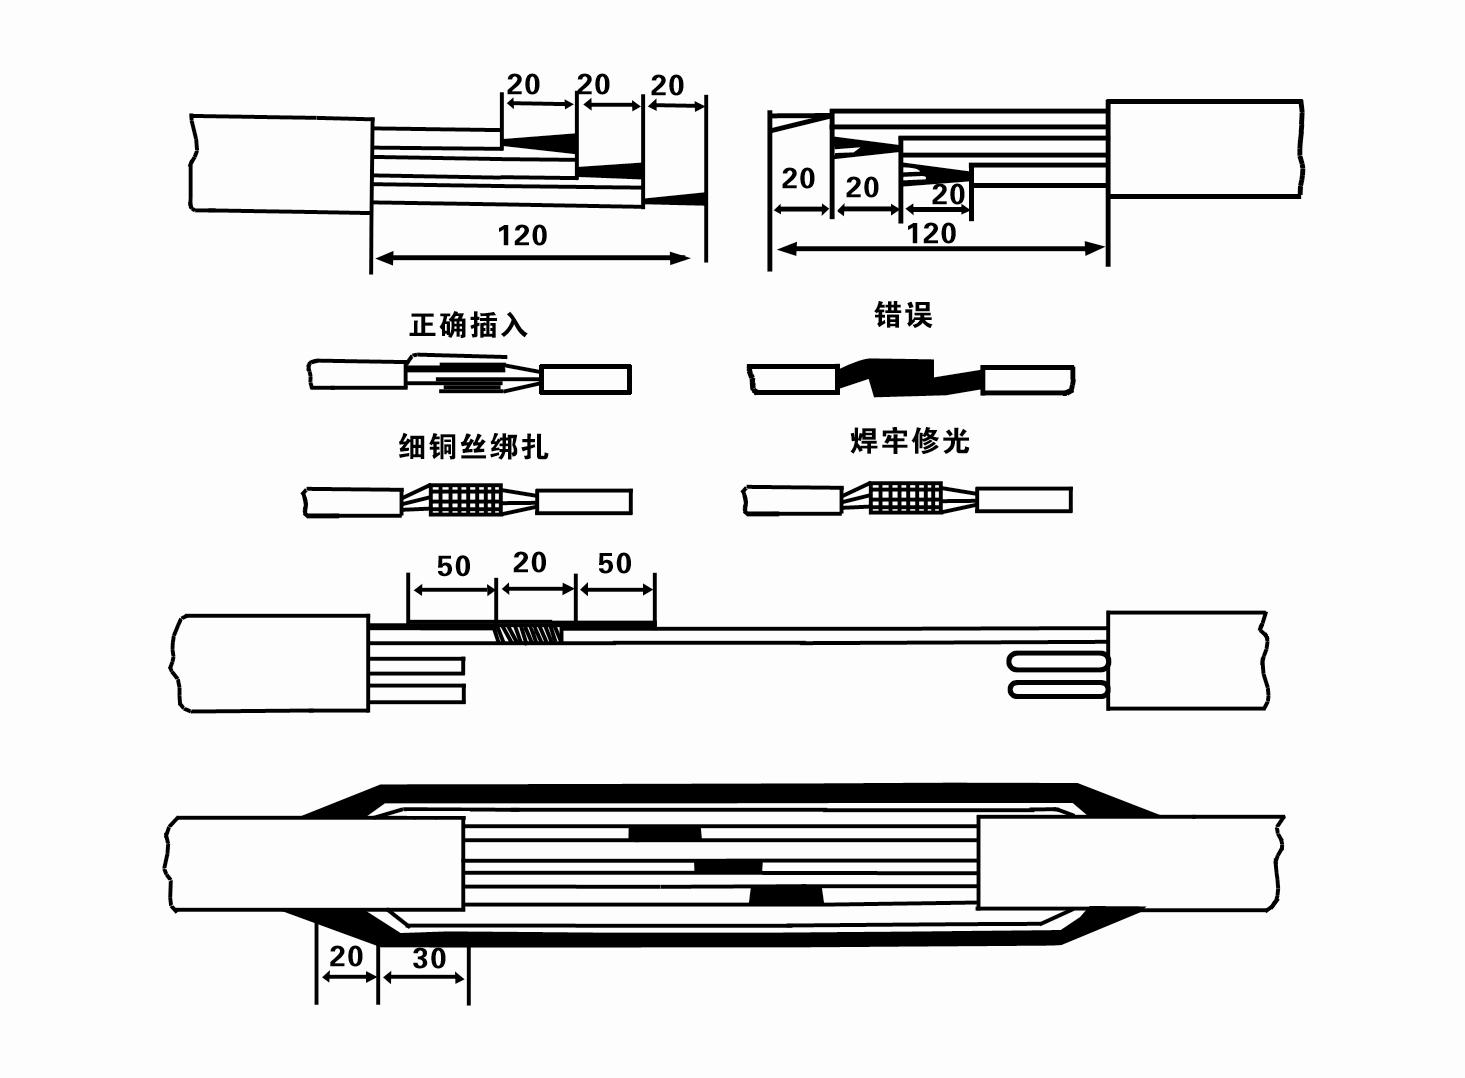
8. Izmantojiet multimetru, lai pārbaudītu, vai trīsfāzu vadi ir savienoti un vai līdzstrāvas pretestība ir aptuveni līdzsvarota.
9. Pārbaudiet, vai ķēde un transformatora jauda nav pārslogota, un pēc tam pievienojiet pārslodzes aizsardzības slēdzi vai palaišanas aprīkojumu. Konkrētus modeļus skatiet 2. tabulā un pēc tamIelejiet ūdens spaini ūdens sūknī no ūdens sūkņa izplūdes atveres, lai ieeļļotu sūkņa gumijas gultņus, un pēc tam novietojiet iegremdējamo elektrisko sūkni vertikāli un stabili. Sāciet (ne vairāk kā vienu sekundi) un pārbaudiet, vai stūrēšanas virziens atbilst stūres zīmei. Ja nē, nomainiet divus trīsfāzu kabeļa savienotājus. Pēc tam uzstādiet filtru un sagatavojieties nolaišanai akā. Ja to lieto īpašos gadījumos (piemēram, grāvjos, grāvjos, upēs, dīķos, dīķos utt.), elektriskajam sūknim jābūt droši iezemētam.
(2) Uzstādīšanas aprīkojums un instrumenti:
1. Viens celšanas ķēžu pāris vairāk nekā divām tonnām.
2. Statīvs, kura vertikālais augstums nav mazāks par četriem metriem.
3. Divas piekārtas virves (stiepļu troses), kas var izturēt svaru, kas pārsniedz vienu tonnu (var izturēt visa ūdens sūkņu komplekta svaru).
4. Uzstādiet divus skavu (šīnu) pārus.
5. Uzgriežņu atslēgas, āmuri, skrūvgrieži, elektroinstrumenti un instrumenti utt.
(3) Elektriskā sūkņa uzstādīšana:
1. Iegremdējamā elektriskā sūkņa uzstādīšanas shēma ir parādīta 2. attēlā. Konkrētie uzstādīšanas izmēri ir parādīti 3. tabulā "Iegremdējamā elektriskā sūkņa uzstādīšanas izmēru saraksts".
2. Iegremdējamos elektriskos sūkņus, kuru augstums ir mazāks par 30 metriem, var tieši ievilkt akā, izmantojot šļūtenes un stiepļu troses vai citas kaņepju troses, kas var izturēt visas mašīnas, ūdensvadu un caurulēs esošo ūdeni.
3. Sūkņiem, kuru augstums pārsniedz 30 metrus, tiek izmantotas tērauda caurules, un uzstādīšanas secība ir šāda:
①Izmantojiet skavu, lai nofiksētu ūdens sūkņa daļas augšējo galu (šobrīd motors un ūdens sūknis ir savienoti), paceliet to ar piekārtu ķēdi un lēnām piesieniet akā, līdz uzlieciet skavu uz akas galvas un noņemiet piekarināma ķēde.
② Izmantojiet citu skavu pāri, lai nostiprinātu cauruli, paceliet to ar piekārtu ķēdi 15 cm attālumā no atloka un lēnām nolaidiet. Starp caurules atloku un sūkņa atlokuIevietojiet gumijas paliktni vietā un vienmērīgi pievelciet cauruli un sūkni ar skrūvēm, uzgriežņiem un atsperu paplāksnēm.
③ Nedaudz paceliet iegremdējamo sūkni, noņemiet skavu ūdens sūkņa augšējā galā, cieši piesieniet kabeli pie ūdens caurules ar plastmasas lenti un lēnām piesieniet to, līdz skava ir novietota pie akas galvas.
④Izmantojiet to pašu metodi, lai visas ūdens caurules iesietu akā.
⑤Pēc tam, kad izvades kabelis ir pievienots vadības slēdzim, tas tiek pievienots trīsfāzu barošanas avotam.
(4) Lietas, kas jāņem vērā uzstādīšanas laikā:
1. Ja sūknēšanas procesā tiek konstatēta iesprūšanas parādība, pagrieziet vai pavelciet ūdens cauruli, lai pārvarētu iesprūšanas vietu. Ja dažādi pasākumi joprojām nedarbojas, lūdzu, nespiediet sūkni uz leju, lai izvairītos no zemūdens elektriskā sūkņa un akas bojājumiem.
2. Uzstādīšanas laikā pie katras caurules atloka jānovieto gumijas paliktnis un vienmērīgi jāpievelk.
3. Kad ūdens sūknis ir nolaists akā, tas jānovieto akas caurules vidū, lai sūknis ilgstoši nedarbotos pret akas sienu, izraisot sūkņa vibrāciju un motora slaucīšanu un degšanu. .
4. Nosakiet ūdens sūkņa dziļumu līdz akas dibenam atbilstoši akas plūstošajiem smilšu un dūņu apstākļiem. Neapglabājiet sūkni dubļos. Attālums no ūdens sūkņa līdz akas dibenam parasti nav mazāks par 3 metriem (skat. 2. attēlu).
5. Ūdens sūkņa ūdens ieplūdes dziļumam jābūt ne mazākam par 1-1,5 metriem no dinamiskā ūdens līmeņa līdz ūdens ieplūdes mezglam (skat. 2. attēlu). Pretējā gadījumā ūdens sūkņa gultņi var tikt viegli sabojāti.
6. Ūdens sūkņa pacēlājs nedrīkst būt pārāk zems. Pretējā gadījumā uz urbuma ūdens cauruļvada ir jāuzstāda aizbīdņa vārsts, lai kontrolētu sūkņa plūsmu nominālajā plūsmas punktā, lai novērstu motora pārslodzi un izdegšanu lielu plūsmas ātrumu dēļ.
7. Kad ūdens sūknis darbojas, ūdens izvadei jābūt nepārtrauktai un vienmērīgai, strāvai jābūt stabilai (nominālos darba apstākļos parasti ne vairāk kā 10% no nominālās strāvas), un tajā nedrīkst būt vibrācijas vai trokšņa. Ja ir kādas novirzes, mašīna ir jāaptur, lai noskaidrotu cēloni un to novērstu.
8. Uzstādot, pievērsiet uzmanību motora zemējuma vada iestatījumam (sk. 2. attēlu). Ja ūdens caurule ir tērauda caurule, izvadiet to no akas galvas skavas; ja ūdens caurule ir plastmasas caurule, novadiet to no elektriskā sūkņa zemējuma atzīmes.
The use of underwater pumps need to be carried out in strict accordance with the following steps: First of all, after the installation of the underwater pump, it is necessary to recheck the insulation resistance and the three-phase continuity of the switch, and check whether there are errors in the connection of the instrument and the start equipment. If there is no problem, you can start to test the machine. After the start, observe whether the indication readings of each instrument are correct. If the rated voltage and current specified on the nameplate are exceeded, please observe whether the pump has any noise or vibration. If everything is normal, it can be put into operation. The second step, after the pump runs for four hours for the first time, it should be closed and the thermal insulation resistance of the motor should be tested quickly. Its value should not be less than 0.5 megaohm. The third step, after the pump stops, it should be restarted after five minutes to prevent the water column in the pipeline from completely reversing, resulting in the motor burning due to excessive current. The fourth step, after the pump is put into normal operation, in order to prolong its service life, it is necessary to check the power supply voltage, operating current and insulation resistance regularly to see if they are normal. If the following conditions are found, the machine should be shut down immediately to troubleshoot:
1 the current exceeds 20% under the rated working conditions.
2 the dynamic water level drops to the inlet section, causing intermittent drainage.
3 the underwater pump vibrates violently or makes a lot of noise.
4 the supply voltage is lower than 340 volts.
5 a fuse burned. 6 water pipe damage.
7 the motor to the ground thermal insulation resistance is less than 0.5 megaohms.
The fifth step, the removal of the unit:
1 untie the cable tether, remove the pipe part, and remove the line protection plate.
2 screw down the water bolt and discharge all the water in the motor chamber.
3 remove the filter and loosen the fixing screw on the coupling fixed motor shaft.
4 screw down the bolt connecting the water inlet section and the motor, separate the pump and the motor (pay attention to make the unit level to prevent the bending of the pump shaft when separating)
5 the removal sequence of the pump is: (see Figure 1) water inlet section, impeller, shunt shell, impeller, check valve body. When removing the impeller, use special tools to loosen the cone sleeve fixed the impeller. In the process of removal, avoid bending the pump shaft and damage the various parts.
6 the removal process of the motor is: (see Figure 1) put the motor on the platform, and in order from the bottom of the motor bolt nuts, base, shaft head lock nut, thrust plate, key and lower guide bearing seat (iron rod bolt) on the connecting parts, and then take out the stator (careful not to damage the wire packet), and finally remove the connecting part and the upper guide bearing seat. Unit assembly: before assembly, rust and dirt on each component should be cleaned and sealant should be applied to each mating surface and fastener, and then the assembly should be carried out in reverse order of disassembly (the motor shaft moves about 1 mm after assembly), the coupling should be flexible after assembly, and then the filter should be put on for testing. Step six, after each use of the underwater electric pump operation for one year, or less than one year but immersed for two years, the disassembly and inspection should be carried out in accordance with the provisions of Article 5 to replace the worn parts.
1, izlaidiet ūdeni motora dobumā (īpaši ziemā, lai motors nesasaltu) un labi piesiet kabeli.
2, store in an indoor room without corrosive substances and gases, with a temperature below 40 °C.
3, ilgstošai lietošanai jāpievērš uzmanība iegremdējamo sūkņu rūsas novēršanai.
- Darbrats
- Vārpstas uzmava
- Gumijas vārpstas uzmava
-
Blīvgredzens
01 Dziļās akas ūdens ņemšana
02 Daudzstāvu ūdensapgāde
03 kalnu ūdens apgāde
04 torņa ūdens
05 Lauksaimniecības apūdeņošana
06 dārza laistīšana
07 upes ūdens ņemšanas vieta
08 sadzīves ūdens

