The variable frequency winding design ensures the motor's long-term smooth conversion operation between 1HZ-50HZ, energy saving and longer service life. This product stands out for its advanced technology and efficient performance, which can achieve energy-saving and environmentally friendly operation, while ensuring the stability and reliability of the motor for long-term use. Not only that, its design makes the product with a longer life, bringing more value to users. Whether in home applications or industrial fields, this motor can provide you with excellent performance to meet a variety of needs.
1,Power supply: three-phase AC 380V (tolerance + / - 5%), 50HZ (tolerance + / - 1%).
2, ජලයේ ගුණාත්මකභාවය:
(1) water temperature is not higher than 20 °C;
(2) ඝන අපද්රව්ය අන්තර්ගතය (ස්කන්ධ අනුපාතය) 0.01% ට වඩා වැඩි නොවේ;
(3) PH අගය (pH) 6.5-8.5;
(4) හයිඩ්රජන් සල්ෆයිඩ් අන්තර්ගතය 1.5mg/L ට වඩා වැඩි නොවේ;
(5) ක්ලෝරයිඩ් අයන අන්තර්ගතය 400mg/L ට වඩා වැඩි නොවේ.
3, the motor is a closed or water-filled wet structure, before use the submersible motor cavity must be full of clean water, to prevent false full, and then tighten the water injection, air release bolts, otherwise not allowed to use
4, the submersible pump must be completely submerged in the water, the diving depth is not greater than 70m, the bottom of the submersible pump from the bottom of the well is not less than 3m.
5, ළිං ජල ප්රවාහය ගිල්විය හැකි පොම්ප ජල ප්රතිදානය සහ අඛණ්ඩ ක්රියාකාරීත්වය සපුරාලීමට හැකි විය යුතුය, ගිල්විය හැකි පොම්ප ජල ප්රතිදානය 0.7 - 1.2 ගුණයක ශ්රේණිගත ප්රවාහය පාලනය කළ යුතුය.
6, ළිඳ කෙළින්ම විය යුතුය, ගිල්විය හැකි පොම්පය භාවිතා කිරීමට හෝ ඉවත දැමිය නොහැක, සිරස් භාවිතය පමණි.
7, ගිල්විය හැකි පොම්පය අවශ්යතා අනුව කේබලය සමඟ ගැලපිය යුතු අතර බාහිර අධි බර ආරක්ෂණ උපාංගය.
8, the pump is strictly prohibited without water no-load test machine.

| ආකෘතිය | ප්රවාහය (m3/h) | හිස (එම්) |
භ්රමණය වන වේගය (වෙනස් කිරීම/ලක්ෂ්යය) |
වතුර පොමිපය(%) | අලෙවිසැල විෂ්කම්භය (මි.මී.) |
හොඳින් අදාළ වේ විෂ්කම්භය (මි.මී.) |
ශ්රේණිගත කර ඇත බලය (KW) |
ශ්රේණිගත කර ඇත වෝල්ටීයතාව (V) |
ශ්රේණිගත කර ඇත වත්මන් (A) |
මෝටර් කාර්යක්ෂමතාව (%) | power factorcosφ | ඒකකය රේඩියල් උපරිම ප්රමාණය(මි.මී.) |
සටහන් කරන්න | |||||||||
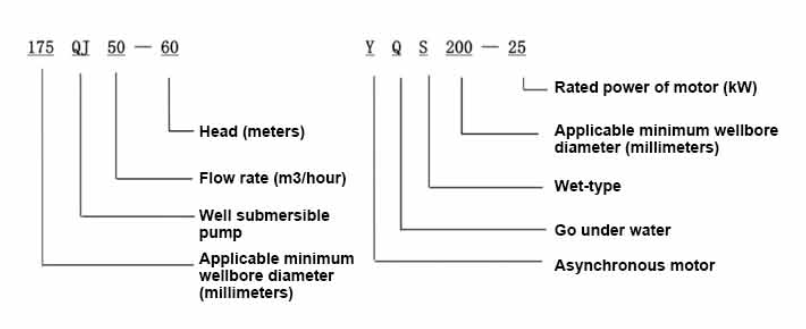
| 135QJ5-34 | 5 | 34 | 2850 | 40 | 135ඉහත | 1.5 | 380 | 4.23 | 128 | |||||||||||||
| 135QJ5-51 | 51 | 2.2 | 6.03 | |||||||||||||||||||
| 135QJ5-68 | 68 | 3 | 8.01 | |||||||||||||||||||
| 135QJ5-85 | 85 | 4 | 10.53 | |||||||||||||||||||
| 135QJ5-102 | 102 | 5.5 | 14.1 | |||||||||||||||||||
| 135QJ5-119 | 119 | 5.5 | 14.1 | |||||||||||||||||||
| 135QJ5-240 | 240 | 11 | 26.28 | |||||||||||||||||||
| 135QJ5-280 | 5 | 280 | 2850 | 40 | 135ඉහත | 13 | 380 | 30.87 | 128 | |||||||||||||
| 135QJ5-320 | 320 | 15 | 35.62 | |||||||||||||||||||
| 135QJ10-24 | 10 | 24 | 2850 | 50 | 135ඉහත | 1.5 | 380 | 4.23 | 128 | |||||||||||||
| 135QJ10-32 | 32 | 2.2 | 6.03 | |||||||||||||||||||
| 135QJ10-48 | 48 | 3 | 8.01 | |||||||||||||||||||
| 135QJ10-56 | 56 | 4 | 10.53 | |||||||||||||||||||
| 135QJ10-72 | 72 | 5.5 | 14.1 | |||||||||||||||||||
| 135QJ10-80 | 80 | 5.5 | 14.1 | |||||||||||||||||||
| 135QJ10-104 | 104 | 7.5 | 19.0 | |||||||||||||||||||
| 135QJ10-120 | 120 | 7.5 | 19.0 | |||||||||||||||||||
| 135QJ10-136 | 136 | 9.2 | 22.7 | |||||||||||||||||||
| 135QJ10-180 | 180 | 11 | 26.28 | |||||||||||||||||||
| 135QJ10-210 | 210 | 13 | 30.87 | |||||||||||||||||||
| 135QJ10-240 | 240 | 15 | 35.62 | |||||||||||||||||||
| 135QJ10-300 | 300 | 18.5 | 43.12 | |||||||||||||||||||
| 135QJ15-36 | 15 | 36 | 2850 | 50 | 135ඉහත | 2.2 | 380 | 6.03 | 128 | |||||||||||||
| 135QJ15-39 | 39 | 3 | 8.01 | |||||||||||||||||||
| 135QJ15-46 | 46 | 4 | 10.53 | |||||||||||||||||||
| 135QJ15-52 | 52 | 4 | 10.53 | |||||||||||||||||||
| 135QJ15-59 | 59 | 5.5 | 14.1 | |||||||||||||||||||
| 135QJ15-65 | 65 | 5.5 | 14.1 | |||||||||||||||||||
| 135QJ15-78 | 78 | 7.5 | 19.0 | |||||||||||||||||||
| 135QJ15-91 | 91 | 7.5 | 19.0 | |||||||||||||||||||
| 135QJ15-104 | 104 | 9.2 | 22.7 | |||||||||||||||||||
| 135QJ15-120 | 120 | 11 | 26.28 | |||||||||||||||||||
| 135QJ15-142 | 142 | 13 | 30.87 | |||||||||||||||||||
| 135QJ15-162 | 162 | 15 | 35.62 | |||||||||||||||||||
| 135QJ15-200 | 200 | 18.5 | 43.12 | |||||||||||||||||||
| 135QJ20-16 | 20 | 16 | 2850 | 50 | 135above | 2.2 | 380 | 6.03 | 128 | |||||||||||||
| 135QJ20-24 | 24 | 3 | 8.01 | |||||||||||||||||||
| 135QJ20-32 | 32 | 4 | 10.53 | |||||||||||||||||||
| 135QJ20-40 | 40 | 4 | 10.53 | |||||||||||||||||||
| 135QJ20-48 | 48 | 5.5 | 14.1 | |||||||||||||||||||
| 135QJ20-56 | 56 | 5.5 | 14.1 | |||||||||||||||||||
| 135QJ20-64 | 64 | 7.5 | 19.0 | |||||||||||||||||||
| 135QJ20-72 | 72 | 7.5 | 19.0 | |||||||||||||||||||
| 135QJ20-80135QJ20-100 | 80 | 9.2 | 22.7 | |||||||||||||||||||
| 100 | 11 | 26.28 | ||||||||||||||||||||
| 135QJ20-120 | 120 | 13 | 30.87 | |||||||||||||||||||
| 135QJ20-136 | 136 | 15 | 35.62 | |||||||||||||||||||
| 135QJ20-168135QJ25-12 | 168 | 18.5 | 43.12 | |||||||||||||||||||
| 25 | 12 | 2850 | 65 | 135ඉහත | 2.2 | 380 | 6.03 | 128 | ||||||||||||||
| 135QJ25-18 | 18 | 3 | 8.01 | |||||||||||||||||||
| 135QJ25-24 | 24 | 4 | 10.53 | |||||||||||||||||||
| 135QJ25-30 | 30 | 4 | 10.53 | |||||||||||||||||||
| 135QJ25-36 | 36 | 5.5 | 14.1 | |||||||||||||||||||
| 135QJ25-48 | 48 | 7.5 | 19.0 | |||||||||||||||||||
| 135QJ25-60 | 60 | 9.2 | 22.7 | |||||||||||||||||||
| 135QJ25-82 | 82 | 11 | 26.28 | |||||||||||||||||||
| 135QJ25-97 | 97 | 13 | 30.87 | |||||||||||||||||||
| 135QJ25-110 | 110 | 15 | 35.62 | |||||||||||||||||||
| 135QJ25-130 | 130 | 18.5 | 43.12 | |||||||||||||||||||
| 135QJ32-24 | 32 | 24 | 2850 | 80 | 135ඉහත | 4 | 380 | 10.53 | 128 | |||||||||||||
| 135QJ32-30 | 30 | 5.5 | 14.1 | |||||||||||||||||||
| 135QJ32-42 | 42 | 7.5 | 19.0 | |||||||||||||||||||
| 135QJ32-54 | 54 | 9.2 | 22.7 | |||||||||||||||||||
| 135QJ32-68 | 68 | 11 | 26.28 | |||||||||||||||||||
| 135QJ32-80 | 80 | 13 | 30.87 | |||||||||||||||||||
| 135QJ32-92 | 92 | 15 | 35.62 | |||||||||||||||||||
| 135QJ32-104 | 104 | 18.5 | 43.12 | |||||||||||||||||||
| 135QJ40-46 | 40 | 46 | 2850 | 80 | 135ඉහත | 11 | 380 | 26.28 | 128 | |||||||||||||
| 135QJ40-54 | 54 | 13 | 30.87 | |||||||||||||||||||
| 135QJ40-62 | 62 | 15 | 35.62 | |||||||||||||||||||
| 135QJ40-84 | 84 | 18.5 | 43.12 | |||||||||||||||||||
1, well submersible pump for clean water pump, prohibit the new well, pumping sediment and muddy water,
2, well water pump voltage grade of 380/50HZ, the use of other voltage grades of submersible motors need to be customized. The underground cable must use waterproof cable, must be equipped with starting equipment, such as distribution box, start not ready should have commonly used motor comprehensive protection function, such as short circuit overload protection, phase protection, undervoltage protection, grounding protection, idling protection, in case of abnormal conditions, the protection device should be timely action trip.
3, the installation and use of the pump must be reliably grounded, prohibit the push and pull switch when the hands and feet are wet, the installation and maintenance of the pump must be cut off the power supply, the use of the pump place to set up "to prevent electric shock" obvious signs:
4, down the well or before installation, the motor cavity must be filled with distilled water or non-corrosive clean cold boiling water, tighten the / water bolt, the pump on the ground test run, must be to the pump chamber water lubrication rubber bearings, instant start not more than a second, see whether the steering is the same as the steering instructions. When the pump is upright, pay attention to safety, prevent overturning injury.
5, දැඩි ලෙස පොම්ප සෝපානයේ විධිවිධාන අනුව, භාවිතයේ ප්රවාහ පරාසය, අඩු ප්රවාහය හෝ ඉහළ සෝපාන පොම්ප බලය වැළැක්වීම සඳහා, තෙරපුම දරණ සහ අනෙකුත් ඇඳුම් කොටස්, මෝටර් අධි බර 6, ළිඳ බැස පොම්ප පසු, බිම පරිවාරක ප්රතිරෝධය සඳහා මෝටරය මැනීම 100M ට නොඅඩු විය යුතුය, වෝල්ටීයතාවය සහ ධාරාව නිරීක්ෂණය කිරීම ආරම්භ කිරීමෙන් පසුව, අවශ්යතාවයන්ට අනුකූලව මෝටර් එතීෙම් පරිවරණය පරීක්ෂා කරන්න; පොම්ප ගබඩා ස්ථානයේ උෂ්ණත්වය හිමාංකයට වඩා අඩු නම්, මෝටර් කුහරයේ ජලය වියළා ගත යුතුය, අඩු උෂ්ණත්වය හේතුවෙන් මෝටර් කුහරයේ ජලය අයිස් හානි වළක්වා ගත යුතුය.
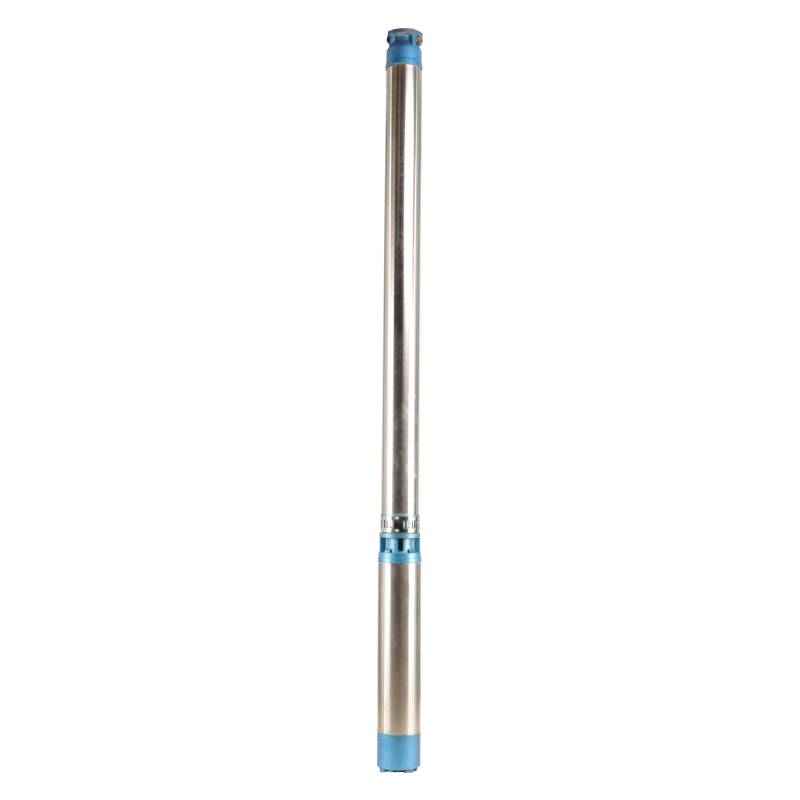
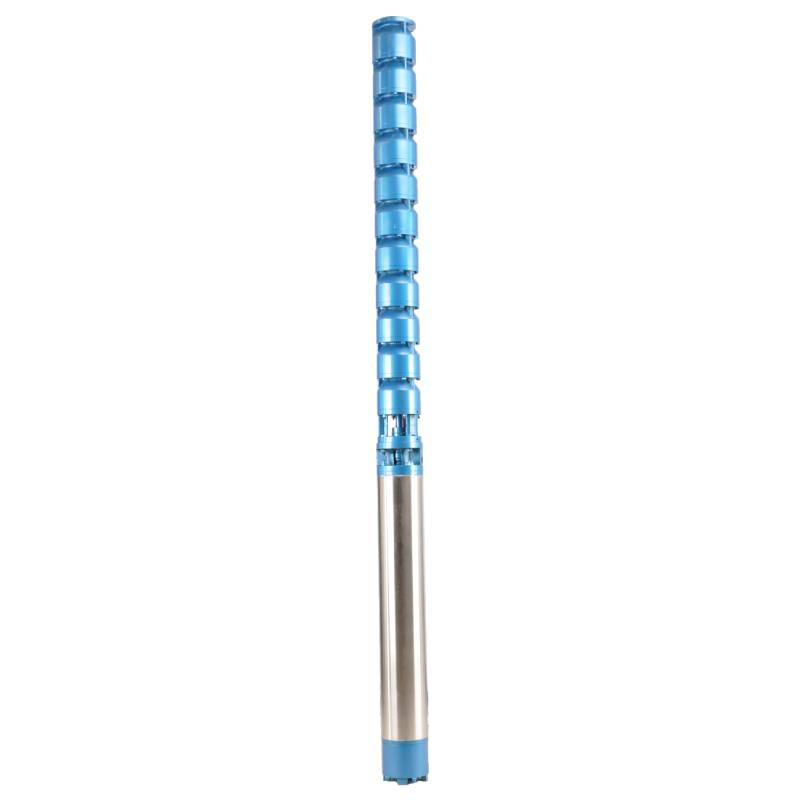
The pump parts are mainly composed of pump shaft, impeller, shunt shell, rubber bearing, check valve body (optional) and other components. The motor parts are mainly composed of base, pressure regulating diaphragm, thrust bearing, thrust plate, lower guide bearing seat, stator, rotor, upper guide bearing seat, sand discharging ring, water inlet section, and lead cable.
නිෂ්පාදනයේ ප්රධාන ලක්ෂණ ඇතුළත් වේ:
The main characteristic of the product is that the pump is a water-immersed three-phase asynchronous motor, and the motor cavity is full of water for cooling the motor and lubricating the bearing. The pressure regulating diaphragm at the bottom of the motor is used to adjust the expansion-contraction pressure difference of the water inside the body caused by the change of temperature. At the same time, in order to prevent the sand particles in the well water from entering the motor, two oil seals are installed at the end of the motor shaft, and the sand discharging ring is installed to form a sand control structure. In order to prevent the pump shaft from beating when starting up, the pump shaft and the motor shaft are connected by a coupling, and the thrust bearing is installed at the bottom of the motor. In addition, the motor and the pump bearing are water-lubricated, and the stator winding of the motor uses high-quality submersible motor winding to ensure high insulation performance. The overall design is made of computer CAD, with simple structure and superior technical performance.

(1) ස්ථාපනය කිරීමට පෙර සූදානම් කිරීම:
1. ගිල්විය හැකි පොම්පය අත්පොතෙහි දක්වා ඇති භාවිත කොන්දේසි සහ විෂය පථය සපුරාලන්නේ දැයි පරීක්ෂා කරන්න.
2. ගිල්විය හැකි පොම්පයේ උපරිම බාහිර විෂ්කම්භයට සමාන විෂ්කම්භයක් සහිත බර obiect එකක් භාවිතා කරමින්, ළිං කුහරයේ අභ්යන්තර විෂ්කම්භය ගිල්විය හැකි පොම්පයට ගැලපේද යන්න සහ ළිං ගැඹුර ස්ථාපන අවශ්යතා සපුරාලන්නේද යන්න මැන බලන්න.
3. ළිඳ පිරිසිදුද ළිං ජලය කැළඹිලි සහිතද යන්න පරීක්ෂා කරන්න. ගිල්විය හැකි විදුලි පොම්පයට අකාලයේ හානි වීම වළක්වා ගැනීම සඳහා වෙලෝර් පොම්පයේ මඩ සහ වැලි ජලය සේදීමට කිසි විටෙක ගිල්විය හැකි විදුලි පොම්පයක් භාවිතා නොකරන්න.
4. වෙල්හෙඩ් ස්ථාපන කලම්පයේ පිහිටීම සුදුසු දැයි සහ එය සම්පූර්ණ ඒකකයේ ගුණාත්මක භාවයට ඔරොත්තු දිය හැකිද යන්න පරීක්ෂා කරන්න
5. අත්පොතෙහි ඇති එකලස් කිරීමේ රූප සටහනට අනුව ගිල්විය හැකි පොම්ප සංරචක සම්පුර්ණ වී නිසි ලෙස ස්ථාපනය කර ඇත්දැයි පරීක්ෂා කරන්න පෙරහන තිරය ඉවත් කර එය නම්යශීලීව භ්රමණය වන්නේ දැයි බැලීමට කප්ලිං කරකවන්න.
6. ජල ඉස්කුරුප්පු ඇණ ගලවා මෝටර් කුහරය පිරිසිදු, නොදිරන ජලයෙන් පුරවන්න (සටහන. එය පිරවීමට වග බලා ගන්න), ඉන්පසු ජල ඉස්කුරුප්පු ඇණ තද කරන්න. වතුර එන්නත් කිරීමෙන් පැය 12 කට පසු, 500V සෙලවෙන මේසයක් සමඟ මනින විට මෝටරයේ පරිවාරක ප්රතිරෝධය 150M Q ට නොඅඩු විය යුතුය.
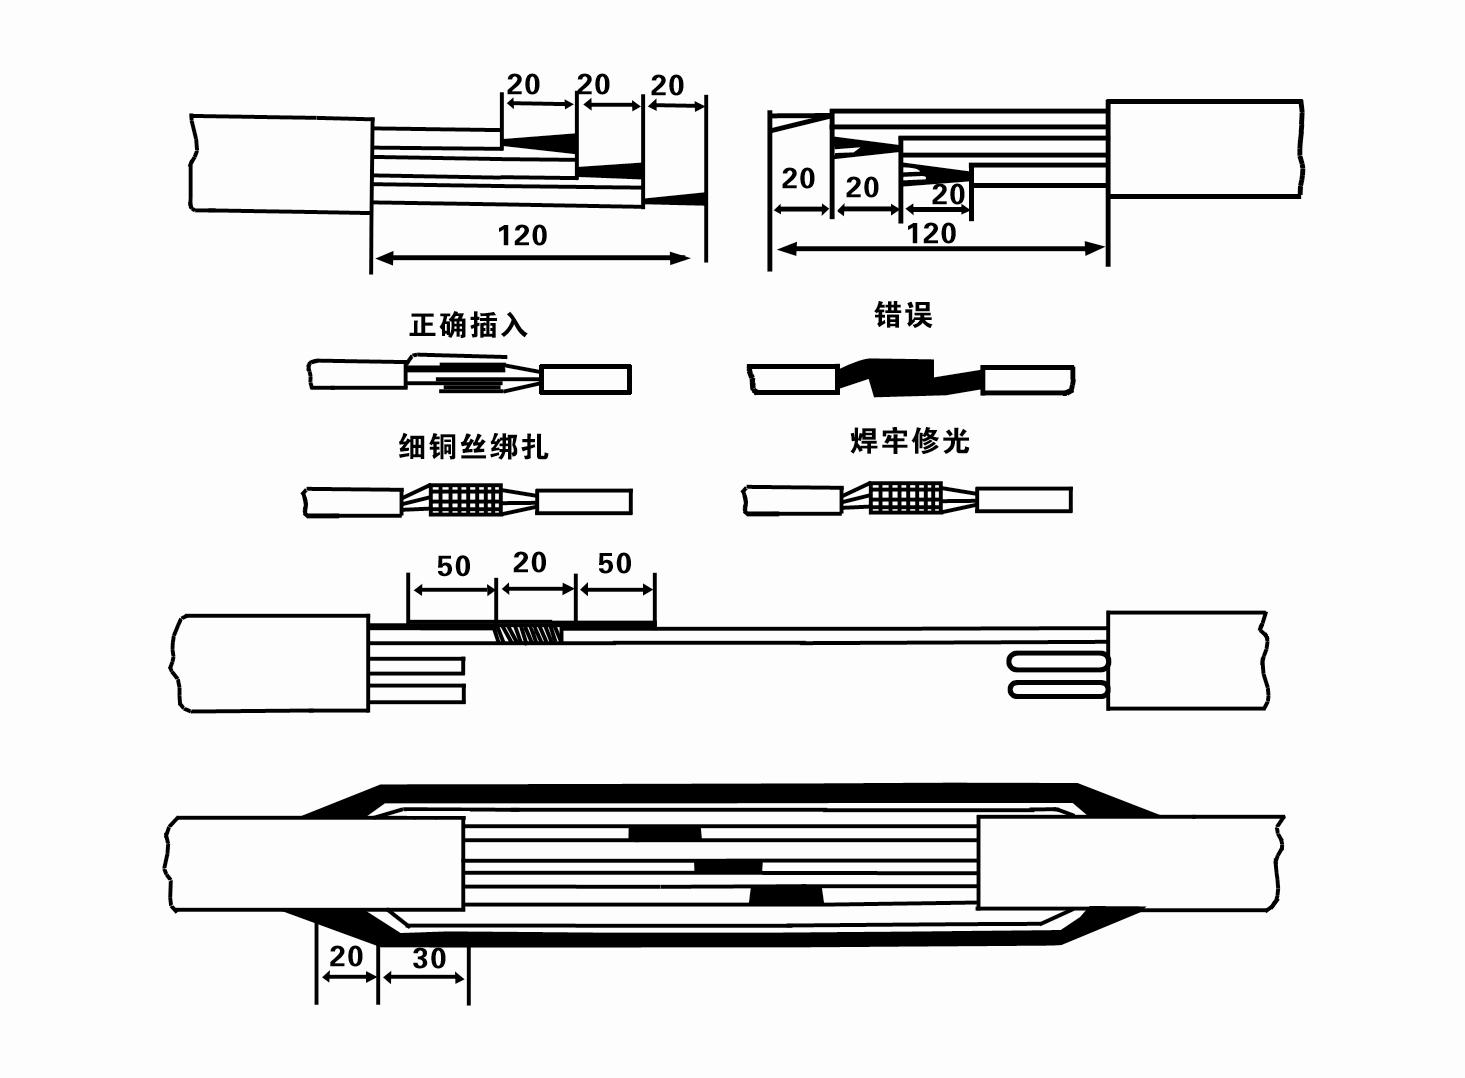
7. Cable joint, cut off a 120mm rubber sleeve from one end of the outgoing cable and the matching cable with an electrician's knifethen stagger the length of the three core wires in a stepped shape, peel off a 20mm copper core, scrape of the oxide layer on theoutside of the copper wire with a knife or sand cloth, and insert the two connected wire ends in palirs.After tying the layer tightly with fine copper wire, solder it thoroughly and firmly, and sand of any. burrs on the surface. Then, forthe three joints, use polyvester insulation tape to wrap them in a semi stacked manner for three lavers. Wrap the two ends of thewrapping layer tightywith nyion thread,and then use a semi stacked method to wrap the tape for three layers. Wrap the outellayer with high-pressure insulation tape for three layers. Finally, fold the threestrands together and repeatedly wrap them for fivelayers with high-pressure tape. Each layer must be tightly tied, and the interlayer joints must be tight and fimm to prevent water frompenetrating and damaging the insulation, After wrapping, soak in water at room temperature of 20 ’c for 12 hours, and measurethe insulation resistance with a shaking table, which should not be less than 100M Ω
අමුණා ඇති කේබල් රැහැන් ක්රියාවලියේ රූප සටහන පහත පරිදි වේ:

8. ත්රි-ෆේස් වයර් සම්බන්ධ වී ඇත්ද සහ DC ප්රතිරෝධය ආසන්න වශයෙන් සමතුලිත වේද යන්න පරීක්ෂා කිරීමට බහුමාපකයක් භාවිතා කරන්න.
9. පරිපථය සහ ට්රාන්ස්ෆෝමර් ධාරිතාව අධික ලෙස පටවා ඇත්දැයි පරීක්ෂා කරන්න, ඉන්පසු අධි බර ආරක්ෂණ ස්විචය හෝ ආරම්භක උපකරණ සම්බන්ධ කරන්න. නිශ්චිත මාදිලි සඳහා වගුව 2 බලන්න, ඉන්පසු පොම්පයේ රබර් ෙබයාරිං ලිහිසි කිරීම සඳහා ජල පොම්ප අලෙවිසැලෙන් ජල පොම්පයට වතුර බාල්දියක් වත් කරන්න, ඉන්පසු ගිල්විය හැකි විදුලි පොම්පය කෙළින් සහ ස්ථාවරව තබන්න.ආරම්භ කරන්න (තත්පරයකට වඩා වැඩි නොවේ) සහ සුක්කානම් දිශාව සුක්කානම් ලකුණට අනුකූලදැයි පරීක්ෂා කරන්න. එසේ නොවේ නම්, ත්රි-ෆේස් කේබලයේ ඕනෑම සම්බන්ධක දෙකක් මාරු කරන්න. ඉන්පසු පෙරහන ස්ථාපනය කර ළිඳට බැසීමට සූදානම් වන්න. විශේෂ අවස්ථා වලදී (අගල, අගල්, ගංගා, පොකුණු, පොකුණු, ආදිය) භාවිතා කරන්නේ නම්, විදුලි පොම්පය විශ්වාසදායක ලෙස පදනම් විය යුතුය.
(2) ස්ථාපන උපකරණ සහ මෙවලම්:
1. ටොන් දෙකකට වඩා වැඩි එසවුම් දම්වැල් යුගලයක්.
2. මීටර් හතරකට නොඅඩු සිරස් උසකින් යුත් ට්රයිපොඩ් එකක්.
3. ටොන් එකකට වැඩි බරක් දරාගත හැකි (සම්පූර්ණ ජල පොම්ප කට්ටලයක බර දරාගත හැකි) එල්ලෙන ලණු දෙකක් (කම්බි ලණු).
4. කලම්ප යුගල දෙකක් (ස්ප්ලින්ට්) ස්ථාපනය කරන්න.
5. යතුර, මිටි, ඉස්කුරුප්පු නියන, විදුලි මෙවලම් සහ උපකරණ ආදිය.
(3) විදුලි පොම්ප ස්ථාපනය:
1. ගිල්විය හැකි විදුලි පොම්පයේ ස්ථාපන රූප සටහන රූප සටහන 2 හි පෙන්වා ඇත. නිශ්චිත ස්ථාපන මානයන් වගුව 3 හි දැක්වේ "ගිල්විය හැකි විදුලි පොම්පයේ ස්ථාපන මානයන් ලැයිස්තුව".
2. මීටර් 30 ට අඩු හිසක් සහිත ගිල්විය හැකි විදුලි පොම්ප, සම්පූර්ණ යන්ත්රයේ සම්පූර්ණ බර, ජල නල සහ පයිප්පවල ජලය දරාගත හැකි හෝස් සහ කම්බි ලණු හෝ වෙනත් හන ලණු භාවිතයෙන් කෙලින්ම ළිඳට එසවිය හැකිය.
3. මීටර් 30 ට වැඩි හිසක් සහිත පොම්ප වානේ පයිප්ප භාවිතා කරන අතර, ස්ථාපන අනුපිළිවෙල පහත පරිදි වේ:
①ජල පොම්ප කොටසේ ඉහළ කෙළවර තද කිරීමට කලම්පයක් භාවිතා කරන්න (මේ අවස්ථාවේ මෝටරය සහ වතුර පොම්පය සම්බන්ධ කර ඇත), එල්ලෙන දම්වැලකින් එය ඔසවා, ළිඳෙහි කලම්පය දමා ඉවත් කරන තෙක් ළිඳට සෙමින් ගැට ගසන්න. එල්ලෙන දම්වැල.
② පයිප්පයක් තද කිරීමට තවත් කලම්ප යුගලයක් භාවිතා කරන්න, ෆ්ලැන්ජ් සිට සෙන්ටිමීටර 15 ක් දුරින් එල්ලෙන දම්වැලකින් එය ඔසවා සෙමින් පහත් කරන්න. පයිප්ප ෆ්ලැන්ජ් සහ පොම්ප ෆ්ලැන්ජ් අතර රබර් පෑඩ් දමා නළය තද කර බෝල්ට්, ඇට වර්ග සහ වසන්ත රෙදි සෝදන යන්ත්රවලින් ඒකාකාරව පොම්ප කරන්න.
③ ගිල්විය හැකි පොම්පය මදක් ඔසවන්න, ජල පොම්පයේ ඉහළ කෙළවරේ ඇති කලම්පය ඉවත් කර, ප්ලාස්ටික් පටියකින් ජල නළයට කේබලය තදින් බැඳ, කලම්පය ළිඳෙහි තබන තුරු සෙමින් බැඳ තබන්න.
④ සියලුම ජල නල ළිඳට බැඳීමට එකම ක්රමය භාවිතා කරන්න.
⑤ Lead-out කේබලය පාලන ස්විචයට සම්බන්ධ කළ පසු, එය තෙකලා බල සැපයුමට සම්බන්ධ වේ.
(4) ස්ථාපනය කිරීමේදී අවධානය යොමු කළ යුතු දේ:
1. පොම්ප කිරීමේ ක්රියාවලියේදී තදබදයක් ඇති වන සංසිද්ධියක් සොයාගතහොත්, තදබදය ජය ගැනීම සඳහා ජල නළය හරවන්න හෝ අදින්න. විවිධ ක්රියාමාර්ග තවමත් ක්රියාත්මක නොවන්නේ නම්, ගිල්විය හැකි විදුලි පොම්පයට සහ ළිඳට හානි නොකිරීමට කරුණාකර පොම්පය පහත් කිරීමට බල නොකරන්න.
2. ස්ථාපනය අතරතුර, එක් එක් පයිප්පයේ ෆ්ලැන්ජ්හි රබර් පෑඩ් තබා ඒකාකාරව තද කළ යුතුය.
3. වතුර පොම්පය ළිඳට පහත් කළ විට, පොම්පය ළිං බිත්තියට එරෙහිව දිගු වේලාවක් ධාවනය වීම වැළැක්වීම සඳහා එය ළිං පයිප්පයේ මැදට තැබිය යුතුය, එවිට පොම්පය කම්පනය වී මෝටරය අතුගා දැවී යයි. .
4. ළිඳේ ගලා යන වැලි සහ රොන්මඩ තත්වයන් අනුව ළිඳේ පතුලේ ජල පොම්පයේ ගැඹුර තීරණය කරන්න. පොම්පය මඩේ වළලන්න එපා. ජල පොම්පයේ සිට ළිඳේ පතුල දක්වා දුර සාමාන්යයෙන් මීටර් 3 ට නොඅඩු වේ (රූපය 2 බලන්න).
5. ජල පොම්පයේ ජල ඇතුල් වීමේ ගැඹුර ගතික ජල මට්ටමේ සිට ජල ආදාන නෝඩය දක්වා මීටර් 1-1.5 ට නොඅඩු විය යුතුය (රූපය 2 බලන්න). එසේ නොමැති නම්, ජල පොම්ප ෙබයාරිං පහසුවෙන් හානි විය හැක.
6. වතුර පොම්පයේ සෝපානය ඉතා අඩු විය නොහැක. එසේ නොමැති නම්, විශාල ප්රවාහ අනුපාත හේතුවෙන් මෝටරය අධික ලෙස පැටවීම හා දැවී යාම වැළැක්වීම සඳහා ශ්රේණිගත ප්රවාහ ස්ථානයේ පොම්ප ප්රවාහය පාලනය කිරීම සඳහා ළිං ජල නල මාර්ගයේ ගේට්ටු කපාටයක් ස්ථාපනය කිරීම අවශ්ය වේ.
7. ජල පොම්පය ක්රියාත්මක වන විට, ජල ප්රතිදානය අඛණ්ඩව පැවතිය යුතු අතර, ඒකාකාරව, ධාරාව ස්ථායී විය යුතුය (ශ්රේණිගත කරන ලද සේවා කොන්දේසි යටතේ, සාමාන්යයෙන් ශ්රේණිගත ධාරාවෙන් 10% ට වඩා වැඩි නොවේ), සහ කම්පනයක් හෝ ශබ්දයක් නොතිබිය යුතුය. කිසියම් අසාමාන්යතාවයක් තිබේ නම්, හේතුව සොයා ගැනීමට සහ එය ඉවත් කිරීමට යන්ත්රය නතර කළ යුතුය.
8. ස්ථාපනය කරන විට, මෝටර් භූගත වයර් සැකසීමට අවධානය යොමු කරන්න (රූපය 2 බලන්න). ජල නළය වානේ පයිප්පයක් වන විට, එය ළිං හෙඩ් කලම්පයෙන් එය මෙහෙයවන්න; ජල නළය ප්ලාස්ටික් පයිප්පයක් වන විට, විදුලි පොම්පයේ බිම් සලකුණෙන් එය මෙහෙයවන්න.
- 1.After the submersible pump is installed, check the insulation resistance and three-phase conduction from the switch again, check whether the instrument and the connection of the start equipment are wrong, if there is no problem, the trial machine can be started, and after the start, observe whether the indicator readings of the instrument exceed the rated voltage and current specified on the nameplate, observe whether the pump has noise and vibration phenomenon, and put into operation if everything is normal.
- 2. After the first operation of the pump for four hours, the motor should be stopped to test the thermal insulation resistance quickly, and its value should not be less than 0.5 megaohm.
- 3. After the pump is stopped, it should be started after five minutes to prevent the water column in the pipe from being completely reflowed and causing the motor to burn out due to excessive current.
- 4. Our pump is designed to provide efficient, reliable and lasting pumping solutions.After normal operation, in order to prolong the service life of the pump, it is necessary to check the power supply voltage, running current and insulation resistance regularly to ensure that they are normal.
- If the following conditions are found, the machine should be shut down immediately to eliminate the fault:
- - the current exceeds 20% under the rated working conditions;
- - the dynamic water level drops to the inlet section, resulting in intermittent drainage;
- - the submersible pump vibrates violently or emits noisy sounds;
- - the power supply voltage is lower than 340 volts;
- - one phase of a fuse is blown out;
- - the water pipe is damaged;
- - the thermal insulation resistance of the motor to the ground is less than 0.5 megaohm.
- The steps of disassembling the unit include unlocking the cable holder, taking off the pipe part, removing the line protection plate, rotating the drain screw and emptying all the water in the motor chamber, taking out the filter and loosening the screw of the coupling fixed to the motor shaft.Unscrew the bolt connecting the water inlet section and the motor, and separate the pump and the motor (note that the unit should be placed horizontally when separating to prevent the bending of the pump shaft).
- 5. The disassembly sequence of the pump includes: water inlet part, impeller, shunt shell, impeller, check valve body.When removing the impeller, use a special tool to loosen the cone sleeve fixing the impeller.During the disassembly process, avoid bending the pump shaft and damaging various parts.The disassembly process of the motor includes: placing the motor on the platform, and then removing the nuts on the studs, base, shaft head lock nut, thrust plate, key, lower guide rail, bearing seat and bolt from the bottom of the motor, then removing the rotor (be careful not to damage the winding), and finally removing the connecting parts and upper guide bearing seat. Before assembling the unit, it is necessary to clean the rust and dirt of each part, and apply sealant on each mating surface and fastener, and then assemble it in the opposite order of disassembly.After assembly, the coupling should be flexibly rotated, and then the filter should be put on to test the machine. Our pump products are designed to provide superior performance and reliability to meet your pumping needs.
- 6. Submersible pumps operating every year, or less than a year of operation but the submersible time has reached two years, should be taken out of the well according to the 5th dismantled maintenance, replacement of worn parts.
1, මෝටර් කුහරය තුළ ජලය නිවා දමන්න (විශේෂයෙන් ශීත ඍතුවේ දී මෝටරය කැටි කිරීම වැළැක්වීම සඳහා), සහ කේබලය හොඳින් බැඳ තබන්න.
2, store in an indoor room without corrosive substances and gases, with a temperature below 40 °C.
3, දිගුකාලීන භාවිතය ගිල්විය හැකි පොම්ප වල මලකඩ වැළැක්වීම කෙරෙහි අවධානය යොමු කළ යුතුය.
- ප්රේරකය
- පතුවළ අත්
- රබර් පතුවළ අත්
- මුද්රා මුද්ද
01 ගැඹුරු ළිං ජලය ගැනීම
02 උස් ජල සැපයුම
03 කඳුකර ජල සැපයුම
04 කුළුණු ජලය
05 කෘෂිකාර්මික වාරිමාර්ග
06 ගෙවතු වාරිමාර්ග
07 ගංගා ජලය පානය කිරීම
08 ගෘහස්ථ ජලය


