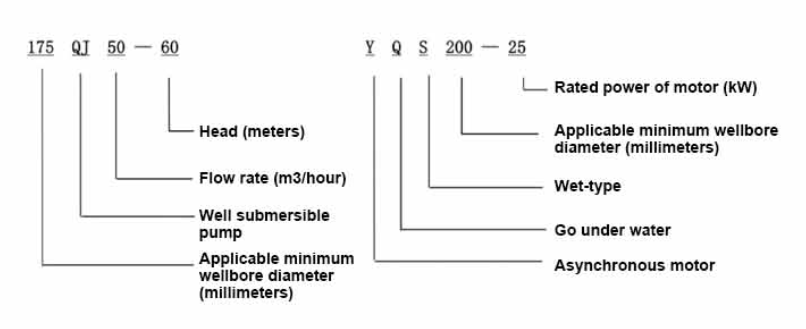
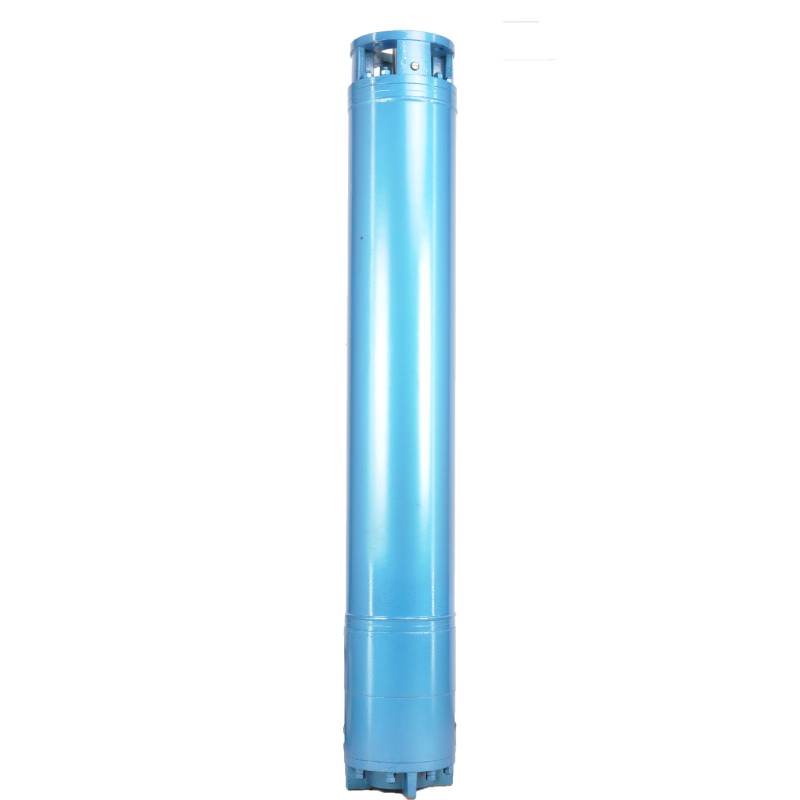
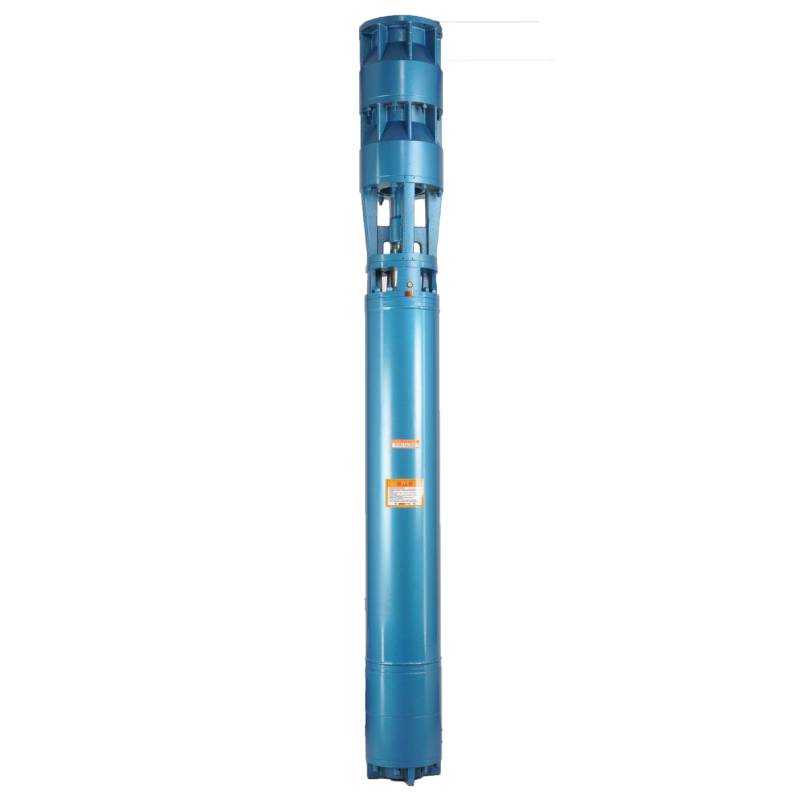
This hot water pump adopts the motor made of 50W400 grade high quality cold rolled silicon steel, which is stamped by high speed punch press. It has the advantages of low stator iron loss and low self-heating. The motor winding is designed for hot water pump, high temperature resistance and anti-aging. The winding has water resistance, and adopts 3CR13 stainless steel blade shaft, high temperature resistant bushing and other high quality accessories to enable it to operate for a long time at high temperature, and can be used with frequency converter, so as to automatically adjust according to the amount of water used. This hot water pump is the ideal choice for your hot water equipment, which can operate stably and efficiently, providing you with a lasting hot water supply.
The product is a three-phase AC 380V (tolerance + / - 5%), 50HZ (tolerance + / - 1%) power supply submersible pump. With water quality requirements: water temperature is not higher than 20 °C; solid impurities content (mass ratio) is not more than 0.01%; PH value (pH) is 6.5-8.5; hydrogen sulfide content is not more than 1.5mg/L; chloride ion content is not more than 400mg/L. The electric pump adopts closed or water sealed wet structure, before use must be submersible motor inner cavity filled with clean water to prevent empty, and then tighten the water and air bolts, otherwise not to use. Its work should be completely immersed in water, immersion depth is not more than 70 meters, the distance between the bottom of the pump and the bottom of the well is not less than 3 meters. Well water inflow quantity should be able to meet the electric pump water output and continuous operation, the output water quantity should be controlled at 0.7-1.2 times of the rated flow. The well should be vertical, the electric pump can not be used horizontally or inclined, only vertically placed. The electric pump must be equipped with cables and external overload protection device as required. It is strictly prohibited to conduct no-load test under no water condition.

| მოდელი | ნაკადი (მ3/სთ) | უფროსი (მ) |
ბრუნვის სიჩქარე (შეცვლა/პუნქტი) |
წყლის ტუმბო (%) | Გამოსასვლელი დიამეტრი (მმ) |
კარგად გამოსაყენებელი დიამეტრი (მმ) |
Შეფასებული power(KW) |
Შეფასებული ძაბვა (V) |
Შეფასებული მიმდინარე (A) |
მოტორეფექტიანობა (%) | power factorcosφ | ერთეული რადიალური მაქსიმალური ზომა (მმ) |
შენიშვნა | |||||||||
| 300QJ200-40 | 200 | 40 | 2900 | 76 | 150 | 300ზემოთ | 37 | 380 | 77.8 | 85.0 | 0.85 | 281 | ||||||||||
| 300QJ200-60 | 60 | 55 | 115 | 85.5 | 0.85 | |||||||||||||||||
| 300QJ200-80 | 80 | 75 | 154.1 | 86.0 | 0.86 | |||||||||||||||||
| 300QJ200-100 | 100 | 90 | 183.8 | 86.5 | 0.86 | |||||||||||||||||
| 300QJ200-120 | 120 | 100 | 204.3 | 86.5 | 0.86 | |||||||||||||||||
| 300QJ200-140 | 140 | 125 | 249.5 | 87.5 | 0.87 | |||||||||||||||||
| 300QJ200-160 | 160 | 140 | 277.8 | 88.0 | 0.87 | |||||||||||||||||
| 300QJ200-180 | 180 | 160 | 317.5 | 88.0 | 0.87 | |||||||||||||||||
| 300QJ200-200 | 200 | 185 | 367.2 | 88.0 | 0.87 | |||||||||||||||||
| 300QJ200-240 | 240 | 220 | 436.6 | 88.0 | 0.87 | |||||||||||||||||
| 300QJ320-30 | 320 | 30 | 2900 | 77 | 200 | 300ზემოთ | 45 | 380 | 94.6 | 85.0 | 0.85 | 281 | ||||||||||
| 300QJ320-60 | 60 | 90 | 183.8 | 86.5 | 0.86 | |||||||||||||||||
| 300QJ320-90 | 90 | 125 | 249.5 | 87.5 | 0.87 | |||||||||||||||||
| 300QJ320-120 | 120 | 160 | 317.5 | 88.0 | 0.87 | |||||||||||||||||
1, well submersible pump for clean water pump, prohibit the new well, pumping sediment and muddy water,
2, well water pump voltage grade of 380/50HZ, the use of other voltage grades of submersible motors need to be customized. The underground cable must use waterproof cable, must be equipped with starting equipment, such as distribution box, start not ready should have commonly used motor comprehensive protection function, such as short circuit overload protection, phase protection, undervoltage protection, grounding protection, idling protection, in case of abnormal conditions, the protection device should be timely action trip.
3, the installation and use of the pump must be reliably grounded, prohibit the push and pull switch when the hands and feet are wet, the installation and maintenance of the pump must be cut off the power supply, the use of the pump place to set up "to prevent electric shock" obvious signs:
4, down the well or before installation, the motor cavity must be filled with distilled water or non-corrosive clean cold boiling water, tighten the / water bolt, the pump on the ground test run, must be to the pump chamber water lubrication rubber bearings, instant start not more than a second, see whether the steering is the same as the steering instructions. When the pump is upright, pay attention to safety, prevent overturning injury.
5, მკაცრად ტუმბოს ამწევის დებულებების შესაბამისად, ნაკადის გამოყენების დიაპაზონი, დაბალი ნაკადის ან მაღალი ამწე სატუმბი ძალის თავიდან ასაცილებლად, ბიძგების საკისარი და აცვიათ სხვა ნაწილები, ძრავის გადატვირთვა დაიწვა
6, ტუმბოს ჭაბურღილში ჩასვლის შემდეგ, ძრავის გაზომვა მიწის იზოლაციის წინააღმდეგობამდე არ უნდა იყოს 100 მ-ზე ნაკლები, ძაბვისა და დენის დაკვირვების დაწყების შემდეგ, შეამოწმეთ ძრავის გრაგნილის იზოლაცია, შეესაბამება თუ არა მოთხოვნებს; ტუმბოს შენახვის ადგილის ტემპერატურა, თუ გაყინვის წერტილზე ნაკლებია, უნდა გაშრეს წყალი საავტომობილო ღრუში, თავიდან აიცილოს ძრავის ღრუს წყლის ყინულის დაზიანება დაბალი ტემპერატურის გამო.
The pump part is mainly composed of pump shaft, impeller, shunt shell, rubber bearing, check valve body (optional) and other components. The motor part is mainly composed of base, pressure regulating diaphragm, thrust bearing, thrust plate, lower guide bearing seat, stator, rotor, upper guide bearing seat, sand discharging ring, water inlet section, lead cable and other components. The main characteristic of this product is that the motor is a water-cooled submersible three-phase asynchronous motor, and the motor cavity is filled with water to cool the motor and lubricate the bearing. The pressure regulating diaphragm at the bottom is used to adjust the expansion-contraction pressure difference in the body caused by the change of the temperature rise of the motor. In order to prevent the sand particles in the well water from entering the motor, two oil seals are installed at the upper end of the motor shaft extension, and a sand discharging ring is installed to form a sand discharging structure. In order to prevent the pump shaft from jumping when starting, the pump shaft and the motor shaft are connected together through a coupling, and a thrust bearing is installed at the bottom of the motor. The lubrication of the motor and the pump bearing is realized through water lubrication. The stator winding of the motor is made of high-quality well motor winding wire, with high insulation performance. The pump is designed by computer CAD, with simple structure and good technical performance.

(1) მომზადება ინსტალაციამდე:
1. შეამოწმეთ, აკმაყოფილებს თუ არა წყალქვეშა ტუმბო სახელმძღვანელოში მითითებულ გამოყენების პირობებსა და მოცულობას.
2. მძიმე ობიექტის გამოყენებით, რომლის დიამეტრი უდრის წყალქვეშა ტუმბოს მაქსიმალურ გარე დიამეტრს, გაზომეთ რამდენად შეესაბამება ჭაბურღილის შიდა დიამეტრი წყალქვეშა ტუმბოს და გაზომეთ რამდენად აკმაყოფილებს ჭაბურღილის სიღრმე სამონტაჟო მოთხოვნებს.
3. შეამოწმეთ არის თუ არა ჭაბურღილის სისუფთავე და ჭაბურღილის წყალი ბუნდოვანი. არასოდეს გამოიყენოთ წყალქვეშა ელექტრო ტუმბო ტუმბოს ტალახისა და ქვიშის წყლის დასაბანად, რათა თავიდან აიცილოთ წყალქვეშა ელექტროტუმბოს ნაადრევი დაზიანება.
4. შეამოწმეთ არის თუ არა სამაგრის სამონტაჟო სამაგრის პოზიცია და შეუძლია თუ არა იგი გაუძლოს მთლიანი დანადგარის ხარისხს
5. შეამოწმეთ, არის თუ არა წყალქვეშა ტუმბოს კომპონენტები სრული და სწორად დაყენებული სახელმძღვანელოში მოცემული აწყობის სქემის მიხედვით. ამოიღეთ ფილტრის ეკრანი და დაატრიალეთ შეერთება, რომ ნახოთ, ბრუნავს თუ არა ის მოქნილად
6. გახსენით წყლის ხრახნი და შეავსეთ ძრავის ღრუ სუფთა, არაკოროზიული წყლით (გაითვალისწინეთ. დარწმუნდით, რომ ამოავსეთ იგი), შემდეგ დაჭერით წყლის ხრახნი. წყლის ინექციის 12 საათის შემდეგ, ძრავის საიზოლაციო წინააღმდეგობა არ უნდა იყოს 150 მ Q-ზე ნაკლები, როდესაც გაზომავთ 500 ვ-ის შერყევის მაგიდას.
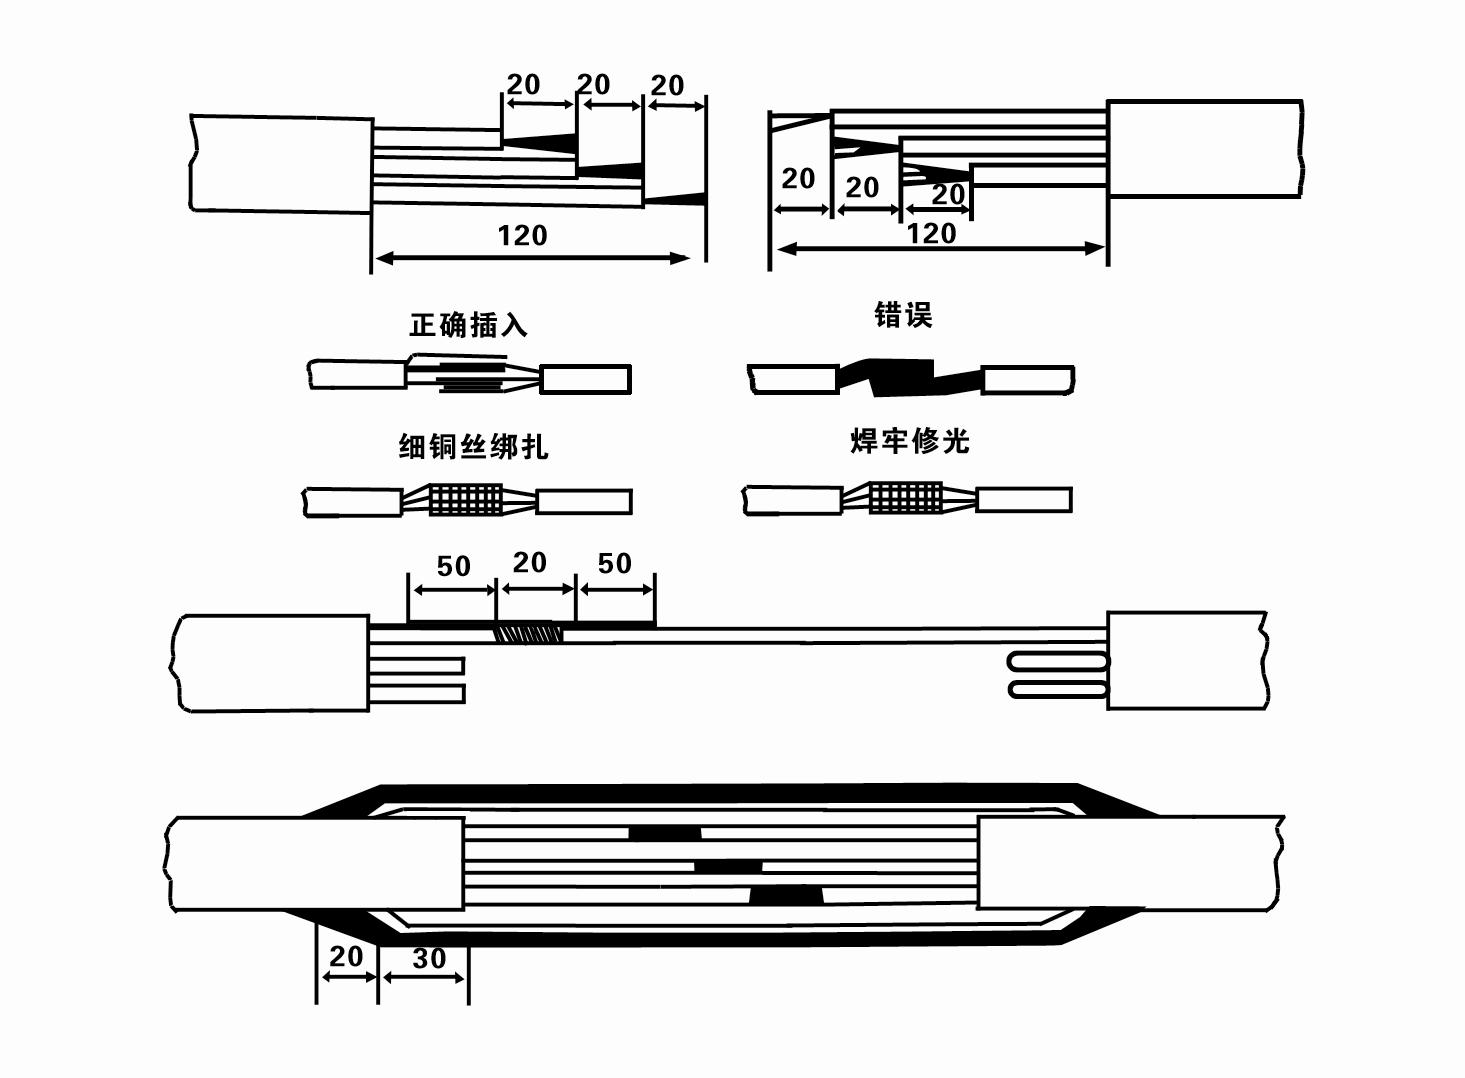
7. Cable joint, cut off a 120mm rubber sleeve from one end of the outgoing cable and the matching cable with an electrician's knifethen stagger the length of the three core wires in a stepped shape, peel off a 20mm copper core, scrape of the oxide layer on theoutside of the copper wire with a knife or sand cloth, and insert the two connected wire ends in palirs.After tying the layer tightly with fine copper wire, solder it thoroughly and firmly, and sand of any. burrs on the surface. Then, forthe three joints, use polyvester insulation tape to wrap them in a semi stacked manner for three lavers. Wrap the two ends of thewrapping layer tightywith nyion thread,and then use a semi stacked method to wrap the tape for three layers. Wrap the outellayer with high-pressure insulation tape for three layers. Finally, fold the threestrands together and repeatedly wrap them for fivelayers with high-pressure tape. Each layer must be tightly tied, and the interlayer joints must be tight and fimm to prevent water frompenetrating and damaging the insulation, After wrapping, soak in water at room temperature of 20 ’c for 12 hours, and measurethe insulation resistance with a shaking table, which should not be less than 100M Ω
მიმაგრებული საკაბელო გაყვანილობის პროცესის დიაგრამა შემდეგია:
8. გამოიყენეთ მულტიმეტრი, რათა შეამოწმოთ არის თუ არა დაკავშირებული სამფაზიანი მავთულები და არის თუ არა DC წინააღმდეგობა დაახლოებით დაბალანსებული.
9. შეამოწმეთ არის თუ არა მიკროსქემის და ტრანსფორმატორის სიმძლავრე გადატვირთული და შემდეგ შეაერთეთ გადატვირთვისაგან დამცავი გადამრთველი ან გაშვების მოწყობილობა. იხილეთ ცხრილი 2 კონკრეტული მოდელებისთვის და შემდეგ ჩაასხით წყლის ტუმბოში წყლის ტუმბოში წყლის ტუმბოს გამოსასვლელიდან, რათა შეზეთოთ ტუმბოს რეზინის საკისრები და შემდეგ მოათავსეთ წყალქვეშა ელექტროტუმბო ვერტიკალურად და სტაბილურად. დაიწყეთ (არა უმეტეს ერთი წამისა) და შეამოწმეთ შეესაბამება თუ არა საჭის მიმართულება საჭის ნიშანს. თუ არა, შეცვალეთ სამფაზიანი კაბელის ნებისმიერი ორი კონექტორი. შემდეგ დააინსტალირეთ ფილტრი და მოემზადეთ ჭაბურღილში ჩასასვლელად. თუ გამოიყენება განსაკუთრებულ შემთხვევებში (როგორიცაა თხრილები, თხრილები, მდინარეები, აუზები, აუზები და ა.შ.), ელექტროტუმბო საიმედოდ უნდა იყოს დამიწებული.
(2) სამონტაჟო აღჭურვილობა და ხელსაწყოები:
1. ერთი წყვილი ამწევი ჯაჭვები ორ ტონაზე მეტი.
2. სამფეხა, რომლის ვერტიკალური სიმაღლე არანაკლებ ოთხი მეტრია.
3. ორი ჩამოკიდებული თოკი (მავთულის თოკი), რომელიც უძლებს ერთ ტონაზე მეტ წონას (გაუძლოს წყლის ტუმბოების სრული კომპლექტის წონას).
4. დააინსტალირეთ ორი წყვილი დამჭერი (სპლინტები).
5. ქანჩები, ჩაქუჩები, ხრახნები, ელექტრო იარაღები და ინსტრუმენტები და სხვ.
(3) ელექტრო ტუმბოს მონტაჟი:
1. წყალქვეშა ელექტროტუმბოს სამონტაჟო დიაგრამა ნაჩვენებია ნახაზ 2-ზე. ინსტალაციის სპეციფიკური ზომები ნაჩვენებია ცხრილში 3 „წყალქვეშა ელექტროტუმბოს სამონტაჟო ზომების სია“.
2. წყალქვეშა ელექტრული ტუმბოები 30 მეტრზე ნაკლები სათავით შეიძლება აიწიოს პირდაპირ ჭაბურღილში შლანგების და მავთულის ან სხვა კანაფის თოკების გამოყენებით, რომლებსაც შეუძლიათ მთელი მანქანის, წყლის მილებისა და წყლის მილების მთლიანი წონა.
3. ტუმბოები 30 მეტრზე მეტი თავით იყენებენ ფოლადის მილებს და მონტაჟის თანმიმდევრობა ასეთია:
① გამოიყენეთ დამჭერი წყლის ტუმბოს ნაწილის ზედა ბოლოს დასამაგრებლად (ამ დროს ძრავი და წყლის ტუმბო შეერთებულია), აწიეთ იგი ჩამოკიდებული ჯაჭვით და ნელ-ნელა მიამაგრეთ ჭაბურღილში, სანამ არ დაადეთ დამჭერი ჭაბურღილზე და ამოიღეთ ჩამოკიდებული ჯაჭვი.
② გამოიყენეთ კიდევ ერთი წყვილი დამჭერი მილის დასამაგრებლად, ასწიეთ იგი ჩამოკიდებული ჯაჭვით ფლანგიდან 15 სმ დაშორებით და ნელა ჩამოწიეთ. მილის ფლანგსა და ტუმბოს ფლანგს შორის მოათავსეთ რეზინის საფენი ადგილზე და გამკაცრეთ მილი და თანაბრად ამოტუმბეთ ჭანჭიკებით, თხილებით და ზამბარებით.
③ ოდნავ აწიეთ წყალქვეშა ტუმბო, ამოიღეთ დამჭერი წყლის ტუმბოს ზედა ბოლოზე, მჭიდროდ მიამაგრეთ კაბელი წყლის მილს პლასტმასის ლენტით და ნელ-ნელა მიამაგრეთ, სანამ დამჭერი არ დაიდება ჭაბურღილთან.
④ გამოიყენეთ იგივე მეთოდი ყველა წყლის მილის ჭაში შესაკრავად.
⑤ მას შემდეგ, რაც გამომავალი კაბელი უკავშირდება საკონტროლო გადამრთველს, ის უკავშირდება სამფაზიან ელექტრომომარაგებას.
(4)რა უნდა გაითვალისწინოთ ინსტალაციის დროს:
1. თუ ამოტუმბვის პროცესში აღმოჩენილია შეფერხების ფენომენი, გადაატრიალეთ ან ამოიღეთ წყლის მილი დაბლოკვის წერტილის დასაძლევად. თუ სხვადასხვა ზომები მაინც არ მუშაობს, გთხოვთ, ძალით ნუ ჩამოაგდებთ ტუმბოს წყალქვეშა ელექტროტუმბოსა და ჭაბურღილის დაზიანების თავიდან ასაცილებლად.
2. ინსტალაციის დროს, რეზინის საფენი უნდა განთავსდეს თითოეული მილის ფლანგზე და თანაბრად გამკაცრდეს.
3. როდესაც წყლის ტუმბო ჩაშვებულია ჭაში, ის უნდა განთავსდეს ჭაბურღილის მილის შუაში, რათა არ მოხდეს ტუმბოს დიდი ხნის განმავლობაში მუშაობა ჭაბურღილის კედელთან, რაც გამოიწვევს ტუმბოს ვიბრაციას და ძრავის გაწმენდას და დამწვრობას. .
4. განსაზღვრეთ წყლის ტუმბოს სიღრმე ჭაბურღილის ფსკერამდე ჭაბურღილის ქვიშისა და სილაღის პირობების მიხედვით. ნუ ჩამარხავთ ტუმბოს ტალახში. მანძილი წყლის ტუმბოდან ჭაბურღილის ძირამდე, ზოგადად, არანაკლებ 3 მეტრია (იხ. სურათი 2).
5. წყლის ტუმბოს წყლის შესვლის სიღრმე უნდა იყოს არანაკლებ 1-1,5 მეტრი წყლის დინამიური დონიდან წყლის შესასვლელ კვანძამდე (იხ. სურათი 2). წინააღმდეგ შემთხვევაში, წყლის ტუმბოს საკისრები შეიძლება ადვილად დაზიანდეს.
6. წყლის ტუმბოს ამწე არ შეიძლება იყოს ძალიან დაბალი. წინააღმდეგ შემთხვევაში, ჭაბურღილის წყლის მილსადენზე უნდა დამონტაჟდეს კარიბჭე სარქველი, რათა აკონტროლოს ტუმბოს ნაკადი ნომინალურ ნაკადის წერტილში, რათა თავიდან აიცილოს ძრავის გადატვირთვა და დამწვრობა დიდი დინების გამო.
7. როდესაც წყლის ტუმბო მუშაობს, წყლის გამომავალი უნდა იყოს უწყვეტი და თანაბარი, დენი უნდა იყოს სტაბილური (რეიტინგული სამუშაო პირობებში, ზოგადად, ნომინალური დენის არაუმეტეს 10%) და არ უნდა იყოს ვიბრაცია ან ხმაური. თუ რაიმე დარღვევაა, მანქანა უნდა შეჩერდეს მიზეზის გასარკვევად და აღმოსაფხვრელად.
8. ინსტალაციისას ყურადღება მიაქციეთ ძრავის დამიწების მავთულის დაყენებას (იხ. სურათი 2). როდესაც წყლის მილი არის ფოლადის მილი, გამოიყვანეთ იგი ჭაბურღილის სამაგრიდან; როდესაც წყლის მილი არის პლასტმასის მილი, გამოიყვანეთ იგი ელექტროტუმბოს დამიწების ნიშნიდან.
After installation of the underwater pump, it is necessary to recheck the insulation resistance and three-phase continuity of the switch, and check whether the connection between the instrument and the starting equipment is wrong. If there is no problem, you can start the test machine. After starting, observe whether the indication reading of each instrument is correct. If the rated voltage and current specified on the nameplate are exceeded, observe whether the pump has any noise or vibration. If everything is normal, it can be put into operation. Four hours after the first operation of the pump, it should be turned off and the thermal insulation resistance of the motor should be quickly tested, and its value should not be less than 0.5 megaohm. After stopping the pump, it should be restarted after an interval of five minutes to prevent the water column in the pipeline from completely reversing, resulting in the motor burning due to excessive current. After the pump is put into normal operation, in order to prolong its service life, it is necessary to check regularly whether the supply voltage, working current and insulation resistance are normal. If the following conditions are found, the machine should be stopped immediately to eliminate the fault:
1 the current exceeds 20% under the rated working condition.
2 the dynamic water level drops to the inlet section, resulting in intermittent drainage.
3 the underwater pump vibrates violently or emits huge noise.
4 the supply voltage is lower than 340 volts.
5 a fuse is burned.
6 the water pipe is damaged.
7 the thermal insulation resistance of the motor to the ground is less than 0.5 megaohm.
When disassembling the device, it is necessary to untie the cable bundle and remove the pipeline part and the line protection plate. Remove the drain bolt and exclude all water in the motor chamber. Remove the filter element and loosen the screw on the coupling fixed to the motor shaft. Unscrew the bolt connecting the water inlet section and the motor, and separate the pump and the motor (pay attention to placing the device horizontally when separating to prevent the bending of the pump shaft). The sequence of disassembling the pump is as follows: (see Figure 1) water inlet section, impeller, water inlet shell, impeller. Check the valve body, and use a special tool to loosen the cone sleeve fixed to the impeller when removing the impeller. In the process of disassembly, avoid bending the pump shaft and damaging various components. The disassembly process of the motor is as follows: (see Figure 1) put the motor on the platform, and remove the nuts on the screw (pull rod bolt), base, shaft head lock nut, thrust plate, key and lower guide rail - bearing seat, bolt, and then remove the rotor (be careful not to damage the wiring harness), and finally remove the connecting parts and upper guide bearing seat. Unit assembly: before assembly, the rust and dirt of each component should be cleaned, and the sealant should be coated on each mating surface and fastener, and then assembled in the opposite order of disassembly (the movement of the motor shaft after assembly is about one millimeter), after the assembly is completed, the coupling should be flexibly rotated, and then the filter element should be placed for testing. Each time the underwater electric pump has been used for one year, or less than one year but has been immersed for two years, it must be disassembled and inspected in accordance with Article 5 and replace the worn parts.
1, ამოიღეთ წყალი ძრავის ღრუში (განსაკუთრებით ზამთარში ძრავის გაყინვის თავიდან ასაცილებლად) და კარგად შეაერთეთ კაბელი.
2, store in an indoor room without corrosive substances and gases, with a temperature below 40 °C.
3, გრძელვადიანი გამოყენებისას ყურადღება უნდა მიექცეს წყალქვეშა ტუმბოების ჟანგის თავიდან აცილებას.
- იმპერატორი
- Shaft ყდის
- რეზინის ლილვის ყდის
-
დალუქვის ბეჭედი
01 ღრმა ჭაბურღილის წყალმიმღები
02 მაღალსართულიანი წყალმომარაგება
03 მთის წყალმომარაგება
04 კოშკის წყალი
05 სასოფლო-სამეურნეო სარწყავი
06 ბაღის სარწყავი
07 მდინარის წყალმიმღები
08 საყოფაცხოვრებო წყალი


