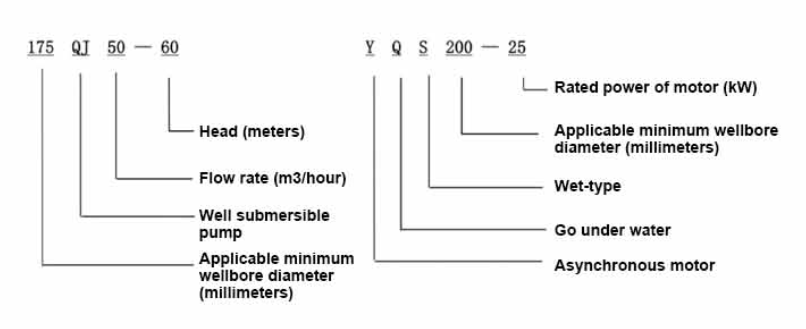
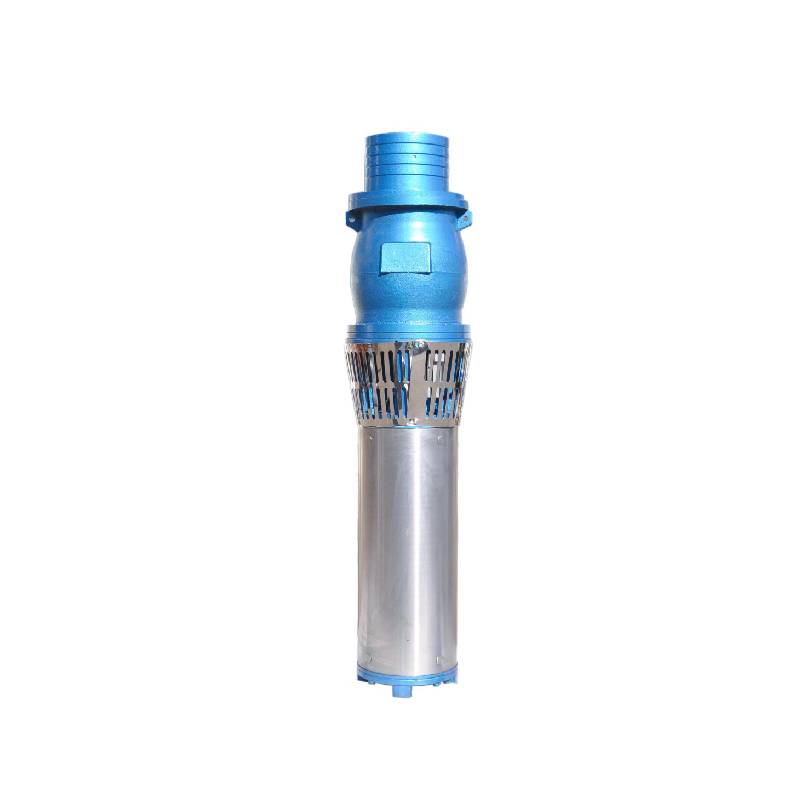
Well-designed sand-proof large flow water system, using water-immersed motor, no oil after burning machine does not pollute water. Suitable for freshwater aquaculture extraction of river water, sea water oxygen. Flow range 100-1000m3/h, lift 3-100m, power 3-100KW.
1, बिजुली आपूर्ति: तीन-चरण एसी 380V (सहिष्णुता + / - 5%), 50HZ (सहिष्णुता + / - 1%)।
2, पानी गुणस्तर:
(1) water temperature is not higher than 20 °C;
(२) ठोस अशुद्धता सामग्री (जन अनुपात) ०.०१% भन्दा बढी छैन;
(3) PH मान (pH) 6.5-8.5;
(4) हाइड्रोजन सल्फाइड सामग्री 1.5mg/L भन्दा बढी छैन;
(5) क्लोराइड आयन सामग्री 400mg/L भन्दा बढी छैन।
3, मोटर बन्द छ वा पानीले भरिएको भिजेको संरचना, प्रयोग गर्नु अघि पनडुब्बी मोटर गुहा सफा पानीले भरिएको हुनुपर्छ, गलत पूर्ण रोक्नको लागि, र त्यसपछि पानी इन्जेक्सन, हावा रिलिज बोल्ट कस्नुहोस्, अन्यथा प्रयोग गर्न अनुमति छैन।
4, पनडुब्बी पम्प पूर्ण रूपमा पानीमा डुबेको हुनुपर्छ, डाइभिङको गहिराई 70m भन्दा बढी हुँदैन, इनारको तलबाट पनडुब्बी पम्पको तल्लो भाग 3m भन्दा कम हुँदैन।
5, कुवाको पानीको प्रवाह पनडुब्बी पम्प पानी उत्पादन र निरन्तर सञ्चालन पूरा गर्न सक्षम हुनुपर्छ, पनडुब्बी पम्प पानी उत्पादन 0.7 - 1.2 पटक मूल्याङ्कन प्रवाह मा नियन्त्रण गर्नुपर्छ।
6, इनार सीधा हुनुपर्छ, पनडुब्बी पम्प प्रयोग वा फ्याँक्न सकिँदैन, केवल ठाडो प्रयोग।
7, पनडुब्बी पम्प केबल आवश्यकताहरु अनुसार, र बाह्य ओभरलोड सुरक्षा उपकरण संग मेल खानुपर्छ। 8, पम्प पानी नो-लोड परीक्षण मेसिन बिना कडा रूपमा निषेध गरिएको छ

| 200 QS पनडुब्बी पम्प प्रदर्शन तालिका गैर-मानक अनुकूलित श्रृंखला |
||||||||
| मोडेल | मोडेल | |||||||
| QS5-70-2.2KW | QS10-52-4KW | |||||||
| QS5-90-3KW | QS10-70-5.5KW | |||||||
| QS5-108-4KW | QS10-90-7.5KW | |||||||
| QS5-126-5.5KW | QS10-108-7.5KW | |||||||
| QS5-144-5.5KW | QS20-40-4KW | |||||||
| QS5-160-7.5KW | QS20-54-5.5KW | |||||||
| QS5-180-7.5KW | QS20-65-7.5KW | |||||||
| QS10-36-2.2KW | QS20-81-7.5KW | |||||||
| QS10-54-3KW | QS32-13-2.2KW | |||||||
| QS10-70-4KW | QS32-26-4KW | |||||||
| QS10-90-5.5KW | QS32-52-7.5KW | |||||||
| QS10-108-5.5KW | QS40-39-7.5KW | |||||||
| QS10-126-7.5KW | QS40-13-4KW | |||||||
| QS10-140-7.5KW | QS40-26-5.5KW | |||||||
| QS15-38-3KW | QS50-13-4KW | |||||||
| QS15-54-4KW | QS50-26-5.5KW | |||||||
| QS15-65-5.5KW | QS50-39-7.5KW | |||||||
| QS15-81-5.5KW | QS63-12-4KW | |||||||
| QS15-100-7.5KW | QS63-24-7.5KW | |||||||
| QS20-30-3KW | QS80-11-4KW | |||||||
| QS20-45-4KW | QS80-22-7.5KW | |||||||
| QS20-60-5.5KW | QS10-88-7.5KW | |||||||
| QS20-75-7.5KW | QS10-105-7.5KW | |||||||
| QS20-81-7.5KW | QS40-52-11KW | |||||||
| QS10-198-15KW | QS50-60-11KW | |||||||
| QS10-160-9.2KW | QS65-30-9.2KW | |||||||
| QS15-180-15KW | QS80-28-9.2KW | |||||||
| QS10-180-11KW | QS125-15-7.5KW | |||||||
This well submersible pump is a clean water pump. It is strictly prohibited to excavate new wells, discharge sediments and muddy water. The voltage rating of the pump is 380/50 hertz, and other voltage ratings are not allowed. The submersible motor needs to be customized, and the underground cable must be waterproof cable, and must be equipped with starting equipment, such as distribution box, etc. The starting equipment should have common motor comprehensive protection functions, such as short circuit overload protection, phase loss protection, undervoltage protection, grounding protection and idling protection, etc. In order to prevent abnormal conditions, the protection device should be timely trip. During the installation and use process, the pump must be reliably grounded. It is strictly prohibited to push and pull the switch when hands and feet are wet. The power supply must be cut off before installation and maintenance of the pump. An obvious "anti-electric shock" sign must be set up where the pump is used. Before going down the well or installing, the motor must fill the inner cavity with distilled water or non-corrosive clean cold water, and the inlet and outlet bolts must be tightened. When testing the pump, the pump cavity must be filled with water to lubricate the rubber bearings, and the instant start time shall not exceed one second to check whether the direction is correct. Pay attention to safety when lifting, and prevent the overturning of the pump from causing injury. Strictly according to the provisions of the pump lift and flow range, to prevent the pump in low lift when the large flow or in high lift when the large pull, resulting in serious wear and tear of thrust bearings and other parts, causing motor overload and burnout. After the pump into the well, the insulation resistance between the motor and the ground should not be less than 100MΩ, after the start of regular observation of voltage and current, and check whether the motor winding insulation meets the requirements; if the pump storage temperature below freezing, the water in the motor cavity should be discharged to prevent the cold temperature caused by the motor cavity water icing and damage the motor due to low temperature.
संरचनाको संक्षिप्त परिचय: पम्प भाग मुख्यतया पम्प शाफ्ट, इम्पेलर, डाइभर्सन शेल, रबर असर, चेक भल्भ बडी (वैकल्पिक भागहरू) र अन्य कम्पोनेन्टहरू मिलेर बनेको हुन्छ। मोटर पार्ट मुख्यतया आधार, दबाव विनियमन फिल्म, थ्रस्ट बेयरिंग, थ्रस्ट प्लेट, तल्लो गाइड असर सीट, स्टेटर, रोटर, माथिल्लो गाइड असर सीट, बालुवा रिंग, पानी इनलेट खण्ड, केबल र अन्य कम्पोनेन्टहरू मिलेर बनेको छ।
उत्पादनको मुख्य विशेषताहरू समावेश छन्:
1, मोटर पानीले भरिएको भिजेको पनडुब्बी तीन-चरण एसिन्क्रोनस मोटर हो, मोटर गुहा सफा पानीले भरिएको हुन्छ, मोटरलाई चिसो गर्न र असर लुब्रिकेट गर्न प्रयोग गरिन्छ, मोटरको तलको दबाब नियमन गर्ने फिल्म समायोजन गर्न प्रयोग गरिन्छ। मोटरको तापक्रम वृद्धिको परिवर्तनले गर्दा शरीर भित्रको पानीको विस्तार र संकुचन दबाव भिन्नता।
2, इनारको पानीमा बालुवालाई मोटरमा प्रवेश गर्नबाट रोक्नको लागि, मोटर शाफ्टको माथिल्लो छेउमा दुईवटा तेल सिलहरू राखिएको छ, र बालुवाको रिंगलाई बालुवा रोकथाम संरचना बनाउन स्थापना गरिएको छ।
3, सुरु गर्दा पम्प शाफ्टलाई चल्नबाट रोक्नको लागि, पम्प शाफ्ट र मोटर शाफ्ट एक युग्मनद्वारा जोडिएको छ, र मोटरको तल्लो भागमा माथिल्लो थ्रस्ट बियरिङ स्थापना गरिएको छ।
4, मोटर र पम्प असर को लुब्रिकेशन पानी स्नेहन हो।
5, मोटर स्टेटर घुमाउरो उच्च गुणस्तर पनडुब्बी मोटर घुमाउरो तार, उच्च इन्सुलेशन प्रदर्शन संग बनेको छ।
6, पम्प सरल संरचना र राम्रो प्राविधिक प्रदर्शन संग, कम्प्युटर CAD द्वारा डिजाइन गरिएको छ।

(1) स्थापना अघि तयारी:
1. पनडुब्बी पम्पले म्यानुअलमा तोकिएको उपयोग सर्त र दायरा पूरा गर्छ कि गर्दैन जाँच गर्नुहोस्।
2. पनडुब्बी पम्पको अधिकतम बाहिरी व्यास बराबर व्यास भएको भारी ओबिएक्ट प्रयोग गरेर, वेलबोरको भित्री व्यासले पनडुब्बी पम्पमा फिट हुन सक्छ कि गर्दैन मापन गर्नुहोस्, र इनारको गहिराइले स्थापना आवश्यकताहरू पूरा गर्छ कि गर्दैन मापन गर्नुहोस्।
3. इनार सफा छ कि छैन र इनारको पानी फोहोर छ कि छैन जाँच गर्नुहोस्। पनडुब्बी बिजुली पम्पलाई समय भन्दा पहिले क्षति हुनबाट जोगाउन वेलर पम्प माटो र बालुवाको पानी धुन पनडुब्बी बिजुली पम्प प्रयोग नगर्नुहोस्।
4. वेल्हेड स्थापना क्ल्याम्पको स्थिति उपयुक्त छ कि छैन र यसले सम्पूर्ण एकाइको गुणस्तरको सामना गर्न सक्छ कि छैन भनेर जाँच गर्नुहोस्।
5. पनडुब्बी पम्प कम्पोनेन्टहरू म्यानुअलको एसेम्ब्ली रेखाचित्र अनुसार पूर्ण र स्थापित छन् कि छैनन् जाँच गर्नुहोस्फिल्टर स्क्रिन हटाउनुहोस् र यो लचिलो रूपमा घुम्छ कि भनेर हेर्नको लागि युग्मन घुमाउनुहोस्।
6. पानीको स्क्रू खोल्नुहोस् र सफा, गैर संक्षारक पानीले मोटर गुहा भर्नुहोस् (नोट। यसलाई भर्न निश्चित हुनुहोस्), त्यसपछि वाटरस्क्रू कस्नुहोस्। 12 घण्टा पानी इन्जेक्सन पछि, मोटरको इन्सुलेशन प्रतिरोध 150M Q भन्दा कम हुनु हुँदैन जब 500V काँप्ने तालिकामा मापन गरिन्छ।
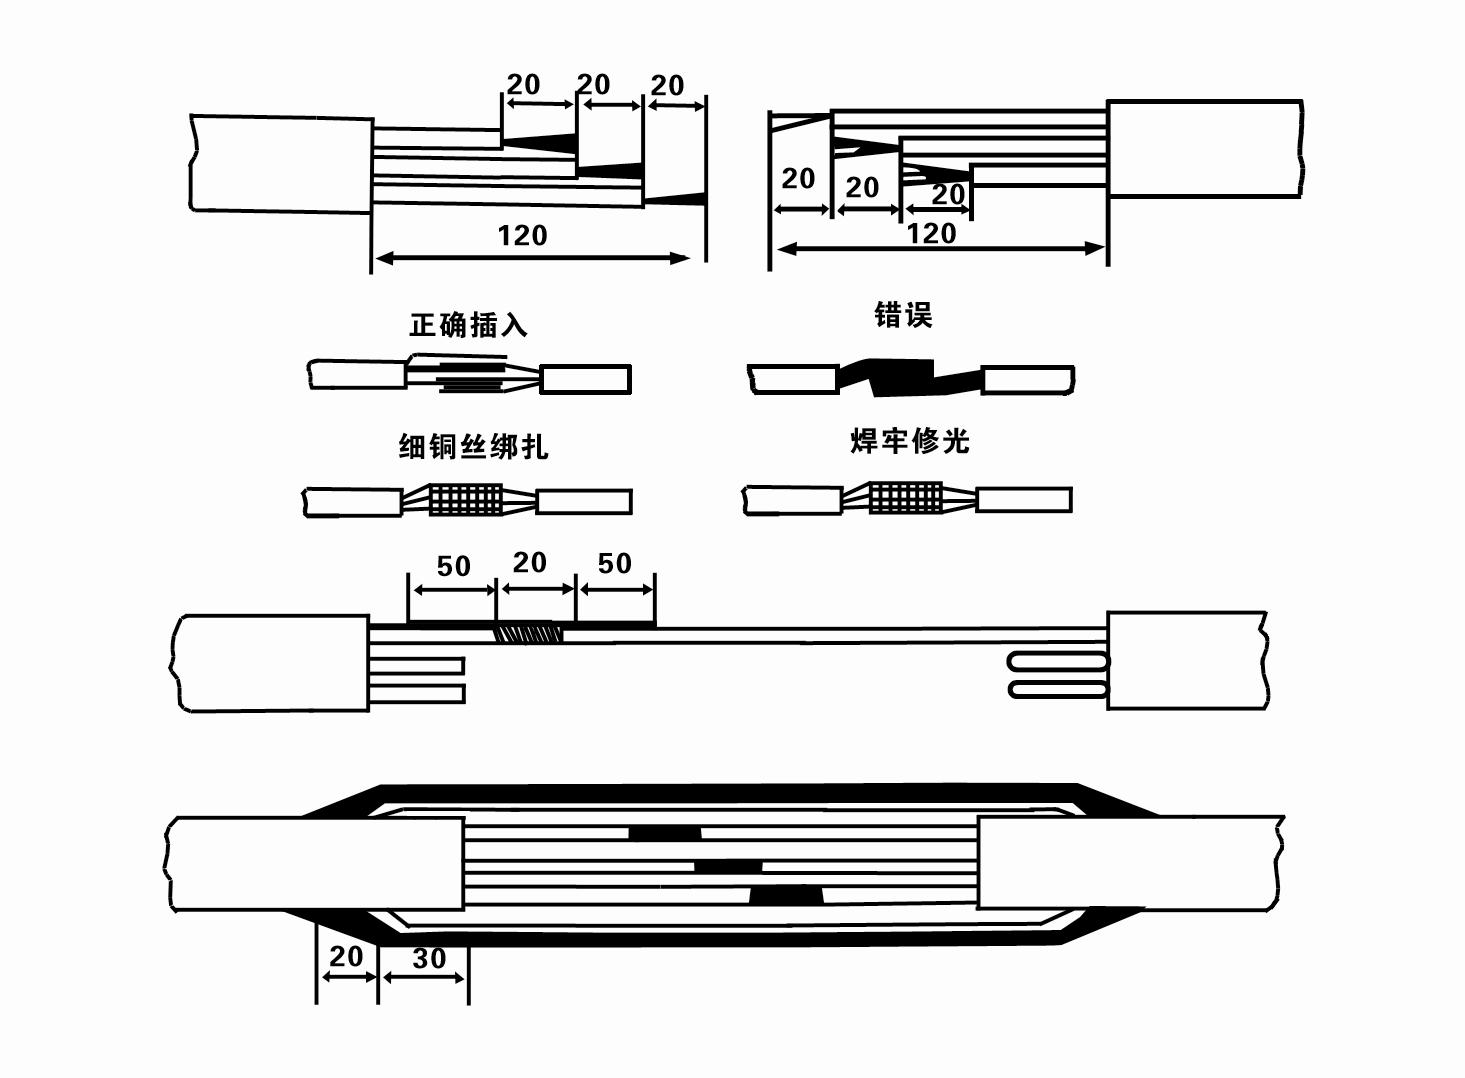
7. Cable joint, cut off a 120mm rubber sleeve from one end of the outgoing cable and the matching cable with an electrician's knifethen stagger the length of the three core wires in a stepped shape, peel off a 20mm copper core, scrape of the oxide layer on theoutside of the copper wire with a knife or sand cloth, and insert the two connected wire ends in palirs.After tying the layer tightly with fine copper wire, solder it thoroughly and firmly, and sand of any. burrs on the surface. Then, forthe three joints, use polyvester insulation tape to wrap them in a semi stacked manner for three lavers. Wrap the two ends of thewrapping layer tightywith nyion thread,and then use a semi stacked method to wrap the tape for three layers. Wrap the outellayer with high-pressure insulation tape for three layers. Finally, fold the threestrands together and repeatedly wrap them for fivelayers with high-pressure tape. Each layer must be tightly tied, and the interlayer joints must be tight and fimm to prevent water frompenetrating and damaging the insulation, After wrapping, soak in water at room temperature of 20 ’c for 12 hours, and measurethe insulation resistance with a shaking table, which should not be less than 100M Ω
संलग्न केबल तारिङ प्रक्रिया रेखाचित्र निम्नानुसार छ:

8. तीन-चरण तारहरू जडान भएका छन् वा छैनन् र DC प्रतिरोध लगभग सन्तुलित छ कि छैन भनेर जाँच गर्न मल्टिमिटर प्रयोग गर्नुहोस्।
9. सर्किट र ट्रान्सफर्मर क्षमता ओभरलोड भएको छ कि छैन जाँच गर्नुहोस्, र त्यसपछि ओभरलोड सुरक्षा स्विच वा सुरु उपकरण जडान गर्नुहोस्। विशेष मोडेलहरूको लागि तालिका 2 हेर्नुहोस्, र त्यसपछि पम्पमा रबर बियरिङहरू लुब्रिकेट गर्न वाटर पम्प आउटलेटबाट पानीको पम्पमा एक बाल्टिन पानी हाल्नुहोस्, र त्यसपछि पनडुब्बी बिजुली पम्पलाई सीधा र स्थिर राख्नुहोस्। सुरु गर्नुहोस् (एक सेकेन्ड भन्दा बढी छैन) र स्टेयरिङको दिशा स्टेयरिङ चिन्हसँग मिल्दोजुल्दो छ कि छैन जाँच गर्नुहोस्। यदि होइन भने, थ्री-फेज केबलको कुनै पनि दुई कनेक्टरहरू बदल्नुहोस्। त्यसपछि फिल्टर स्थापना गर्नुहोस् र इनारमा जान तयार हुनुहोस्। यदि विशेष अवसरहरूमा प्रयोग गरिन्छ (जस्तै खाडल, खाडल, खोला, पोखरी, पोखरी, आदि), विद्युतीय पम्प विश्वसनीय रूपमा ग्राउन्ड हुनुपर्छ।
(2) स्थापना उपकरण र उपकरणहरू:
1. दुई टन भन्दा बढीको लागि लिफ्टिङ चेनहरूको एक जोडी।
2. चार मिटर भन्दा कम ठाडो उचाइ भएको ट्राइपड।
3. एक टन भन्दा बढी वजन बोक्न सक्ने दुईवटा ह्याङ्गिङ डोरीहरू (तार डोरीहरू)।
4. दुई जोडी क्ल्याम्पहरू (स्प्लिन्टहरू) स्थापना गर्नुहोस्।
5. रेन्चहरू, ह्यामरहरू, स्क्रू ड्राइभरहरू, विद्युतीय उपकरणहरू र उपकरणहरू, इत्यादि।
(3) विद्युत पम्प स्थापना:
1. पनडुब्बी बिजुली पम्पको स्थापना रेखाचित्र चित्र 2 मा देखाइएको छ। विशिष्ट स्थापना आयामहरू तालिका 3 मा देखाइएको छ "पनडुब्बी इलेक्ट्रिक पम्पको स्थापना आयामहरूको सूची"।
2. 30 मिटर भन्दा कम टाउको भएका सबमर्सिबल इलेक्ट्रिक पम्पहरू सम्पूर्ण मेसिन, पानीको पाइप, र पाइपहरूमा पानीको पूरा तौल वहन गर्न सक्ने नली र तारको डोरी वा अन्य हेम्प डोरीहरू प्रयोग गरेर सिधै इनारमा फहराउन सकिन्छ।
३. ३० मिटरभन्दा बढी टाउको भएका पम्पहरूले स्टिल पाइपहरू प्रयोग गर्छन्, र स्थापना क्रम निम्नानुसार छ:
①वाटर पम्प भागको माथिल्लो छेउमा क्ल्याम्प गर्न क्ल्याम्प प्रयोग गर्नुहोस् (यस समयमा मोटर र पानी पम्प जडान गरिएको छ), यसलाई झुण्डिएको चेनले उठाउनुहोस्, र बिस्तारै कुवामा क्ल्याम्प नराख्दासम्म यसलाई इनारमा बाँध्नुहोस्। झुण्डिएको चेन।
② पाइप क्ल्याम्प गर्न अर्को जोडी क्ल्याम्पहरू प्रयोग गर्नुहोस्, यसलाई फ्ल्यान्जबाट 15 सेन्टिमिटर टाढा झुण्डिएको चेनले उठाउनुहोस्, र यसलाई बिस्तारै तल राख्नुहोस्। पाइप फ्ल्यान्ज र पम्प फ्ल्यान्जको बिचमा रबर प्याड राख्नुहोस् र पाइपलाई कस्नुहोस् र बोल्ट, नट र स्प्रिङ वाशरले समान रूपमा पम्प गर्नुहोस्।
③ सबमर्सिबल पम्पलाई थोरै उठाउनुहोस्, पानी पम्पको माथिल्लो छेउमा रहेको क्ल्याम्प हटाउनुहोस्, केबललाई प्लास्टिकको ट्यापले पानीको पाइपमा दृढतापूर्वक बाँध्नुहोस्, र क्ल्याम्प कुवामा नराख्दासम्म यसलाई बिस्तारै तल बाँध्नुहोस्।
④ पानीका सबै पाइपहरू इनारमा बाँध्न एउटै विधि प्रयोग गर्नुहोस्।
⑤ लेड-आउट केबल नियन्त्रण स्विचमा जडान भएपछि, यो तीन-चरण बिजुली आपूर्तिमा जोडिएको छ।
(4) स्थापना गर्दा ध्यान दिनुपर्ने कुराहरू:
1. यदि पम्पिङ प्रक्रियाको क्रममा जामिङ घटना फेला पर्यो भने, जामिङ बिन्दुलाई पार गर्न पानीको पाइप घुमाउनुहोस् वा तान्नुहोस्। यदि विभिन्न उपायहरूले अझै पनि काम गर्दैन भने, कृपया पनडुब्बी बिजुली पम्प र इनारमा क्षति हुनबाट जोगिन पम्पलाई जबरजस्ती नदिनुहोस्।
2. स्थापनाको समयमा, रबर प्याड प्रत्येक पाइपको फ्ल्यान्जमा राख्नुपर्छ र समान रूपमा कडा गर्नुपर्छ।
3. पानीको पम्प इनारमा तल झर्दा, पम्पलाई लामो समयसम्म इनारको पर्खालमा चल्न नदिनको लागि इनारको पाइपको बीचमा राख्नुपर्छ, जसले गर्दा पम्प कम्पन हुन्छ र मोटरले स्वीप र जलाउँछ। ।
4. इनारको बगिरहेको बालुवा र गारो अवस्था अनुसार इनारको तलसम्म पानी पम्पको गहिराइ निर्धारण गर्नुहोस्। पम्पलाई हिलोमा गाड्नु हुँदैन। पानी पम्पदेखि इनारको तलसम्मको दूरी सामान्यतया ३ मिटरभन्दा कम हुँदैन (चित्र २ हेर्नुहोस्)।
5. पानी पम्पको पानी प्रवेश गहिराई गतिशील जल स्तर देखि पानी इनलेट नोड सम्म 1-1.5 मिटर भन्दा कम हुनु हुँदैन (चित्र 2 हेर्नुहोस्)। अन्यथा, पानी पम्प बियरिङ सजिलै क्षतिग्रस्त हुन सक्छ।
6. पानी पम्पको लिफ्ट धेरै कम हुन सक्दैन। अन्यथा, ठूलो प्रवाह दरको कारण मोटरलाई ओभरलोड हुन र जलाउनबाट रोक्नको लागि मूल्याङ्कन गरिएको प्रवाह बिन्दुमा पम्प प्रवाहलाई नियन्त्रण गर्न वेलहेड पानीको पाइपलाइनमा गेट भल्भ स्थापना गर्न आवश्यक छ।
7. जब पानी पम्प चलिरहेको छ, पानीको आउटपुट निरन्तर र समान हुनुपर्छ, वर्तमान स्थिर हुनुपर्छ (मूल्याङ्कन गरिएको कार्य अवस्था अन्तर्गत, सामान्यतया मूल्याङ्कन गरिएको वर्तमानको 10% भन्दा बढी हुँदैन), र त्यहाँ कुनै कम्पन वा आवाज हुनु हुँदैन। यदि त्यहाँ कुनै असामान्यता छ भने, मेसिनलाई कारण पत्ता लगाउन र हटाउनको लागि रोकिनुपर्छ।
8. स्थापना गर्दा, मोटर ग्राउन्डिङ तारको सेटिङमा ध्यान दिनुहोस् (चित्र 2 हेर्नुहोस्)। जब पानीको पाइप स्टिलको पाइप हो, यसलाई वेलहेड क्ल्याम्पबाट लैजानुहोस्; जब पानीको पाइप प्लास्टिकको पाइप हुन्छ, त्यसलाई विद्युतीय पम्पको ग्राउन्डिङ मार्कबाट लैजानुहोस्।
- 1.After the submersible electric pump is installed, recheck the insulation resistance and three-phase continuity from the switch, and check whether there are any errors in the connection of the instruments and starting equipment. If there are no problems, you can start the test machine. After starting, observe whether the indication readings of each instrument are correct. If the rated voltage and current specified on the nameplate are exceeded, observe whether the water pump has any noise or vibration. If everything is normal, it can be put into operation.
2. Four hours after the water pump is operated for the first time, the motor should be stopped and the thermal insulation resistance tested quickly. The value should be no less than 0.5 megohms.
3.After the water pump is stopped, it should be restarted after an interval of five minutes to prevent the water column in the pipe from flowing back completely and causing the motor to burn out due to excessive current.
4. After the water pump is put into normal operation, in order to extend its service life, it is necessary to regularly check whether the power supply voltage, operating current and insulation resistance are normal. If the following conditions are found, the machine should be shut down immediately to eliminate the fault.
①Under rated working conditions, the current exceeds 20%.
② The dynamic water level drops to the water inlet section, causing intermittent water discharge.
③The submersible pump vibrates violently or makes loud noise.
④The power supply voltage is lower than 340 volts.
⑤One phase of the fuse is burned out.
⑥The water pipe is damaged.
⑦The thermal insulation resistance of the motor to the ground is less than 0.5 megohms.
5. Unit disassembly:
① Untie the cable tether, remove the pipeline part, and remove the wire protection plate.
② Unscrew the water drain bolt and drain all the water in the motor cavity.
③Remove the filter and loosen the fixing screw on the coupling that fixes the motor shaft.
④ Unscrew the bolts connecting the water inlet section and the motor, and separate the water pump from the motor (pay attention to leveling the unit when separating to prevent the pump shaft from bending)
⑤The water pump disassembly sequence is: (see Figure 1) water inlet section, impeller, diversion shell, impeller... check valve body. When disassembling the impeller, use a special tool to first loosen the tapered sleeve that fixes the impeller. Avoid disassembly during the disassembly process. Bend the pump shaft and damage various parts.
⑥The motor disassembly process is: (See Figure 1) Place the motor on the platform, and remove the nuts, bases, shaft head locking nuts, thrust plates, keys, and lower guides on the stud bolts (tie rod bolts) in sequence from the bottom of the motor. bearing seat, stud bolts, and then take out the rotor (be careful not to
If the wire package is damaged), finally remove the connecting section and upper guide bearing seat.
⑦Unit assembly:
Before assembly, all parts should be cleaned of rust and dirt, and all mating surfaces and fasteners should be coated with sealant, and then assembled in the reverse order of disassembly (the amount of movement of the motor shaft after assembly is about one millimeter). After completion, the coupling should be flexible, and then put the filter on to test the machine.
6. Every time the submersible electric pump is operated for one year, or if it is operated for less than one year but has been submerged for two years, it should be disassembled and inspected in accordance with Article 5 to replace worn parts.
1, मोटरको गुफामा पानी बाहिर राख्नुहोस् (विशेष गरी जाडोमा मोटरलाई चिसो हुनबाट रोक्न), र केबल राम्रोसँग बाँध्नुहोस्।
2, store in an indoor room without corrosive substances and gases, with a temperature below 40 °C.
3, दीर्घकालीन प्रयोग पनडुब्बी पम्प को खिया रोकथाम ध्यान दिनु पर्छ।
- इम्पेलर
- शाफ्ट आस्तीन
- रबर शाफ्ट आस्तीन
-
सील रिंग
01 गहिरो कुवाको पानी सेवन
02 अग्लो पानी आपूर्ति
03 पहाड पानी आपूर्ति
04 टावर पानी
05 कृषि सिंचाई
06 बगैचा सिंचाई
07 नदीको पानी सेवन
08 घरेलु पानी


