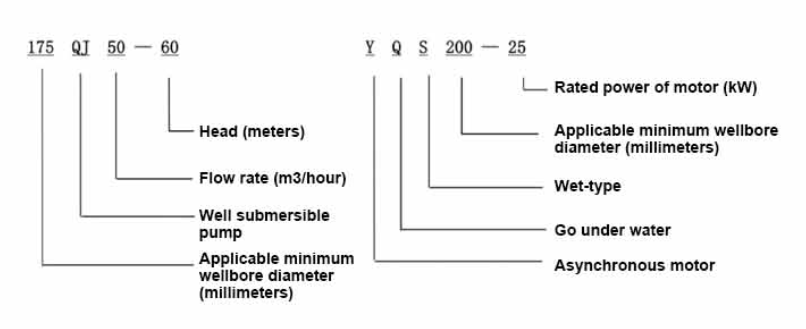
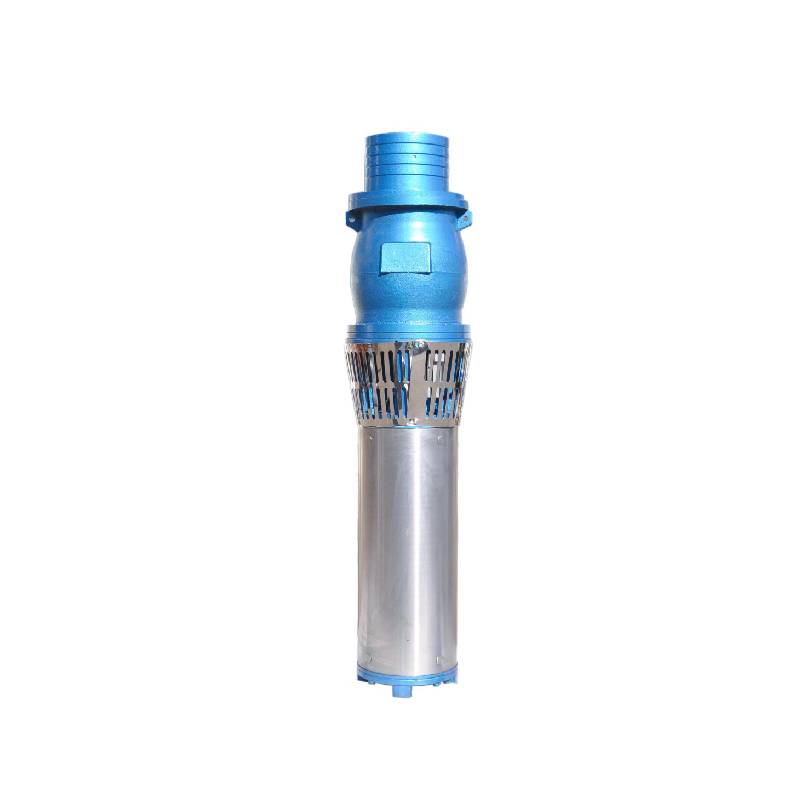
Well-designed sand-proof large flow water system, using water-immersed motor, no oil after burning machine does not pollute water. Suitable for freshwater aquaculture extraction of river water, sea water oxygen. Flow range 100-1000m3/h, lift 3-100m, power 3-100KW.
1, ספק כוח: תלת פאזי AC 380V (סובלנות + / - 5%), 50HZ (סובלנות + / - 1%).
2, איכות מים:
(1) water temperature is not higher than 20 °C;
(2) תכולת זיהומים מוצקים (יחס מסה) אינה גדולה מ-0.01%;
(3) ערך PH (pH) 6.5-8.5;
(4) תכולת מימן גופרתי אינה גדולה מ-1.5 מ"ג/ליטר;
(5) תכולת יוני כלוריד אינה גדולה מ-400 מ"ג/ליטר.
3, המנוע סגור או מלא במים מבנה רטוב, לפני השימוש חלל המנוע הצולל חייב להיות מלא במים נקיים, כדי למנוע מלא כוזב, ולאחר מכן להדק את הזרקת המים, ברגי שחרור האוויר, אחרת אסור להשתמש
4, משאבה טבולה חייבת להיות שקועה לחלוטין במים, עומק הצלילה אינו גדול מ-70 מ', תחתית המשאבה הטבולה מתחתית הבאר היא לא פחות מ-3 מ'.
5, זרימת המים בבאר אמורה להיות מסוגלת לעמוד בתפוקת המים של המשאבה הטבולה ובפעולה רציפה, יש לשלוט בתפוקת המים של המשאבה הטבולה ב-0.7 - 1.2 פעמים מהזרימה המדורגת.
6, הבאר צריכה להיות ישרה, משאבת הצוללת לא יכולה לשמש או לזרוק, רק שימוש אנכי.
7, יש להתאים את המשאבה הטבולה לכבל בהתאם לדרישות, ולהתקן ההגנה החיצוני מפני עומס יתר. 8, המשאבה אסורה בהחלט ללא מכונת בדיקת מים ללא עומס

| טבלת ביצועי משאבת טבולה 200 QS סדרות בהתאמה אישית לא סטנדרטית |
||||||||
| דֶגֶם | דֶגֶם | |||||||
| QS5-70-2.2KW | QS10-52-4KW | |||||||
| QS5-90-3KW | QS10-70-5.5KW | |||||||
| QS5-108-4KW | QS10-90-7.5KW | |||||||
| QS5-126-5.5KW | QS10-108-7.5KW | |||||||
| QS5-144-5.5KW | QS20-40-4KW | |||||||
| QS5-160-7.5KW | QS20-54-5.5KW | |||||||
| QS5-180-7.5KW | QS20-65-7.5KW | |||||||
| QS10-36-2.2KW | QS20-81-7.5KW | |||||||
| QS10-54-3KW | QS32-13-2.2KW | |||||||
| QS10-70-4KW | QS32-26-4KW | |||||||
| QS10-90-5.5KW | QS32-52-7.5KW | |||||||
| QS10-108-5.5KW | QS40-39-7.5KW | |||||||
| QS10-126-7.5KW | QS40-13-4KW | |||||||
| QS10-140-7.5KW | QS40-26-5.5KW | |||||||
| QS15-38-3KW | QS50-13-4KW | |||||||
| QS15-54-4KW | QS50-26-5.5KW | |||||||
| QS15-65-5.5KW | QS50-39-7.5KW | |||||||
| QS15-81-5.5KW | QS63-12-4KW | |||||||
| QS15-100-7.5KW | QS63-24-7.5KW | |||||||
| QS20-30-3KW | QS80-11-4KW | |||||||
| QS20-45-4KW | QS80-22-7.5KW | |||||||
| QS20-60-5.5KW | QS10-88-7.5KW | |||||||
| QS20-75-7.5KW | QS10-105-7.5KW | |||||||
| QS20-81-7.5KW | QS40-52-11KW | |||||||
| QS10-198-15KW | QS50-60-11KW | |||||||
| QS10-160-9.2KW | QS65-30-9.2KW | |||||||
| QS15-180-15KW | QS80-28-9.2KW | |||||||
| QS10-180-11KW | QS125-15-7.5KW | |||||||
This well submersible pump is a clean water pump. It is strictly prohibited to excavate new wells, discharge sediments and muddy water. The voltage rating of the pump is 380/50 hertz, and other voltage ratings are not allowed. The submersible motor needs to be customized, and the underground cable must be waterproof cable, and must be equipped with starting equipment, such as distribution box, etc. The starting equipment should have common motor comprehensive protection functions, such as short circuit overload protection, phase loss protection, undervoltage protection, grounding protection and idling protection, etc. In order to prevent abnormal conditions, the protection device should be timely trip. During the installation and use process, the pump must be reliably grounded. It is strictly prohibited to push and pull the switch when hands and feet are wet. The power supply must be cut off before installation and maintenance of the pump. An obvious "anti-electric shock" sign must be set up where the pump is used. Before going down the well or installing, the motor must fill the inner cavity with distilled water or non-corrosive clean cold water, and the inlet and outlet bolts must be tightened. When testing the pump, the pump cavity must be filled with water to lubricate the rubber bearings, and the instant start time shall not exceed one second to check whether the direction is correct. Pay attention to safety when lifting, and prevent the overturning of the pump from causing injury. Strictly according to the provisions of the pump lift and flow range, to prevent the pump in low lift when the large flow or in high lift when the large pull, resulting in serious wear and tear of thrust bearings and other parts, causing motor overload and burnout. After the pump into the well, the insulation resistance between the motor and the ground should not be less than 100MΩ, after the start of regular observation of voltage and current, and check whether the motor winding insulation meets the requirements; if the pump storage temperature below freezing, the water in the motor cavity should be discharged to prevent the cold temperature caused by the motor cavity water icing and damage the motor due to low temperature.
הקדמה קצרה של המבנה: חלק המשאבה מורכב בעיקר מפיר משאבה, אימפלר, מעטפת הסחה, מיסב גומי, גוף שסתום סימון (חלקים אופציונליים) ורכיבים אחרים. חלק מנוע מורכב בעיקר מבסיס, סרט ויסות לחץ, מיסב דחף, לוחית דחף, מושב מיסב מדריך תחתון, סטטור, רוטור, מושב מיסב מדריך עליון, טבעת חול, קטע כניסת מים, כבל ורכיבים אחרים.
המאפיינים העיקריים של המוצר כוללים:
1, המנוע הוא מנוע צולל תלת פאזי רטוב מלא מים אסינכרוני, חלל המנוע מלא במים נקיים, משמש לקירור המנוע ולשימון המיסב, סרט ויסות הלחץ בתחתית המנוע משמש להתאמת הפרש לחץ ההתפשטות וההתכווצות של המים בתוך הגוף הנגרם על ידי שינוי עליית הטמפרטורה של המנוע.
2, על מנת למנוע מהחול במי הבאר להיכנס למנוע, הקצה העליון של פיר המנוע מצויד בשני אטמי שמן, וטבעת חול מותקנת ליצירת מבנה למניעת חול.
3, על מנת למנוע מפיר המשאבה לרוץ למעלה בעת ההתנעה, פיר המשאבה וציר המנוע מחוברים באמצעות צימוד, ומסב דחף עליון מותקן בחלק התחתון של המנוע.
4, שימון המנוע ומסב המשאבה הוא שימון מים.
5, מתפתל הסטטור של המנוע עשוי מחוט מתפתל מנוע צולל באיכות גבוהה, עם ביצועי בידוד גבוהים.
6, המשאבה תוכננה על ידי מחשב CAD, עם מבנה פשוט וביצועים טכניים טובים.

(1) הכנה לפני ההתקנה:
1. בדקו האם המשאבה הטבולה עומדת בתנאי השימוש ובהיקף המפורטים במדריך.
2. בעזרת חפץ כבד בקוטר השווה לקוטר החיצוני המרבי של המשאבה הטבולה, מדוד האם הקוטר הפנימי של צינור הבאר יכול להתאים למשאבה הטבולה, ומדוד האם עומק הבאר עומד בדרישות ההתקנה.
3. בדקו האם שקע הבאר נקי והאם מי הבאר עכורים. לעולם אל תשתמש במשאבה חשמלית טבולה כדי לשטוף את בוץ משאבת welor ומי חול כדי למנוע נזק מוקדם למשאבה החשמלית הטבולה.
4. בדקו האם מיקום מהדק התקנת הבור מתאים והאם הוא יכול לעמוד באיכות היחידה כולה
5. בדוק אם רכיבי המשאבה הטבולה שלמים ומותקנים כראוי בהתאם לתרשים ההרכבה במדריך הסר את מסך המסנן וסובב את המצמד כדי לראות אם הוא מסתובב בצורה גמישה
6. הברג את בורג המים ומלא את חלל המנוע במים נקיים ולא מאכלים (שים לב. הקפד למלא אותו), ולאחר מכן הדק את בורג המים. לאחר 12 שעות של הזרקת מים, התנגדות הבידוד של המנוע לא צריכה להיות פחות מ-150M Q כאשר נמדדת עם שולחן ניעור של 500V.
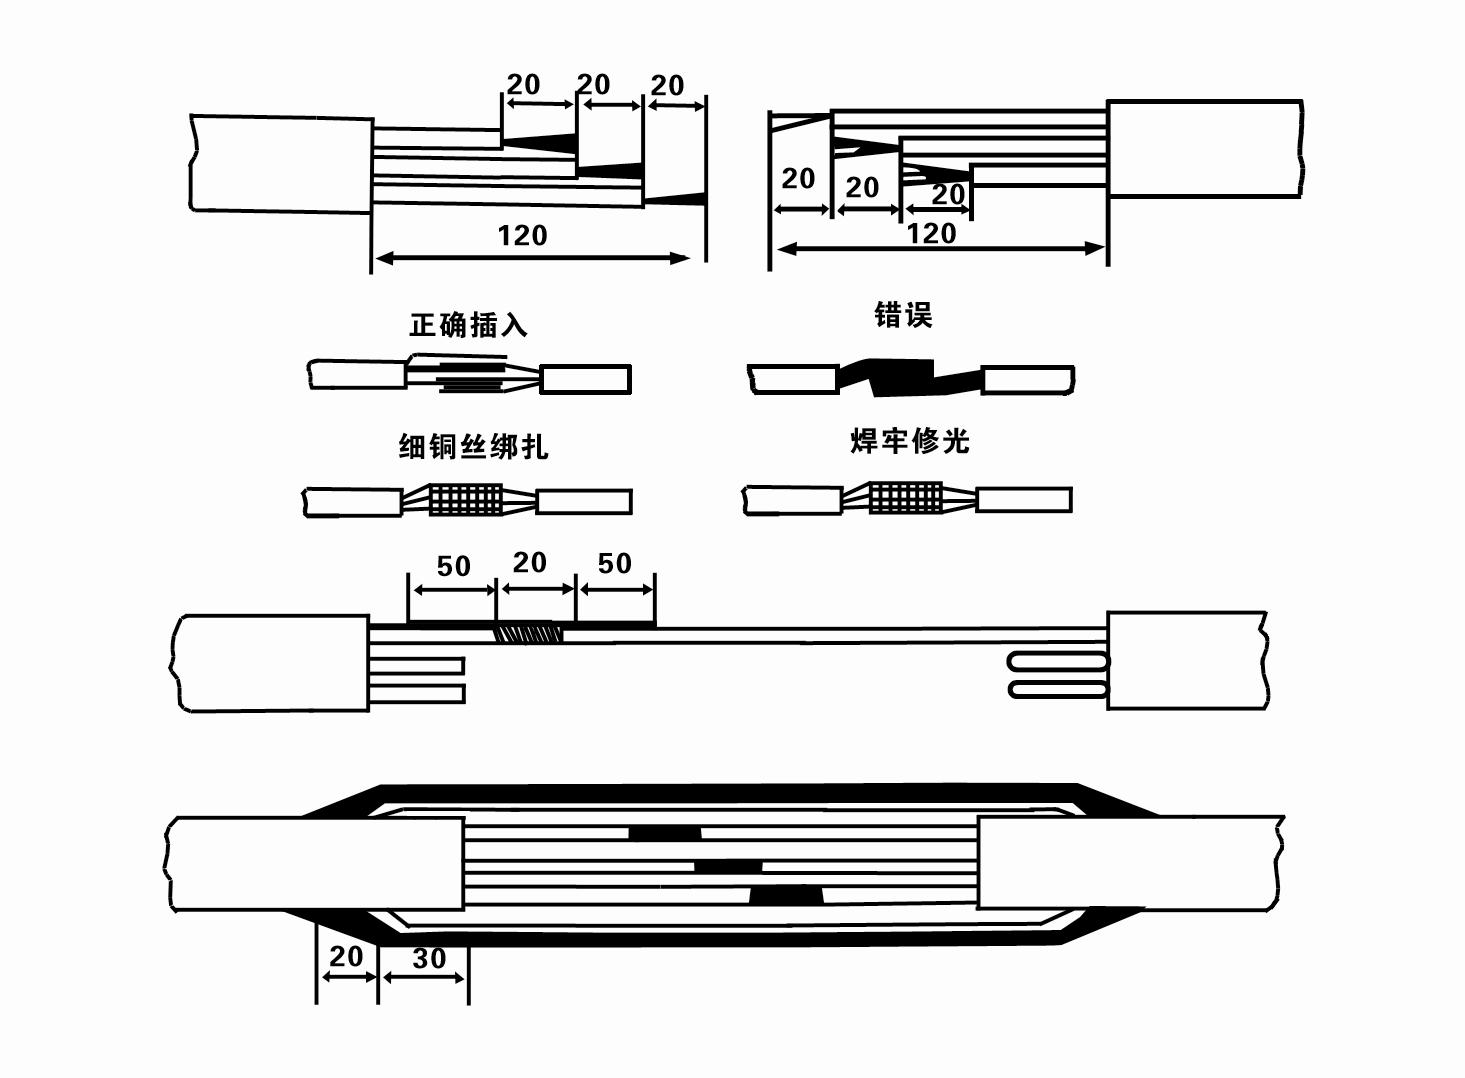
7. Cable joint, cut off a 120mm rubber sleeve from one end of the outgoing cable and the matching cable with an electrician's knifethen stagger the length of the three core wires in a stepped shape, peel off a 20mm copper core, scrape of the oxide layer on theoutside of the copper wire with a knife or sand cloth, and insert the two connected wire ends in palirs.After tying the layer tightly with fine copper wire, solder it thoroughly and firmly, and sand of any. burrs on the surface. Then, forthe three joints, use polyvester insulation tape to wrap them in a semi stacked manner for three lavers. Wrap the two ends of thewrapping layer tightywith nyion thread,and then use a semi stacked method to wrap the tape for three layers. Wrap the outellayer with high-pressure insulation tape for three layers. Finally, fold the threestrands together and repeatedly wrap them for fivelayers with high-pressure tape. Each layer must be tightly tied, and the interlayer joints must be tight and fimm to prevent water frompenetrating and damaging the insulation, After wrapping, soak in water at room temperature of 20 ’c for 12 hours, and measurethe insulation resistance with a shaking table, which should not be less than 100M Ω
תרשים תהליך חיווט הכבלים המצורף הוא כדלקמן:

8. השתמש במולטימטר כדי לבדוק אם החוטים התלת פאזיים מחוברים והאם התנגדות DC מאוזנת בערך.
9. בדוק אם קיבולת המעגל והשנאי עמוסים יתר על המידה, ולאחר מכן חבר את מתג הגנת עומס יתר או ציוד התנעה. ראה טבלה 2 עבור דגמים ספציפיים, ולאחר מכן שפך דלי מים לתוך משאבת המים מיציאת משאבת המים כדי לשמן את מיסבי הגומי במשאבה, ולאחר מכן הנח את המשאבה החשמלית הטבולה זקוף ויציב. התחל (לא יותר משנייה אחת) ולבדוק האם כיוון ההיגוי תואם לתמרור ההיגוי. אם לא, החלף כל שני מחברים של הכבל התלת פאזי. לאחר מכן התקן את המסנן והתכונן לרדת לבאר. אם נעשה שימוש באירועים מיוחדים (כגון תעלות, תעלות, נהרות, בריכות, בריכות וכו'), המשאבה החשמלית חייבת להיות מוארקת בצורה מהימנה.
(2) ציוד וכלי התקנה:
1. זוג אחד של שרשראות הרמה ליותר משני טון.
2. חצובה בגובה אנכי של לא פחות מארבעה מטרים.
3. שני חבלים תלויים (חבלי תיל) שיכולים לשאת משקל של יותר מטון אחד (יכולים לשאת משקל של סט שלם של משאבות מים).
4. התקן שני זוגות מהדקים (סדים).
5. מפתחות ברגים, פטישים, מברגים, כלי עבודה ומכשירים חשמליים וכו'.
(3) התקנת משאבה חשמלית:
1. דיאגרמת ההתקנה של המשאבה החשמלית הטבולה מוצגת באיור 2. מידות ההתקנה הספציפיות מוצגות בטבלה 3 "רשימת מידות ההתקנה של המשאבה החשמלית הטבולה".
2. משאבות חשמליות טבולות בעלות גובה של פחות מ-30 מטר ניתנות להנפה ישירות לבאר באמצעות צינורות וחוטי תיל או חבלי קנבוס אחרים שיכולים לשאת את מלוא המשקל של כל המכונה, צינורות מים ומים בצינורות.
3. משאבות עם ראש של יותר מ-30 מטר משתמשות בצינורות פלדה, ורצף ההתקנה הוא כדלקמן:
①השתמש במהדק כדי להדק את הקצה העליון של חלק משאבת המים (המנוע ומשאבת המים חוברו בשלב זה), הרם אותו בשרשרת תלויה וקשור אותו באיטיות לתוך הבאר עד שתשים את המהדק על ראש הבאר והסר את שרשרת תלויה.
② השתמש בזוג מהדקים נוסף כדי להדק צינור, הרם אותו באמצעות שרשרת תלויה במרחק של 15 ס"מ מהאוגן, והורד אותו לאט. בין אוגן הצינור לאוגן המשאבה הנח את רפידת הגומי במקומה והדק את הצינור ושאבה באופן שווה עם ברגים, אומים ודסקיות קפיצים.
③ הרם מעט את המשאבה הטבולה, הסר את המהדק בקצה העליון של משאבת המים, קשר את הכבל בחוזקה לצינור המים בעזרת סרט פלסטיק, וקשור אותו באיטיות עד שהמהדק מוצב בראש הבאר.
④ השתמש באותה שיטה כדי לקשור את כל צינורות המים לבאר.
⑤ לאחר חיבור כבל היציאה למתג הבקרה, הוא מחובר לספק הכוח התלת פאזי.
(4) דברים שיש לשים לב אליהם במהלך ההתקנה:
1. אם מתגלה תופעת חסימה בתהליך השאיבה, סובב או משוך את צינור המים כדי להתגבר על נקודת החסימה. אם אמצעים שונים עדיין לא פועלים, נא לא להכריח את המשאבה לרדת כדי למנוע נזק למשאבה החשמלית הטבולה ולבאר.
2. במהלך ההתקנה יש להניח כרית גומי על האוגן של כל צינור ולהדק אותו באופן שווה.
3. כאשר משאבת המים יורדת לתוך הבאר, יש למקם אותה באמצע צינור הבאר כדי למנוע מהמשאבה לפעול על דופן הבאר לאורך זמן, ולגרום למשאבה לרטוט ולמנוע לטאטא ולהישרף. .
4. קבעו את עומק משאבת המים לתחתית הבאר בהתאם לתנאי החול והסחף הזורמים של הבאר. אין לקבור את המשאבה בבוץ. המרחק ממשאבת המים לתחתית הבאר הוא בדרך כלל לא פחות מ-3 מטרים (ראה איור 2).
5. עומק כניסת המים של משאבת המים צריך להיות לא פחות מ-1-1.5 מטר ממפלס המים הדינמי לצומת כניסת המים (ראה איור 2). אחרת, מיסבי משאבת המים עלולים להינזק בקלות.
6. הרמה של משאבת המים לא יכולה להיות נמוכה מדי. אחרת, יש להתקין שסתום שער על צינור המים של ראש הבאר כדי לשלוט על זרימת המשאבה בנקודת הזרימה המדורגת כדי למנוע עומס יתר של המנוע ולהישרף עקב קצבי זרימה גדולים.
7. כאשר משאבת המים פועלת, תפוקת המים צריכה להיות רציפה ואחידה, הזרם צריך להיות יציב (בתנאי עבודה מדורגים, בדרך כלל לא יותר מ-10% מהזרם המדורג), ולא צריך להיות רעידות או רעש. אם יש חריגה כלשהי, יש לעצור את המכונה כדי לגלות את הסיבה ולחסל אותה.
8. בעת ההתקנה, שימו לב להגדרה של חוט הארקה של המנוע (ראה איור 2). כאשר צינור המים הוא צינור פלדה, הוביל אותו מהדק ראש הבאר; כאשר צינור המים הוא צינור פלסטיק, הובילו אותו מסימון ההארקה של המשאבה החשמלית.
- 1.After the submersible electric pump is installed, recheck the insulation resistance and three-phase continuity from the switch, and check whether there are any errors in the connection of the instruments and starting equipment. If there are no problems, you can start the test machine. After starting, observe whether the indication readings of each instrument are correct. If the rated voltage and current specified on the nameplate are exceeded, observe whether the water pump has any noise or vibration. If everything is normal, it can be put into operation.
2. Four hours after the water pump is operated for the first time, the motor should be stopped and the thermal insulation resistance tested quickly. The value should be no less than 0.5 megohms.
3.After the water pump is stopped, it should be restarted after an interval of five minutes to prevent the water column in the pipe from flowing back completely and causing the motor to burn out due to excessive current.
4. After the water pump is put into normal operation, in order to extend its service life, it is necessary to regularly check whether the power supply voltage, operating current and insulation resistance are normal. If the following conditions are found, the machine should be shut down immediately to eliminate the fault.
①Under rated working conditions, the current exceeds 20%.
② The dynamic water level drops to the water inlet section, causing intermittent water discharge.
③The submersible pump vibrates violently or makes loud noise.
④The power supply voltage is lower than 340 volts.
⑤One phase of the fuse is burned out.
⑥The water pipe is damaged.
⑦The thermal insulation resistance of the motor to the ground is less than 0.5 megohms.
5. Unit disassembly:
① Untie the cable tether, remove the pipeline part, and remove the wire protection plate.
② Unscrew the water drain bolt and drain all the water in the motor cavity.
③Remove the filter and loosen the fixing screw on the coupling that fixes the motor shaft.
④ Unscrew the bolts connecting the water inlet section and the motor, and separate the water pump from the motor (pay attention to leveling the unit when separating to prevent the pump shaft from bending)
⑤The water pump disassembly sequence is: (see Figure 1) water inlet section, impeller, diversion shell, impeller... check valve body. When disassembling the impeller, use a special tool to first loosen the tapered sleeve that fixes the impeller. Avoid disassembly during the disassembly process. Bend the pump shaft and damage various parts.
⑥The motor disassembly process is: (See Figure 1) Place the motor on the platform, and remove the nuts, bases, shaft head locking nuts, thrust plates, keys, and lower guides on the stud bolts (tie rod bolts) in sequence from the bottom of the motor. bearing seat, stud bolts, and then take out the rotor (be careful not to
If the wire package is damaged), finally remove the connecting section and upper guide bearing seat.
⑦Unit assembly:
Before assembly, all parts should be cleaned of rust and dirt, and all mating surfaces and fasteners should be coated with sealant, and then assembled in the reverse order of disassembly (the amount of movement of the motor shaft after assembly is about one millimeter). After completion, the coupling should be flexible, and then put the filter on to test the machine.
6. Every time the submersible electric pump is operated for one year, or if it is operated for less than one year but has been submerged for two years, it should be disassembled and inspected in accordance with Article 5 to replace worn parts.
1, הוציאו את המים בחלל המנוע (במיוחד בחורף כדי למנוע מהמנוע לקפוא), וקשרו היטב את הכבל.
2, store in an indoor room without corrosive substances and gases, with a temperature below 40 °C.
3, שימוש לטווח ארוך צריך לשים לב למניעת חלודה של משאבות טבולות.
- גַלגַל מְנִיעַ
- שרוול פיר
- שרוול פיר גומי
-
טבעת איטום
01 צריכת מים בבאר עמוקה
02 אספקת מים לגובה
03 אספקת מים בהרים
04 מגדל מים
05 השקיה חקלאית
06 השקיית גינה
07 צריכת מי נהר
08 מים ביתיים


