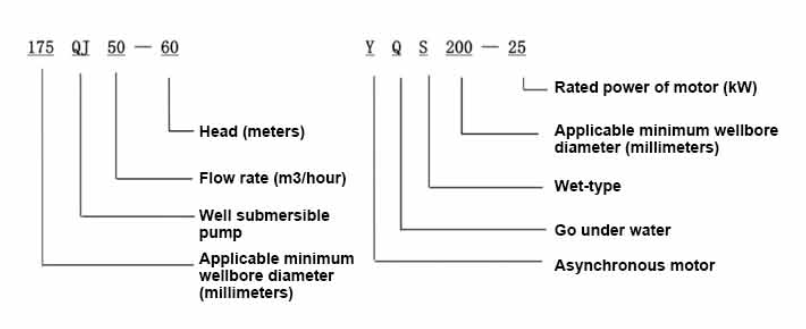
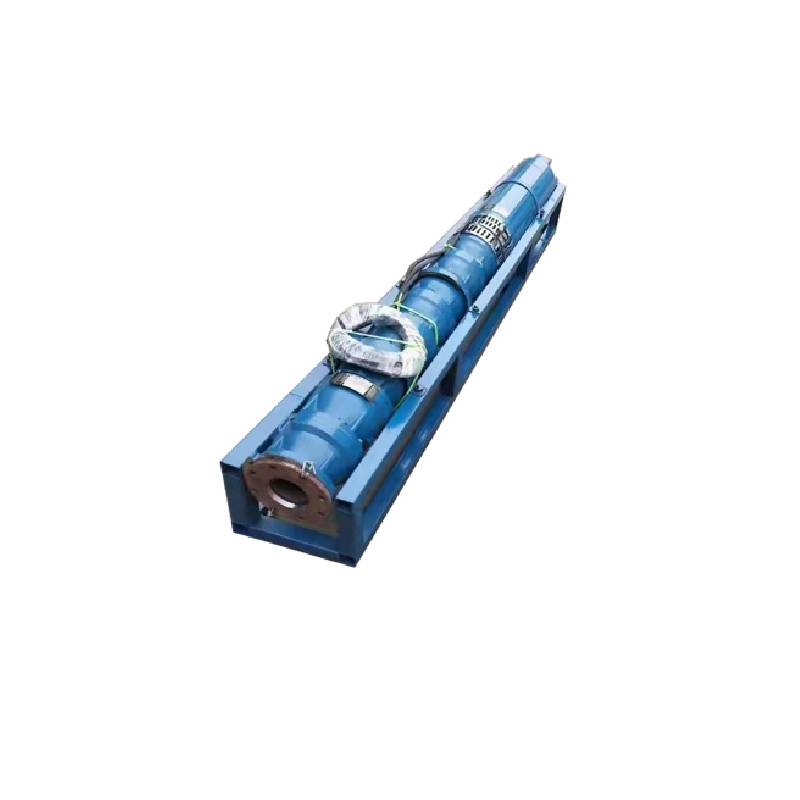
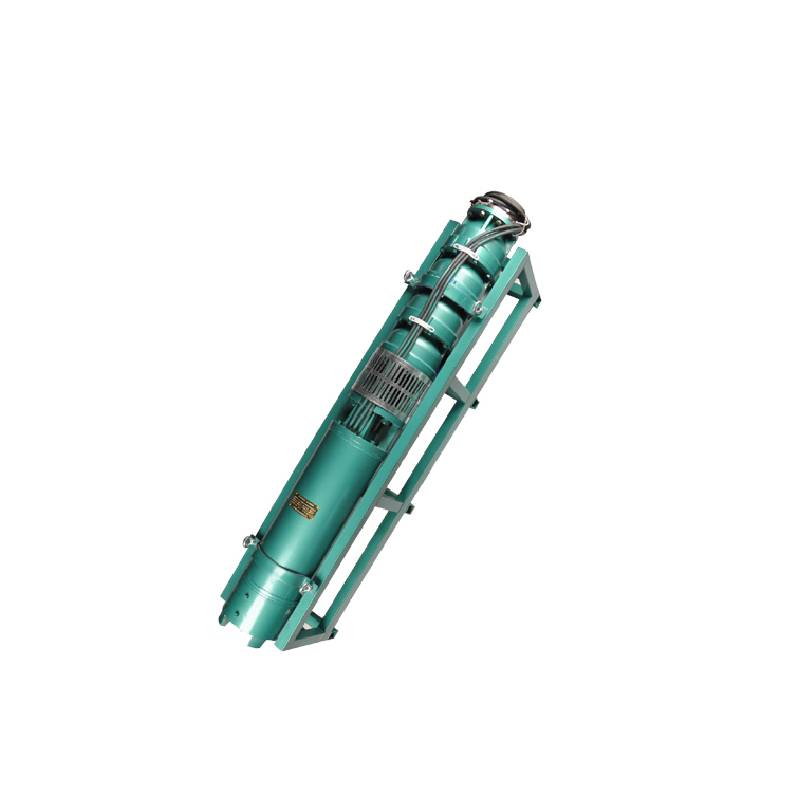
This series of fountain pump is a special fountain pump developed by our factory. The pump motor core is made of high quality cold rolled silicon steel, which makes the pump more efficient, has good magnetic conductivity, and does not produce heat when starting frequently. The two ends of the motor rotor are equipped with alloy copper sleeves with water as lubricant. Stainless steel bushings replace ball bearings, avoiding the problems of easy rust of ball bearings and burnout of motor due to lack of oil and wear. Most suitable for music fountain, all models can be used horizontally.
1, quvvat manbai: uch fazali AC 380V (tolerantlik + / - 5%), 50HZ (tolerantlik + / - 1%).
2, suv sifati:
(1) water temperature is not higher than 20 °C;
(2) qattiq aralashmalar miqdori (massa nisbati) 0,01% dan ko'p emas;
(3) PH qiymati (pH) 6,5-8,5;
(4) vodorod sulfidi miqdori 1,5 mg / L dan oshmaydi;
(5) xlorid ionining miqdori 400 mg / L dan oshmaydi.
3, vosita yopiq yoki suv bilan to'ldirilgan ho'l tuzilishga ega, ishlatishdan oldin suv ostidagi vosita bo'shlig'i toza suv bilan to'la bo'lishi kerak, noto'g'ri to'ldirilishining oldini olish uchun, keyin suv quyish, havo chiqarish murvatlarini torting, aks holda foydalanishga ruxsat etilmaydi.
4, suv osti nasosi to'liq suvga botirilishi kerak, sho'ng'in chuqurligi 70 m dan oshmasligi kerak, quduq ostidan suv osti nasosining pastki qismi 3 m dan kam emas.
5, quduq suvining oqimi suv osti nasosining suv chiqishi va uzluksiz ishlashiga javob berishi kerak, suv osti nasosining suv chiqishi nominal oqimning 0,7 - 1,2 barobarida nazorat qilinishi kerak.
6, quduq to'g'ri bo'lishi kerak, suv osti nasosini ishlatish yoki tushirish mumkin emas, faqat vertikal foydalanish.
7, suv osti nasosi talablarga muvofiq simi va tashqi ortiqcha yukdan himoya qilish moslamasi bilan mos kelishi kerak.
8, nasos suvsiz yuk sinov mashinasisiz qat'iyan man etiladi

| Model | Oqim (m3/soat) | Bosh (m) |
Aylanish tezligi (o'zgartirish / nuqta) |
Suv nasosi(%) | Chiqish diametri (mm) |
Yaxshi qo'llanilishi mumkin diametri (mm) |
Baholangan power(KW) |
Baholangan kuchlanish (V) |
Baholangan joriy (A) |
Motor samaradorligi (%) | power factorcosφ | Birlik Radial maksimal o'lcham (mm) |
Izoh | |||||||||
| 250QJ50-40 | 50 | 40 | 2875 | 72 | 80 | 250yuqorida | 9.2 | 380 | 21.7 | 78.5 | 0.82 | 233 | ||||||||||
| 250QJ50-60 | 60 | 13 | 30.1 | 80.0 | 0.82 | |||||||||||||||||
| 250QJ50-80 | 80 | 18.5 | 40.8 | 82.0 | 0.84 | |||||||||||||||||
| 250QJ50-100 | 100 | 22 | 47.9 | 83.0 | 0.84 | |||||||||||||||||
| 250QJ50-120 | 120 | 25 | 53.8 | 84.0 | 0.84 | |||||||||||||||||
| 250QJ50-140 | 140 | 30 | 64.2 | 84.5 | 0.84 | |||||||||||||||||
| 250QJ50-160 | 160 | 37 | 77.8 | 85.0 | 0.85 | |||||||||||||||||
| 250QJ50-200 | 200 | 45 | 94.1 | 85.5 | 0.85 | |||||||||||||||||
| 250QJ50-240 | 240 | 55 | 114.3 | 86.0 | 0.85 | |||||||||||||||||
| 250QJ50-280 | 280 | 63 | 131.0 | 86.0 | 0.85 | |||||||||||||||||
| 250QJ50-320 | 320 | 75 | 152.3 | 87.0 | 0.86 | |||||||||||||||||
| 250QJ50-400 | 400 | 90 | 182.8 | 87.0 | 0.86 | |||||||||||||||||
| 250QJ50-440 | 440 | 100 | 203.1 | 87.0 | 0.86 | |||||||||||||||||
| 250QJ63-40 | 63 | 40 | 2875 | 74 | 80 | 250yuqorida | 11 | 380 | 25.8 | 79.0 | 0.82 | 233 | ||||||||||
| 250QJ63-60 | 60 | 18.5 | 40.8 | 82.0 | 0.84 | |||||||||||||||||
| 250QJ63-80 | 80 | 22 | 47.9 | 83.0 | 0.84 | |||||||||||||||||
| 250QJ63-100 | 100 | 30 | 64.2 | 84.5 | 0.84 | |||||||||||||||||
| 250QJ63-120 | 120 | 37 | 77.8 | 85.0 | 0.85 | |||||||||||||||||
| 250QJ63-160 | 160 | 45 | 94.1 | 85.5 | 0.85 | |||||||||||||||||
| 250QJ63-200 | 200 | 55 | 114.3 | 86.0 | 0.85 | |||||||||||||||||
| 250QJ63-220 | 220 | 63 | 131.0 | 86.0 | 0.85 | |||||||||||||||||
| 250QJ63-260 | 260 | 75 | 152.3 | 87.0 | 0.86 | |||||||||||||||||
| 250QJ63-300 | 300 | 90 | 182.8 | 87.0 | 0.86 | |||||||||||||||||
| 250QJ63-360 | 360 | 100 | 203.1 | 87.0 | 0.86 | |||||||||||||||||
| 250QJ80-20 | 80 | 20 | 2875 | 75 | 100 | 250yuqorida | 7.5 | 380 | 18.0 | 78.0 | 0.81 | 233 | ||||||||||
| 250QJ80-40 | 40 | 15 | 33.9 | 81.0 | 0.83 | |||||||||||||||||
| 250QJ80-60 | 60 | 22 | 47.9 | 83.0 | 0.84 | |||||||||||||||||
| 250QJ80-80 | 80 | 30 | 64.2 | 84.5 | 0.84 | |||||||||||||||||
| 250QJ80-100 | 100 | 37 | 77.8 | 85.0 | 0.85 | |||||||||||||||||
| 250QJ80-120 | 120 | 45 | 94.1 | 85.5 | 0.85 | |||||||||||||||||
| 250QJ80-160 | 80 | 160 | 2875 | 75 | 100 | 250yuqorida | 55 | 380 | 114.3 | 86.0 | 0.85 | 233 | ||||||||||
| 250QJ80-180 | 180 | 63 | 131.0 | 86.0 | 0.85 | |||||||||||||||||
| 250QJ80-200 | 200 | 75 | 152.3 | 87.0 | 0.86 | |||||||||||||||||
| 250QJ80-240 | 240 | 90 | 182.8 | 87.0 | 0.86 | |||||||||||||||||
| 250QJ80-280 | 280 | 100 | 203.1 | 87.0 | 0.86 | |||||||||||||||||
| 250QJ100-18 | 100 | 18 | 2875 | 75 | 100 | 250yuqorida | 7.5 | 380 | 18.0 | 78.0 | 0.81 | 233 | ||||||||||
| 250QJ100-36 | 36 | 15 | 33.9 | 81.0 | 0.83 | |||||||||||||||||
| 250QJ100-54 | 54 | 25 | 53.8 | 84.0 | 0.84 | |||||||||||||||||
| 250QJ100-72 | 72 | 30 | 64.2 | 84.5 | 0.84 | |||||||||||||||||
| 250QJ100-90 | 90 | 37 | 77.8 | 85.0 | 0.85 | |||||||||||||||||
| 250QJ100-108 | 108 | 45 | 94.1 | 85.5 | 0.85 | |||||||||||||||||
| 250QJ100-126 | 126 | 55 | 114.3 | 86.0 | 0.85 | |||||||||||||||||
| 250QJ100-144 | 144 | 63 | 131.0 | 86.0 | 0.85 | |||||||||||||||||
| 250QJ100-162 | 162 | 75 | 152.3 | 87.0 | 0.86 | |||||||||||||||||
| 250QJ100-198 | 198 | 90 | 182.8 | 87.0 | 0.86 | |||||||||||||||||
| 250QJ100-216 | 216 | 100 | 203.1 | 87.0 | 0.86 | |||||||||||||||||
| 250QJ125-16 | 125 | 16 | 2875 | 76 | 125 | 250yuqorida | 9.2 | 380 | 21.7 | 78.5 | 0.82 | 233 | ||||||||||
| 250QJ125-32 | 32 | 18.5 | 40.8 | 82.0 | 0.84 | |||||||||||||||||
| 250QJ125-48 | 48 | 25 | 53.8 | 84.0 | 0.84 | |||||||||||||||||
| 250QJ125-64 | 64 | 37 | 77.8 | 85.0 | 0.85 | |||||||||||||||||
| 250QJ125-80 | 80 | 45 | 94.1 | 85.5 | 0.85 | |||||||||||||||||
| 250QJ125-96 | 96 | 55 | 114.3 | 86.0 | 0.85 | |||||||||||||||||
| 250QJ125-112 | 112 | 63 | 131.0 | 86.0 | 0.85 | |||||||||||||||||
| 250QJ125-128 | 128 | 75 | 152.3 | 87.0 | 0.86 | |||||||||||||||||
| 250QJ125-160 | 160 | 90 | 182.8 | 87.0 | 0.86 | |||||||||||||||||
| 250QJ125-176 | 176 | 100 | 203.1 | 87.0 | 0.86 | |||||||||||||||||
| 250QJ125-192 | 192 | 110 | 219.6 | 87.5 | 0.87 | |||||||||||||||||
| 250QJ140-15 | 140 | 15 | 2875 | 76 | 125 | 250yuqorida | 9.2 | 380 | 21.7 | 78.5 | 0.82 | 233 | ||||||||||
| 250QJ140-30 | 30 | 18.5 | 40.8 | 82.0 | 0.84 | |||||||||||||||||
| 250QJ140-45 | 45 | 30 | 64.2 | 84.5 | 0.84 | |||||||||||||||||
| 250QJ140-60 | 60 | 37 | 77.8 | 85.0 | 0.85 | |||||||||||||||||
| 250QJ140-75 | 45 | 45 | 94.1 | 85.5 | 0.85 | |||||||||||||||||
| 250QJ140-90 | 90 | 55 | 114.3 | 86.0 | 0.85 | |||||||||||||||||
| 250QJ140-105 | 140 | 105 | 2875 | 76 | 125 | 250yuqorida | 63 | 380 | 131.0 | 86.0 | 0.85 | 233 | ||||||||||
| 250QJ140-120 | 120 | 75 | 152.3 | 87.0 | 0.86 | |||||||||||||||||
| 250QJ140-150 | 150 | 90 | 182.8 | 87.0 | 0.86 | |||||||||||||||||
| 250QJ140-165 | 165 | 100 | 203.1 | 87.0 | 0.86 | |||||||||||||||||
| 250QJ140-180 | 180 | 110 | 219.6 | 87.5 | 0.87 | |||||||||||||||||
| 250QJ200-20 | 200 | 20 | 2875 | 75 | 150 | 250yuqorida | 18.5 | 380 | 40.8 | 82.0 | 0.84 | 233 | ||||||||||
| 250QJ200-40 | 40 | 37 | 77.8 | 85.0 | 0.85 | |||||||||||||||||
| 250QJ200-60 | 60 | 55 | 114.3 | 86.0 | 0.85 | |||||||||||||||||
| 250QJ200-80 | 80 | 75 | 152.3 | 87.0 | 0.86 | |||||||||||||||||
| 250QJ200-100 | 100 | 90 | 182.8 | 87.0 | 0.86 | |||||||||||||||||
| 250QJ200-120 | 120 | 100 | 203.1 | 87.0 | 0.86 | |||||||||||||||||
| 250QJ200-140 | 140 | 125 | 249.5 | 87.5 | 0.87 | |||||||||||||||||
1, well submersible pump for clean water pump, prohibit the new well, pumping sediment and muddy water,
2, well water pump voltage grade of 380/50HZ, the use of other voltage grades of submersible motors need to be customized. The underground cable must use waterproof cable, must be equipped with starting equipment, such as distribution box, start not ready should have commonly used motor comprehensive protection function, such as short circuit overload protection, phase protection, undervoltage protection, grounding protection, idling protection, in case of abnormal conditions, the protection device should be timely action trip.
3, the installation and use of the pump must be reliably grounded, prohibit the push and pull switch when the hands and feet are wet, the installation and maintenance of the pump must be cut off the power supply, the use of the pump place to set up "to prevent electric shock" obvious signs:
4, down the well or before installation, the motor cavity must be filled with distilled water or non-corrosive clean cold boiling water, tighten the / water bolt, the pump on the ground test run, must be to the pump chamber water lubrication rubber bearings, instant start not more than a second, see whether the steering is the same as the steering instructions. When the pump is upright, pay attention to safety, prevent overturning injury.
5, qat'iy ravishda nasosni ko'tarish qoidalariga muvofiq, foydalanish oqim diapazoni, past oqim yoki yuqori ko'taruvchi nasos kuchini oldini olish uchun, rulman va boshqa aşınma qismlari, dvigatelning haddan tashqari yuklanishi
6, after the pump down the well, the measurement of the motor to the ground insulation resistance should not be less than 100M, after the start to observe the voltage and current, check the motor winding insulation, whether in line with the requirements; pump storage location temperature if less than freezing point, should be dry the motor cavity water, prevent the motor cavity water ice damage caused by low temperature.
The introduction and structure of this pump product mainly include pump shaft, impeller, shunt shell, rubber bearing, check valve body (optional) and other components. The motor part is mainly composed of base, pressure regulating diaphragm, thrust bearing, thrust plate, lower guide bearing seat, stator, rotor, upper guide bearing seat, sand ring, water inlet section, lead cable and other components. The main characteristics of this pump product include the use of water-cooled wet submersible three-phase asynchronous motor, the motor cavity is filled with clean water to cool the motor and lubricate the bearing, the pressure regulating diaphragm at the bottom is used to adjust the expansion and contraction pressure difference of the internal water caused by the change of the temperature rise of the motor. In order to prevent the sand particles in the well water from entering the motor, two oil seals are installed on the upper end of the motor shaft extension, and the sand ring is installed to form a sand prevention structure. In order to avoid the pump shaft jumping at startup, the pump shaft and the motor shaft are connected together through the coupling, and the thrust bearing is installed at the lower part of the motor. The motor and pump bearing lubrication adopts water lubrication. The stator winding of the motor adopts high quality submersible motor winding, with high insulation performance. The pump adopts computer CAD design, simple structure and superior technical performance.

(1) O'rnatishdan oldin tayyorgarlik:
1. Suv osti nasosining qo'llanmada ko'rsatilgan foydalanish shartlari va ko'lamiga mos kelishini tekshiring.
2. Diametri suv osti nasosining maksimal tashqi diametriga teng bo'lgan og'ir obiektdan foydalanib, quduqning ichki diametri suv osti nasosiga mos kelishini o'lchang va quduq chuqurligi o'rnatish talablariga javob beradimi yoki yo'qligini o'lchang.
3. Quduq qudug'ining tozaligini va quduq suvining loyqaligini tekshiring. Suv osti elektr nasosiga muddatidan oldin shikast etkazmaslik uchun hech qachon suv osti nasosidan loy va qumli suvni yuvish uchun foydalanmang.
4. Quduq boshini o'rnatish qisqichining joylashuvi mos yoki yo'qligini va u butun qurilma sifatiga bardosh bera oladimi yoki yo'qligini tekshiring.
5. Qo'llanmadagi yig'ish sxemasiga muvofiq suv osti nasosi komponentlari to'liq va to'g'ri o'rnatilganligini tekshiring. Filtr ekranini olib tashlang va muftani egiluvchan aylanayotganligini ko'rish uchun aylantiring.
6. Suv vintini bo'shating va vosita bo'shlig'ini toza, korroziy bo'lmagan suv bilan to'ldiring (eslatma. uni to'ldirishni unutmang), so'ngra suv vintini torting. 12 soatlik suv quyishdan so'ng, 500V chayqash stoli bilan o'lchanganda, dvigatelning izolyatsiyaga chidamliligi 150M Q dan kam bo'lmasligi kerak.
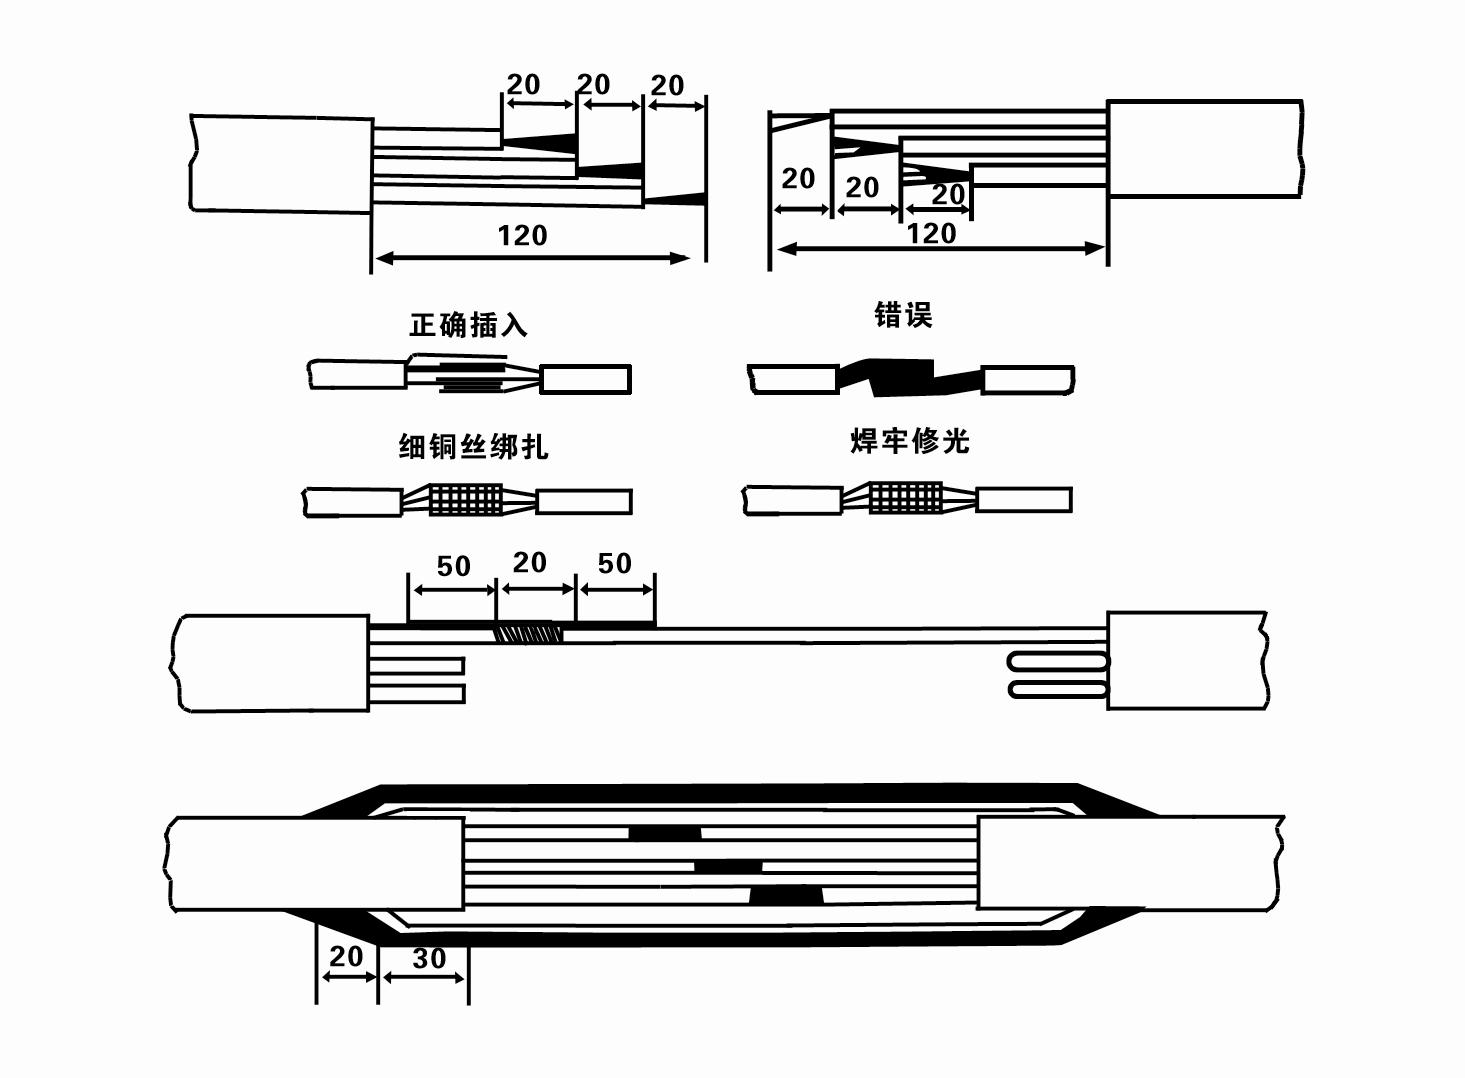
7. Cable joint, cut off a 120mm rubber sleeve from one end of the outgoing cable and the matching cable with an electrician's knifethen stagger the length of the three core wires in a stepped shape, peel off a 20mm copper core, scrape of the oxide layer on theoutside of the copper wire with a knife or sand cloth, and insert the two connected wire ends in palirs.After tying the layer tightly with fine copper wire, solder it thoroughly and firmly, and sand of any. burrs on the surface. Then, forthe three joints, use polyvester insulation tape to wrap them in a semi stacked manner for three lavers. Wrap the two ends of thewrapping layer tightywith nyion thread,and then use a semi stacked method to wrap the tape for three layers. Wrap the outellayer with high-pressure insulation tape for three layers. Finally, fold the threestrands together and repeatedly wrap them for fivelayers with high-pressure tape. Each layer must be tightly tied, and the interlayer joints must be tight and fimm to prevent water frompenetrating and damaging the insulation, After wrapping, soak in water at room temperature of 20 ’c for 12 hours, and measurethe insulation resistance with a shaking table, which should not be less than 100M Ω
Qo'shilgan kabelni ulash jarayoni diagrammasi quyidagicha:
8. Multimetrdan foydalanib, uch fazali simlarning ulanganligini va shahar qarshiligining taxminan muvozanatlanganligini tekshiring.
9. O'chirish va transformator quvvati haddan tashqari yuklangan yoki yo'qligini tekshirib ko'ring va keyin ortiqcha yuk himoyasi kalitini yoki ishga tushirish uskunasini ulang. Muayyan modellar uchun 2-jadvalga qarang, so'ngra nasosdagi rezina podshipniklarni moylash uchun suv nasosining chiqishidan suv nasosiga bir chelak suv quying, so'ngra suv ostidagi elektr nasosni tik va barqaror joylashtiring. Ishga tushirish (bir soniyadan oshmasligi kerak) va rul yo'nalishi rul belgisiga mos kelishini tekshiring. Agar yo'q bo'lsa, uch fazali kabelning har qanday ikkita ulagichini almashtiring.Keyin filtrni o'rnating va quduqqa tushishga tayyorlang. Maxsus holatlarda (masalan, ariqlar, ariqlar, daryolar, suv havzalari, suv havzalari va boshqalar) ishlatilsa, elektr nasos ishonchli tarzda erga ulangan bo'lishi kerak.
(2) O'rnatish uskunalari va asboblari:
1. Ikki tonnadan ortiq yuk ko'tarish uchun bir juft zanjir.
2. Vertikal balandligi to'rt metrdan kam bo'lmagan tripod.
3. Bir tonnadan ortiq og'irlikni ko'tara oladigan ikkita osilgan arqon (sim arqonlari) (suv nasoslarining to'liq to'plamining og'irligini ko'tara oladi).
4. Ikki juft qisqichni (shponlarni) o'rnating.
5. Kalitlar, bolg'alar, tornavidalar, elektr asboblari va asboblari va boshqalar.
(3) Elektr nasosni o'rnatish:
1. Suv osti elektr nasosining o'rnatish sxemasi 2-rasmda ko'rsatilgan. Maxsus o'rnatish o'lchamlari 3-jadvalda "Suv ostidagi elektr nasosni o'rnatish o'lchamlari ro'yxati" da ko'rsatilgan.
2. Boshi 30 metrdan kam bo'lgan suv osti elektr nasoslari to'g'ridan-to'g'ri quduqqa shlanglar va sim arqonlar yoki butun mashinaning, suv quvurlarining va quvurlardagi suvning to'liq og'irligini ko'tara oladigan boshqa kanop arqonlari yordamida ko'tarilishi mumkin.
3. Boshi 30 metrdan ortiq bo‘lgan nasoslar po‘lat quvurlardan foydalanadi va o‘rnatish ketma-ketligi quyidagicha:
①Suv nasos qismining yuqori uchini qisqich bilan mahkamlang (motor va suv nasosi bu vaqtda ulangan), uni osilgan zanjir bilan ko'taring va quduq boshiga qisqichni o'rnatguncha sekin quduqqa bog'lab qo'ying va osilgan zanjir.
② Quvurni mahkamlash uchun yana bir juft qisqichdan foydalaning, uni osilgan zanjir bilan gardishdan 15 sm uzoqlikda ko'taring va sekin pastga tushiring. Quvur gardish va nasos gardishi o'rtasida Kauchuk yostiqni joyiga qo'ying va quvurni torting va murvat, yong'oq va prujinali rondelalar bilan bir tekisda pompalang.
③ Suv osti nasosini biroz ko'taring, suv nasosining yuqori uchidagi qisqichni echib oling, kabelni suv trubasiga plastik lenta bilan mahkam bog'lang va qisqich quduq boshiga o'rnatilguncha sekin bog'lang.
④Hamma suv quvurlarini quduqqa ulash uchun xuddi shu usuldan foydalaning.
⑤Chiqish kabeli boshqaruv kalitiga ulangandan so'ng, u uch fazali quvvat manbaiga ulanadi.
(4) O'rnatish vaqtida e'tiborga olish kerak bo'lgan narsalar:
1. Nasos jarayonida tiqilib qolish hodisasi aniqlansa, tiqilib qolish nuqtasini yengish uchun suv trubkasini burang yoki torting. Agar turli xil choralar hali ham ishlamasa, iltimos, suv osti elektr nasosi va quduqqa shikast etkazmaslik uchun nasosni majburlamang.
2. O'rnatish vaqtida har bir quvurning gardish qismida kauchuk yostiq qo'yilishi va bir tekis tortilishi kerak.
3. Suv nasosi quduqqa tushirilganda, nasosning quduq devoriga uzoq vaqt davomida ishlamasligi, nasosning tebranishi va dvigatelning supurib yonishiga olib kelishi uchun uni quduq trubasining o'rtasiga qo'yish kerak. .
4. Quduqning oqayotgan qum va loy sharoitiga qarab suv nasosining quduq tubiga chuqurligini aniqlang. Nasosni loyga ko'mmang. Suv nasosidan quduq tubigacha bo'lgan masofa odatda 3 metrdan kam emas (2-rasmga qarang).
5. Suv nasosining suvga kirish chuqurligi dinamik suv sathidan suv kirish tuguniga qadar 1-1,5 metrdan kam bo'lmasligi kerak (2-rasmga qarang). Aks holda, suv nasosining podshipniklari osongina shikastlanishi mumkin.
6. Suv nasosining ko'tarilishi juda past bo'lishi mumkin emas. Aks holda, katta oqim tezligi tufayli dvigatelning haddan tashqari yuklanishi va yonib ketishining oldini olish uchun nominal oqim nuqtasida nasos oqimini nazorat qilish uchun quduq bo'yidagi suv quvur liniyasiga eshik klapanini o'rnatish kerak.
7. Suv pompasi ishlayotganida, suv chiqishi uzluksiz va bir tekis bo'lishi kerak, oqim barqaror bo'lishi kerak (nominal ish sharoitida, odatda nominal oqimning 10% dan ko'p bo'lmagan) va tebranish yoki shovqin bo'lmasligi kerak. Agar biron bir anormallik bo'lsa, sababni aniqlash va uni bartaraf etish uchun mashinani to'xtatish kerak.
8. O'rnatishda vosita topraklama simini sozlashga e'tibor bering (2-rasmga qarang). Suv trubkasi po'lat quvur bo'lsa, uni quduqning qisqichidan olib boring; suv trubkasi plastik quvur bo'lsa, uni elektr nasosning topraklama belgisidan olib boring.
After the installation of the underwater pump, the insulation resistance and three-phase continuity of the switch face should be rechecked, and the connection between the instrument and the start device should be checked for any errors. If there is no problem, you can start to test the machine. After the start, observe whether the indication readings of each instrument are correct. If the rated voltage and current specified on the nameplate are exceeded, observe whether the pump has noise or vibration. If everything is normal, it can be put into operation. After the first operation of the pump for four hours, the motor should be shut down and tested for thermal insulation resistance quickly. Its value should not be less than 0.5 megaohm. After stopping the pump, it should be restarted after an interval of five minutes to prevent the water column in the pipeline from completely reversing and causing the motor to burn out due to excessive current. After the pump is put into normal operation, in order to prolong its service life, it is necessary to check regularly whether the supply voltage, running current and insulation resistance are normal. If the following conditions are found, the machine should be shut down immediately to eliminate the fault: the current exceeds 20% under rated working conditions; the dynamic water level drops to the inlet section, resulting in intermittent drainage; the underwater pump becomes violently vibrating or making noise; the supply voltage is lower than 340 volts; a fuse is blown out; the water pipe is damaged; the motor's thermal insulation resistance to the earth is less than 0.5 megaohm. The sequence of disassembly is: untie the cable fastening, remove the pipeline part, remove the line protection plate, screw down the water discharge bolt and discharge all the water in the motor chamber, remove the filter and loosen the coupling fixing screw of the motor shaft. The sequence of disassembly of the pump is: (see Figure 1) inlet section, impeller, guide housing, impeller, check the valve body. When removing the impeller, use special tools to loosen the taper sleeve of the impeller. Avoid bending the pump shaft and damaging the components throughout the process. The disassembly process of the motor is: (see Figure 1) put the motor on the platform, and remove the bolts, base, shaft head lock nut, thrust plate, key, lower guide plate (transverse bolt), bearing seat, screw knife seat from the bottom of the motor in order (take care not to damage the winding), and finally remove the connecting part and the upper guide bearing seat. Before assembling the unit, the rust and dirt of each part should be cleaned, and the sealant should be applied to each mating surface and fastener, and then assembled in reverse order of disassembly (the movement of the motor shaft after assembly is about one millimeter). After assembly, the coupling should be rotated flexibly and put on the filter for test. Once a year, or if less than a year of operation but has been immersed for two years, the underwater electric pump must be disassembled for maintenance in accordance with Article 5 and replace worn parts to ensure the normal operation and durability of the pump.
1, vosita bo'shlig'idagi suvni to'kib tashlang (ayniqsa qishda dvigatel muzlashiga yo'l qo'ymaslik uchun) va kabelni yaxshilab bog'lang.
2, store in an indoor room without corrosive substances and gases, with a temperature below 40 °C.
3, uzoq muddatli foydalanish suv osti nasoslarining zang oldini olishga e'tibor berish kerak.
- Pervanel
- Mil yengi
- Kauchuk mil yengi
-
Muhrlash halqasi
01 Chuqur quduqdan suv olish
02 Ko'p qavatli suv ta'minoti
03 tog 'suv ta'minoti
04 minora suvi
05 Qishloq xo'jaligini sug'orish
06 bog'ni sug'orish
07 daryo suv olish
08 maishiy suv


