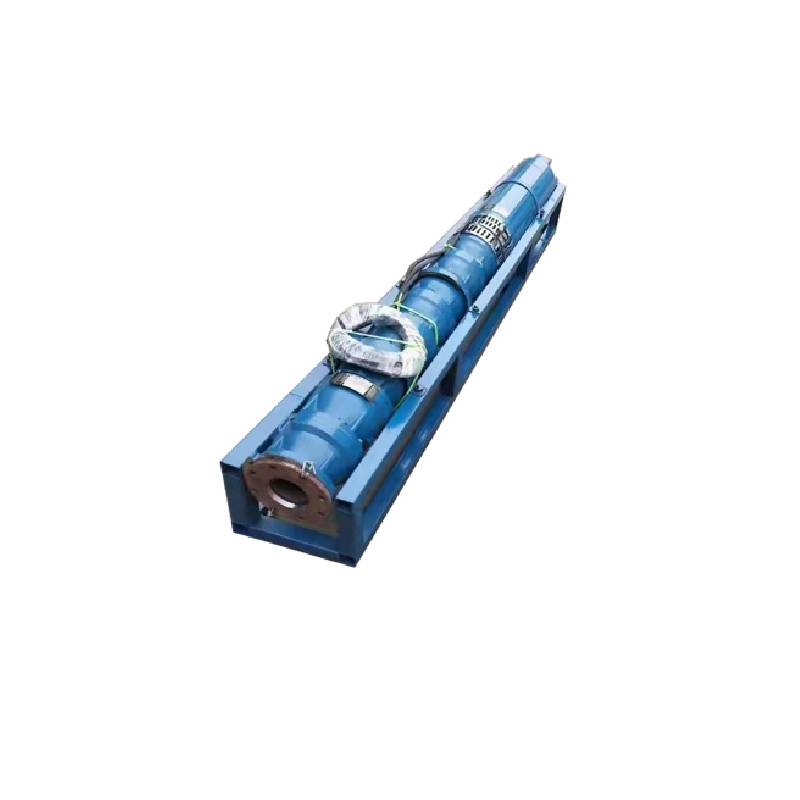
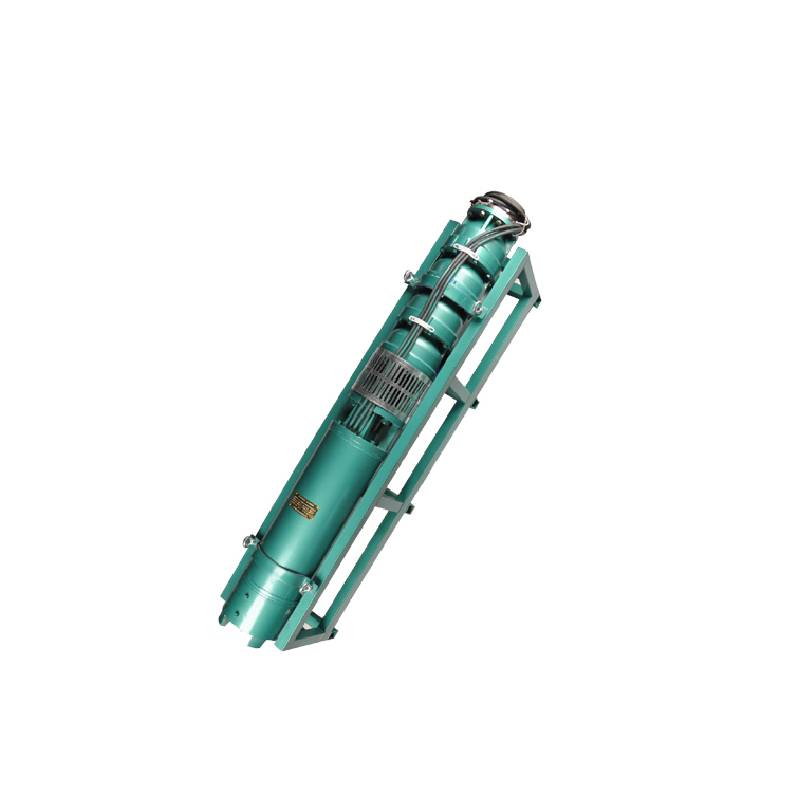
This series of fountain pump is a special fountain pump developed by our factory. The pump motor core is made of high quality cold rolled silicon steel, which makes the pump more efficient, has good magnetic conductivity, and does not produce heat when starting frequently. The two ends of the motor rotor are equipped with alloy copper sleeves with water as lubricant. Stainless steel bushings replace ball bearings, avoiding the problems of easy rust of ball bearings and burnout of motor due to lack of oil and wear. Most suitable for music fountain, all models can be used horizontally.
1, napajanje: trifazni AC 380V (toleranca +/- 5%), 50HZ (toleranca +/- 1%).
2, kakovost vode:
(1) water temperature is not higher than 20 °C;
(2) vsebnost trdnih nečistoč (masno razmerje) ni večja od 0,01 %;
(3) PH vrednost (pH) 6,5-8,5;
(4) vsebnost vodikovega sulfida ni večja od 1,5 mg/l;
(5) vsebnost kloridnih ionov ni večja od 400 mg/L.
3, motor je zaprt ali z vodo napolnjena mokra struktura, pred uporabo mora biti votlina potopnega motorja polna čiste vode, da se prepreči lažna polnost, nato pa zategnite vbrizgavanje vode, vijake za sprostitev zraka, sicer ni dovoljeno uporabljati
4, potopna črpalka mora biti popolnoma potopljena v vodo, globina potapljanja ni večja od 70 m, dno potopne črpalke od dna vodnjaka ni manjše od 3 m.
5, mora biti pretok vode iz vodnjaka sposoben doseči izhod vode potopne črpalke in neprekinjeno delovanje mora biti izhod vode potopne črpalke nadzorovan pri 0,7-1,2-kratnem nazivnem pretoku.
6, vodnjak mora biti raven, potopne črpalke ni mogoče uporabiti ali odložiti, samo navpična uporaba.
7, mora biti potopna črpalka usklajena s kablom v skladu z zahtevami in zunanjo zaščitno napravo pred preobremenitvijo.
8, črpalka je strogo prepovedana brez vodnega preskusnega stroja brez obremenitve

| Model | Pretok (m3/h) | glava (m) |
Hitrost vrtenja (sprememba/točka) |
Črpalka za vodo(%) | Izhod premer (mm) |
Uporabno dobro premer (mm) |
Ocenjeno power(KW) |
Ocenjeno napetost (V) |
Ocenjeno tok (A) |
Motorna učinkovitost (%) | power factorcosφ | Enota Največja radialna velikost (mm) |
Opomba | |||||||||
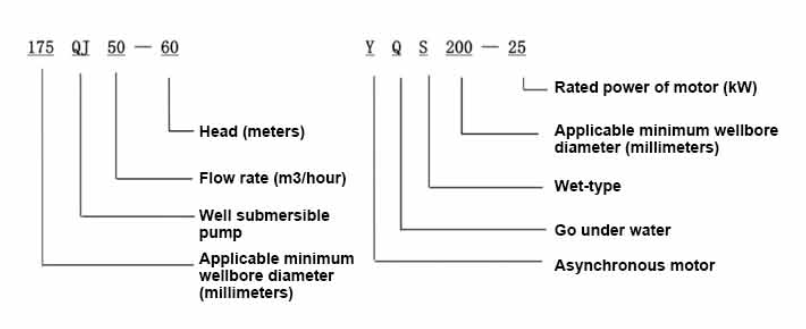
| 250QJ50-40 | 50 | 40 | 2875 | 72 | 80 | 250nad | 9.2 | 380 | 21.7 | 78.5 | 0.82 | 233 | ||||||||||
| 250QJ50-60 | 60 | 13 | 30.1 | 80.0 | 0.82 | |||||||||||||||||
| 250QJ50-80 | 80 | 18.5 | 40.8 | 82.0 | 0.84 | |||||||||||||||||
| 250QJ50-100 | 100 | 22 | 47.9 | 83.0 | 0.84 | |||||||||||||||||
| 250QJ50-120 | 120 | 25 | 53.8 | 84.0 | 0.84 | |||||||||||||||||
| 250QJ50-140 | 140 | 30 | 64.2 | 84.5 | 0.84 | |||||||||||||||||
| 250QJ50-160 | 160 | 37 | 77.8 | 85.0 | 0.85 | |||||||||||||||||
| 250QJ50-200 | 200 | 45 | 94.1 | 85.5 | 0.85 | |||||||||||||||||
| 250QJ50-240 | 240 | 55 | 114.3 | 86.0 | 0.85 | |||||||||||||||||
| 250QJ50-280 | 280 | 63 | 131.0 | 86.0 | 0.85 | |||||||||||||||||
| 250QJ50-320 | 320 | 75 | 152.3 | 87.0 | 0.86 | |||||||||||||||||
| 250QJ50-400 | 400 | 90 | 182.8 | 87.0 | 0.86 | |||||||||||||||||
| 250QJ50-440 | 440 | 100 | 203.1 | 87.0 | 0.86 | |||||||||||||||||
| 250QJ63-40 | 63 | 40 | 2875 | 74 | 80 | 250nad | 11 | 380 | 25.8 | 79.0 | 0.82 | 233 | ||||||||||
| 250QJ63-60 | 60 | 18.5 | 40.8 | 82.0 | 0.84 | |||||||||||||||||
| 250QJ63-80 | 80 | 22 | 47.9 | 83.0 | 0.84 | |||||||||||||||||
| 250QJ63-100 | 100 | 30 | 64.2 | 84.5 | 0.84 | |||||||||||||||||
| 250QJ63-120 | 120 | 37 | 77.8 | 85.0 | 0.85 | |||||||||||||||||
| 250QJ63-160 | 160 | 45 | 94.1 | 85.5 | 0.85 | |||||||||||||||||
| 250QJ63-200 | 200 | 55 | 114.3 | 86.0 | 0.85 | |||||||||||||||||
| 250QJ63-220 | 220 | 63 | 131.0 | 86.0 | 0.85 | |||||||||||||||||
| 250QJ63-260 | 260 | 75 | 152.3 | 87.0 | 0.86 | |||||||||||||||||
| 250QJ63-300 | 300 | 90 | 182.8 | 87.0 | 0.86 | |||||||||||||||||
| 250QJ63-360 | 360 | 100 | 203.1 | 87.0 | 0.86 | |||||||||||||||||
| 250QJ80-20 | 80 | 20 | 2875 | 75 | 100 | 250nad | 7.5 | 380 | 18.0 | 78.0 | 0.81 | 233 | ||||||||||
| 250QJ80-40 | 40 | 15 | 33.9 | 81.0 | 0.83 | |||||||||||||||||
| 250QJ80-60 | 60 | 22 | 47.9 | 83.0 | 0.84 | |||||||||||||||||
| 250QJ80-80 | 80 | 30 | 64.2 | 84.5 | 0.84 | |||||||||||||||||
| 250QJ80-100 | 100 | 37 | 77.8 | 85.0 | 0.85 | |||||||||||||||||
| 250QJ80-120 | 120 | 45 | 94.1 | 85.5 | 0.85 | |||||||||||||||||
| 250QJ80-160 | 80 | 160 | 2875 | 75 | 100 | 250nad | 55 | 380 | 114.3 | 86.0 | 0.85 | 233 | ||||||||||
| 250QJ80-180 | 180 | 63 | 131.0 | 86.0 | 0.85 | |||||||||||||||||
| 250QJ80-200 | 200 | 75 | 152.3 | 87.0 | 0.86 | |||||||||||||||||
| 250QJ80-240 | 240 | 90 | 182.8 | 87.0 | 0.86 | |||||||||||||||||
| 250QJ80-280 | 280 | 100 | 203.1 | 87.0 | 0.86 | |||||||||||||||||
| 250QJ100-18 | 100 | 18 | 2875 | 75 | 100 | 250nad | 7.5 | 380 | 18.0 | 78.0 | 0.81 | 233 | ||||||||||
| 250QJ100-36 | 36 | 15 | 33.9 | 81.0 | 0.83 | |||||||||||||||||
| 250QJ100-54 | 54 | 25 | 53.8 | 84.0 | 0.84 | |||||||||||||||||
| 250QJ100-72 | 72 | 30 | 64.2 | 84.5 | 0.84 | |||||||||||||||||
| 250QJ100-90 | 90 | 37 | 77.8 | 85.0 | 0.85 | |||||||||||||||||
| 250QJ100-108 | 108 | 45 | 94.1 | 85.5 | 0.85 | |||||||||||||||||
| 250QJ100-126 | 126 | 55 | 114.3 | 86.0 | 0.85 | |||||||||||||||||
| 250QJ100-144 | 144 | 63 | 131.0 | 86.0 | 0.85 | |||||||||||||||||
| 250QJ100-162 | 162 | 75 | 152.3 | 87.0 | 0.86 | |||||||||||||||||
| 250QJ100-198 | 198 | 90 | 182.8 | 87.0 | 0.86 | |||||||||||||||||
| 250QJ100-216 | 216 | 100 | 203.1 | 87.0 | 0.86 | |||||||||||||||||
| 250QJ125-16 | 125 | 16 | 2875 | 76 | 125 | 250nad | 9.2 | 380 | 21.7 | 78.5 | 0.82 | 233 | ||||||||||
| 250QJ125-32 | 32 | 18.5 | 40.8 | 82.0 | 0.84 | |||||||||||||||||
| 250QJ125-48 | 48 | 25 | 53.8 | 84.0 | 0.84 | |||||||||||||||||
| 250QJ125-64 | 64 | 37 | 77.8 | 85.0 | 0.85 | |||||||||||||||||
| 250QJ125-80 | 80 | 45 | 94.1 | 85.5 | 0.85 | |||||||||||||||||
| 250QJ125-96 | 96 | 55 | 114.3 | 86.0 | 0.85 | |||||||||||||||||
| 250QJ125-112 | 112 | 63 | 131.0 | 86.0 | 0.85 | |||||||||||||||||
| 250QJ125-128 | 128 | 75 | 152.3 | 87.0 | 0.86 | |||||||||||||||||
| 250QJ125-160 | 160 | 90 | 182.8 | 87.0 | 0.86 | |||||||||||||||||
| 250QJ125-176 | 176 | 100 | 203.1 | 87.0 | 0.86 | |||||||||||||||||
| 250QJ125-192 | 192 | 110 | 219.6 | 87.5 | 0.87 | |||||||||||||||||
| 250QJ140-15 | 140 | 15 | 2875 | 76 | 125 | 250nad | 9.2 | 380 | 21.7 | 78.5 | 0.82 | 233 | ||||||||||
| 250QJ140-30 | 30 | 18.5 | 40.8 | 82.0 | 0.84 | |||||||||||||||||
| 250QJ140-45 | 45 | 30 | 64.2 | 84.5 | 0.84 | |||||||||||||||||
| 250QJ140-60 | 60 | 37 | 77.8 | 85.0 | 0.85 | |||||||||||||||||
| 250QJ140-75 | 45 | 45 | 94.1 | 85.5 | 0.85 | |||||||||||||||||
| 250QJ140-90 | 90 | 55 | 114.3 | 86.0 | 0.85 | |||||||||||||||||
| 250QJ140-105 | 140 | 105 | 2875 | 76 | 125 | 250nad | 63 | 380 | 131.0 | 86.0 | 0.85 | 233 | ||||||||||
| 250QJ140-120 | 120 | 75 | 152.3 | 87.0 | 0.86 | |||||||||||||||||
| 250QJ140-150 | 150 | 90 | 182.8 | 87.0 | 0.86 | |||||||||||||||||
| 250QJ140-165 | 165 | 100 | 203.1 | 87.0 | 0.86 | |||||||||||||||||
| 250QJ140-180 | 180 | 110 | 219.6 | 87.5 | 0.87 | |||||||||||||||||
| 250QJ200-20 | 200 | 20 | 2875 | 75 | 150 | 250nad | 18.5 | 380 | 40.8 | 82.0 | 0.84 | 233 | ||||||||||
| 250QJ200-40 | 40 | 37 | 77.8 | 85.0 | 0.85 | |||||||||||||||||
| 250QJ200-60 | 60 | 55 | 114.3 | 86.0 | 0.85 | |||||||||||||||||
| 250QJ200-80 | 80 | 75 | 152.3 | 87.0 | 0.86 | |||||||||||||||||
| 250QJ200-100 | 100 | 90 | 182.8 | 87.0 | 0.86 | |||||||||||||||||
| 250QJ200-120 | 120 | 100 | 203.1 | 87.0 | 0.86 | |||||||||||||||||
| 250QJ200-140 | 140 | 125 | 249.5 | 87.5 | 0.87 | |||||||||||||||||
1, well submersible pump for clean water pump, prohibit the new well, pumping sediment and muddy water,
2, well water pump voltage grade of 380/50HZ, the use of other voltage grades of submersible motors need to be customized. The underground cable must use waterproof cable, must be equipped with starting equipment, such as distribution box, start not ready should have commonly used motor comprehensive protection function, such as short circuit overload protection, phase protection, undervoltage protection, grounding protection, idling protection, in case of abnormal conditions, the protection device should be timely action trip.
3, the installation and use of the pump must be reliably grounded, prohibit the push and pull switch when the hands and feet are wet, the installation and maintenance of the pump must be cut off the power supply, the use of the pump place to set up "to prevent electric shock" obvious signs:
4, down the well or before installation, the motor cavity must be filled with distilled water or non-corrosive clean cold boiling water, tighten the / water bolt, the pump on the ground test run, must be to the pump chamber water lubrication rubber bearings, instant start not more than a second, see whether the steering is the same as the steering instructions. When the pump is upright, pay attention to safety, prevent overturning injury.
5, strogo v skladu z določbami dvigala črpalke, obseg uporabe pretoka, za preprečevanje nizkega pretoka ali visokega dviga črpalne sile, potisni ležaj in drugi deli obrabe, preobremenitev motorja zgorela
6, after the pump down the well, the measurement of the motor to the ground insulation resistance should not be less than 100M, after the start to observe the voltage and current, check the motor winding insulation, whether in line with the requirements; pump storage location temperature if less than freezing point, should be dry the motor cavity water, prevent the motor cavity water ice damage caused by low temperature.
The introduction and structure of this pump product mainly include pump shaft, impeller, shunt shell, rubber bearing, check valve body (optional) and other components. The motor part is mainly composed of base, pressure regulating diaphragm, thrust bearing, thrust plate, lower guide bearing seat, stator, rotor, upper guide bearing seat, sand ring, water inlet section, lead cable and other components. The main characteristics of this pump product include the use of water-cooled wet submersible three-phase asynchronous motor, the motor cavity is filled with clean water to cool the motor and lubricate the bearing, the pressure regulating diaphragm at the bottom is used to adjust the expansion and contraction pressure difference of the internal water caused by the change of the temperature rise of the motor. In order to prevent the sand particles in the well water from entering the motor, two oil seals are installed on the upper end of the motor shaft extension, and the sand ring is installed to form a sand prevention structure. In order to avoid the pump shaft jumping at startup, the pump shaft and the motor shaft are connected together through the coupling, and the thrust bearing is installed at the lower part of the motor. The motor and pump bearing lubrication adopts water lubrication. The stator winding of the motor adopts high quality submersible motor winding, with high insulation performance. The pump adopts computer CAD design, simple structure and superior technical performance.

(1) Priprava pred namestitvijo:
1. Preverite, ali potopna črpalka ustreza pogojem uporabe in obsegu, navedenim v priročniku.
2. Z uporabo težkega predmeta s premerom, ki je enak največjemu zunanjemu premeru potopne črpalke, izmerite, ali notranji premer vrtine ustreza potopni črpalki, in izmerite, ali globina vrtine ustreza zahtevam za namestitev.
3. Preverite, ali je vrtina čista in ali je voda v vodnjaku motna. Nikoli ne uporabljajte potopne električne črpalke za izpiranje blata in peska črpalke welor, da preprečite prezgodnje poškodbe potopne električne črpalke.
4. Preverite, ali je položaj namestitvene objemke glave valja primeren in ali lahko prenese kakovost celotne enote
5. Preverite, ali so komponente potopne črpalke dokončane in pravilno nameščene v skladu s shemo sestavljanja v priročniku. Odstranite mrežico filtra in zavrtite sklopko, da vidite, ali se vrti prožno
6. Odvijte vodni vijak in napolnite votlino motorja s čisto, nejedko vodo (upoštevajte, da ste jo napolnili), nato privijte vodni vijak. Po 12 urah vbrizgavanja vode izolacijska upornost motorja ne sme biti manjša od 150 M Q, merjena s stresalno mizo 500 V.
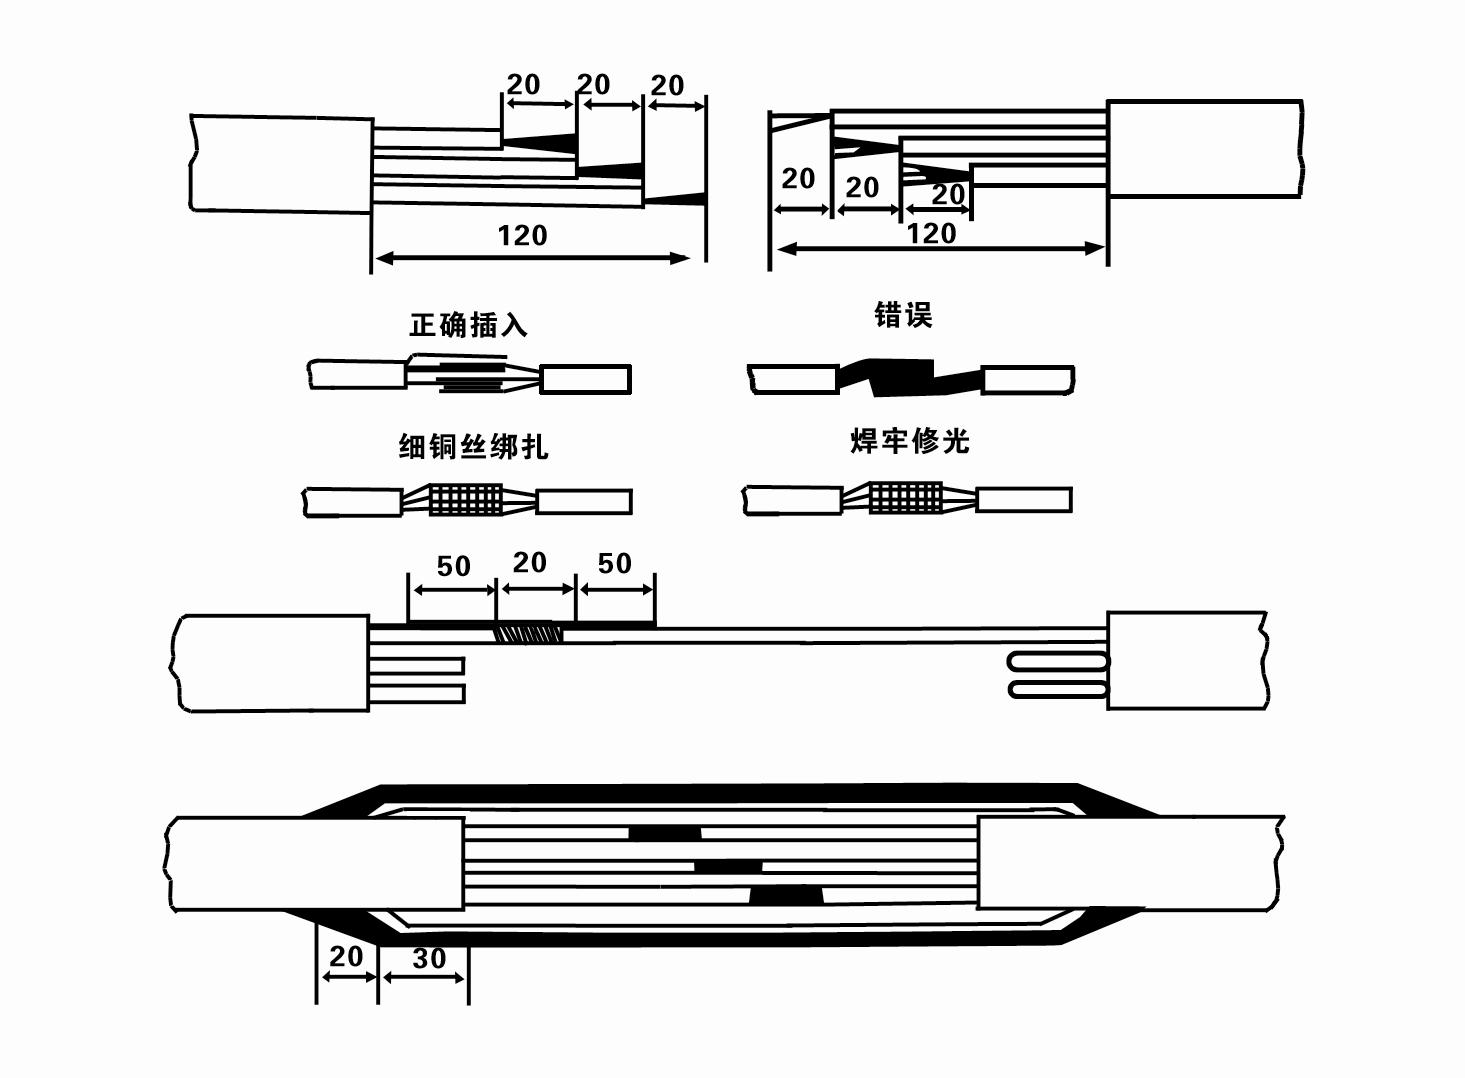
7. Cable joint, cut off a 120mm rubber sleeve from one end of the outgoing cable and the matching cable with an electrician's knifethen stagger the length of the three core wires in a stepped shape, peel off a 20mm copper core, scrape of the oxide layer on theoutside of the copper wire with a knife or sand cloth, and insert the two connected wire ends in palirs.After tying the layer tightly with fine copper wire, solder it thoroughly and firmly, and sand of any. burrs on the surface. Then, forthe three joints, use polyvester insulation tape to wrap them in a semi stacked manner for three lavers. Wrap the two ends of thewrapping layer tightywith nyion thread,and then use a semi stacked method to wrap the tape for three layers. Wrap the outellayer with high-pressure insulation tape for three layers. Finally, fold the threestrands together and repeatedly wrap them for fivelayers with high-pressure tape. Each layer must be tightly tied, and the interlayer joints must be tight and fimm to prevent water frompenetrating and damaging the insulation, After wrapping, soak in water at room temperature of 20 ’c for 12 hours, and measurethe insulation resistance with a shaking table, which should not be less than 100M Ω
Priloženi diagram postopka ožičenja kabla je naslednji:
8. Z multimetrom preverite, ali so trifazne žice priključene in ali je upor DC približno uravnotežen.
9. Preverite, ali sta vezje in zmogljivost transformatorja preobremenjena, nato priključite stikalo za zaščito pred preobremenitvijo ali opremo za zagon. Glejte tabelo 2 za določene modele in nato vlijte vedro vode v vodno črpalko iz izhoda vodne črpalke, da namažete gumijaste ležaje v črpalki, nato pa postavite potopno električno črpalko pokonci in mirno. Zaženite (ne več kot ena sekunda) in preverite, ali je smer krmiljenja skladna z znakom za krmiljenje. Če ne, zamenjajte poljubna dva konektorja trifaznega kabla. Nato namestite filter in se pripravite na spust v vodnjak. Če se uporablja v posebnih priložnostih (kot so jarki, jarki, reke, ribniki, ribniki itd.), mora biti električna črpalka zanesljivo ozemljena.
(2) Oprema in orodje za namestitev:
1. En par dvižnih verig za več kot dve toni.
2. Stativ z navpično višino najmanj štiri metre.
3. Dve viseči vrvi (žični vrvi), ki lahko preneseta težo več kot eno tono (lahko preneseta težo celotnega kompleta vodnih črpalk).
4. Namestite dva para sponk (splintov).
5. Ključi, kladiva, izvijači, električna orodja in instrumenti itd.
(3) Namestitev električne črpalke:
1. Namestitveni diagram potopne električne črpalke je prikazan na sliki 2. Posebne namestitvene mere so prikazane v tabeli 3 "Seznam namestitvenih mer potopne električne črpalke".
2. Potopne električne črpalke z višino manj kot 30 metrov je mogoče dvigniti neposredno v vodnjak s pomočjo cevi in žičnih vrvi ali drugih vrvi iz konoplje, ki lahko prenesejo polno težo celotnega stroja, vodovodnih cevi in vode v ceveh.
3. Črpalke z višino nad 30 metrov uporabljajo jeklene cevi, zaporedje namestitve pa je naslednje:
①Uporabite objemko, da vpnete zgornji konec dela vodne črpalke (motor in vodna črpalka sta bila trenutno povezana), jo dvignite z visečo verigo in počasi privežite v vodnjak, dokler ne namestite objemke na glavo vodnjaka in odstranite viseča veriga.
② Uporabite drug par sponk, da vpnete cev, jo dvignite z visečo verigo 15 cm stran od prirobnice in jo počasi spustite. Med prirobnico cevi in prirobnico črpalke Namestite gumijasto podlogo in enakomerno zategnite cev in črpalko z vijaki, maticami in vzmetnimi podložkami.
③ Rahlo privzdignite potopno črpalko, odstranite objemko na zgornjem koncu vodne črpalke, kabel trdno privežite na vodno cev s plastičnim trakom in ga počasi privežite, dokler objemka ni nameščena na ustju vodnjaka.
④Uporabite isto metodo za pritrditev vseh vodovodnih cevi v vodnjak.
⑤Ko je izhodni kabel priključen na krmilno stikalo, je priključen na trifazno napajanje.
(4) Stvari, ki jih morate upoštevati med namestitvijo:
1. Če med postopkom črpanja odkrijete pojav zagozditve, obrnite ali povlecite cev za vodo, da premagate točko zagozdenja. Če različni ukrepi še vedno ne delujejo, vas prosimo, da črpalke ne spustite na silo, da preprečite poškodbe potopne električne črpalke in vodnjaka.
2. Med namestitvijo je treba na prirobnico vsake cevi namestiti gumijasto blazinico in jo enakomerno zategniti.
3. Ko vodno črpalko spustite v vodnjak, jo postavite na sredino cevi vodnjaka, da preprečite, da bi črpalka dlje časa delovala ob steni vodnjaka, zaradi česar bi črpalka vibrirala, motor pa pometal in gorel .
4. Določite globino vodne črpalke do dna vodnjaka glede na razmere tekočega peska in mulja v vodnjaku. Ne zakopajte črpalke v blato. Razdalja od vodne črpalke do dna vodnjaka običajno ni manjša od 3 metrov (glej sliko 2).
5. Globina vstopa vode vodne črpalke ne sme biti manjša od 1-1,5 metra od dinamičnega nivoja vode do vozlišča vstopa vode (glej sliko 2). V nasprotnem primeru se lahko ležaji vodne črpalke zlahka poškodujejo.
6. Dvig vodne črpalke ne sme biti prenizek. V nasprotnem primeru je treba na cevovod za vodo na ustju vrtine namestiti zaporni ventil za nadzor pretoka črpalke pri nazivni točki pretoka, da se prepreči preobremenitev in izgorevanje motorja zaradi velikih pretokov.
7. Ko vodna črpalka deluje, mora biti izhod vode neprekinjen in enakomeren, tok mora biti stabilen (pri nazivnih delovnih pogojih običajno ne več kot 10 % nazivnega toka) in ne sme biti vibracij ali hrupa. Če pride do kakršnih koli nepravilnosti, je treba stroj ustaviti, da ugotovite vzrok in ga odpravite.
8. Pri namestitvi bodite pozorni na nastavitev ozemljitvene žice motorja (glejte sliko 2). Če je cev za vodo jeklena cev, jo speljite od objemke na ustju vodnjaka; če je cev za vodo plastična cev, jo speljite od oznake za ozemljitev električne črpalke.
After the installation of the underwater pump, the insulation resistance and three-phase continuity of the switch face should be rechecked, and the connection between the instrument and the start device should be checked for any errors. If there is no problem, you can start to test the machine. After the start, observe whether the indication readings of each instrument are correct. If the rated voltage and current specified on the nameplate are exceeded, observe whether the pump has noise or vibration. If everything is normal, it can be put into operation. After the first operation of the pump for four hours, the motor should be shut down and tested for thermal insulation resistance quickly. Its value should not be less than 0.5 megaohm. After stopping the pump, it should be restarted after an interval of five minutes to prevent the water column in the pipeline from completely reversing and causing the motor to burn out due to excessive current. After the pump is put into normal operation, in order to prolong its service life, it is necessary to check regularly whether the supply voltage, running current and insulation resistance are normal. If the following conditions are found, the machine should be shut down immediately to eliminate the fault: the current exceeds 20% under rated working conditions; the dynamic water level drops to the inlet section, resulting in intermittent drainage; the underwater pump becomes violently vibrating or making noise; the supply voltage is lower than 340 volts; a fuse is blown out; the water pipe is damaged; the motor's thermal insulation resistance to the earth is less than 0.5 megaohm. The sequence of disassembly is: untie the cable fastening, remove the pipeline part, remove the line protection plate, screw down the water discharge bolt and discharge all the water in the motor chamber, remove the filter and loosen the coupling fixing screw of the motor shaft. The sequence of disassembly of the pump is: (see Figure 1) inlet section, impeller, guide housing, impeller, check the valve body. When removing the impeller, use special tools to loosen the taper sleeve of the impeller. Avoid bending the pump shaft and damaging the components throughout the process. The disassembly process of the motor is: (see Figure 1) put the motor on the platform, and remove the bolts, base, shaft head lock nut, thrust plate, key, lower guide plate (transverse bolt), bearing seat, screw knife seat from the bottom of the motor in order (take care not to damage the winding), and finally remove the connecting part and the upper guide bearing seat. Before assembling the unit, the rust and dirt of each part should be cleaned, and the sealant should be applied to each mating surface and fastener, and then assembled in reverse order of disassembly (the movement of the motor shaft after assembly is about one millimeter). After assembly, the coupling should be rotated flexibly and put on the filter for test. Once a year, or if less than a year of operation but has been immersed for two years, the underwater electric pump must be disassembled for maintenance in accordance with Article 5 and replace worn parts to ensure the normal operation and durability of the pump.
1, izpustite vodo iz votline motorja (zlasti pozimi, da preprečite zmrzovanje motorja) in dobro zavežite kabel.
2, store in an indoor room without corrosive substances and gases, with a temperature below 40 °C.
3, dolgotrajna uporaba mora biti pozorna na preprečevanje rje potopnih črpalk.
- Tekač
- Tulec gredi
- Gumijast tulec gredi
-
Tesnilni obroč
01 Zajem vode iz globokega vodnjaka
02 Visoka oskrba z vodo
03 gorski vodovod
04 stolpna voda
05 Namakanje v kmetijstvu
06 namakanje vrta
07 zajetje rečne vode
08 gospodinjska voda


