This product adopts a variable frequency winding design, ensuring the motor's smooth conversion operation between 1HZ and 50HZ for a long time. This innovative design not only saves energy and prolongs service life, but also provides lasting and reliable performance in the work process. Whether in a home or industrial environment, this product will provide users with excellent efficiency and reliability, making it an indispensable tool in the manufacturing and production process.
1, bekalan kuasa: tiga fasa AC 380V (toleransi + / - 5%), 50HZ (toleransi + / - 1%).
2, kualiti air:
(1) water temperature is not higher than 20 °C;
(2) kandungan kekotoran pepejal (nisbah jisim) tidak melebihi 0.01%;
(3) Nilai PH (pH) 6.5-8.5;
(4) kandungan hidrogen sulfida tidak melebihi 1.5mg/L;
(5) kandungan ion klorida tidak melebihi 400mg/L.
3, motor ditutup atau struktur basah yang dipenuhi air, sebelum menggunakan rongga motor tenggelam mesti penuh dengan air bersih, untuk mengelakkan penuh palsu, dan kemudian ketatkan suntikan air, bolt pelepas udara, jika tidak, tidak dibenarkan menggunakan
4, submersible pump must be completely submerged in the water, the diving depth is not greater than 70m, the bottom of the submersible pump from the bottom of the well is not less than 3m. 5, the well water flow should be able to meet the submersible pump water output and continuous operation, the submersible pump water output should be controlled at 0.7 - 1.2 times the rated flow.
6, telaga harus lurus, pam tenggelam tidak boleh digunakan atau dibuang, hanya penggunaan menegak.
7, pam tenggelam mesti dipadankan dengan kabel mengikut keperluan, dan peranti perlindungan beban luaran.
8, pam adalah dilarang sama sekali tanpa mesin ujian tanpa beban air

| Model | Aliran (m3/j) | kepala (m) |
Kelajuan berputar (ubah/titik) |
Pam air(%) | Outlet diameter (mm) |
Berkenaan dengan baik diameter(mm) |
Dinilai power(KW) |
Dinilai voltan(V) |
Dinilai semasa (A) |
Kecekapan motor (%) | power factorcosφ | Unit Saiz Maksimum Jejari (mm) |
Teguran | |||||||||
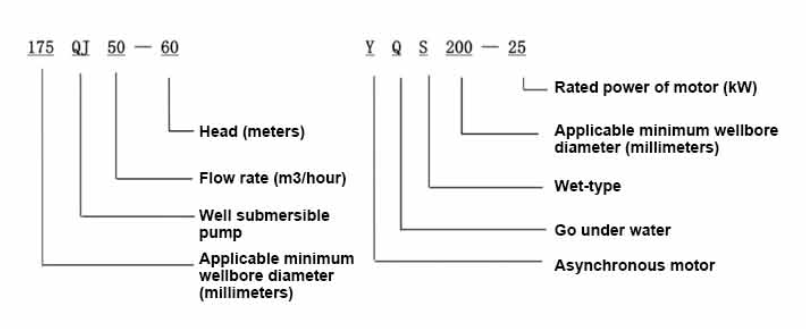
| 300QJ200-40 | 200 | 40 | 2900 | 76 | 150 | 300atas | 37 | 380 | 77.8 | 85.0 | 0.85 | 281 | ||||||||||
| 300QJ200-60 | 60 | 55 | 115 | 85.5 | 0.85 | |||||||||||||||||
| 300QJ200-80 | 80 | 75 | 154.1 | 86.0 | 0.86 | |||||||||||||||||
| 300QJ200-100 | 100 | 90 | 183.8 | 86.5 | 0.86 | |||||||||||||||||
| 300QJ200-120 | 120 | 100 | 204.3 | 86.5 | 0.86 | |||||||||||||||||
| 300QJ200-140 | 140 | 125 | 249.5 | 87.5 | 0.87 | |||||||||||||||||
| 300QJ200-160 | 160 | 140 | 277.8 | 88.0 | 0.87 | |||||||||||||||||
| 300QJ200-180 | 180 | 160 | 317.5 | 88.0 | 0.87 | |||||||||||||||||
| 300QJ200-200 | 200 | 185 | 367.2 | 88.0 | 0.87 | |||||||||||||||||
| 300QJ200-240 | 240 | 220 | 436.6 | 88.0 | 0.87 | |||||||||||||||||
| 300QJ320-30 | 320 | 30 | 2900 | 77 | 200 | 300atas | 45 | 380 | 94.6 | 85.0 | 0.85 | 281 | ||||||||||
| 300QJ320-60 | 60 | 90 | 183.8 | 86.5 | 0.86 | |||||||||||||||||
| 300QJ320-90 | 90 | 125 | 249.5 | 87.5 | 0.87 | |||||||||||||||||
| 300QJ320-120 | 120 | 160 | 317.5 | 88.0 | 0.87 | |||||||||||||||||
This well submersible pump is a pump suitable for clean water. It is strictly prohibited to dig new wells and pump dirty water containing sediment. The voltage grade of the pump is 380/50HZ, and other submersible motors with different voltage grades need to be customized. Underground cables must be waterproof cables and must be equipped with starting equipment, such as distribution boxes, etc. The starting equipment should have common comprehensive motor protection functions, such as short circuit overload protection, dephase protection, undervoltage protection, grounding protection and idling protection, etc., in order to prevent timely tripping when abnormal conditions occur. During the installation and use process, the pump must have reliable grounding. It is strictly prohibited to push and pull the switch when your hands and feet are wet. The power supply must be cut off before installation and maintenance of the pump. An obvious sign "anti-electric shock" must be set up where the pump is used. Before going down the well or installation, the motor must be filled with distilled water or non-corrosive clean cold water, and the water inlet and outlet bolts must be tightened. When testing the pump on the ground, water must be filled into the pump chamber to lubricate the rubber bearings. The instant start time shall not exceed one second to check whether the steering is correct. Pay attention to safety when the pump is upright to prevent toppling and injury. Strictly in accordance with the provisions of the pump lift and flow range, to prevent the pump with a large flow at low lift or produce a large pull at high lift, resulting in extreme wear of thrust bearings and other parts, the motor overload and burn. After the pump into the well, the measurement of the motor to the ground insulation resistance should not be less than 100MΩ. After starting, regularly observe the voltage and current, and check whether the motor winding insulation meets the requirements; if the pump storage temperature below freezing point, should be drained to prevent the water in the motor cavity from freezing and cause the motor damage due to low temperature.
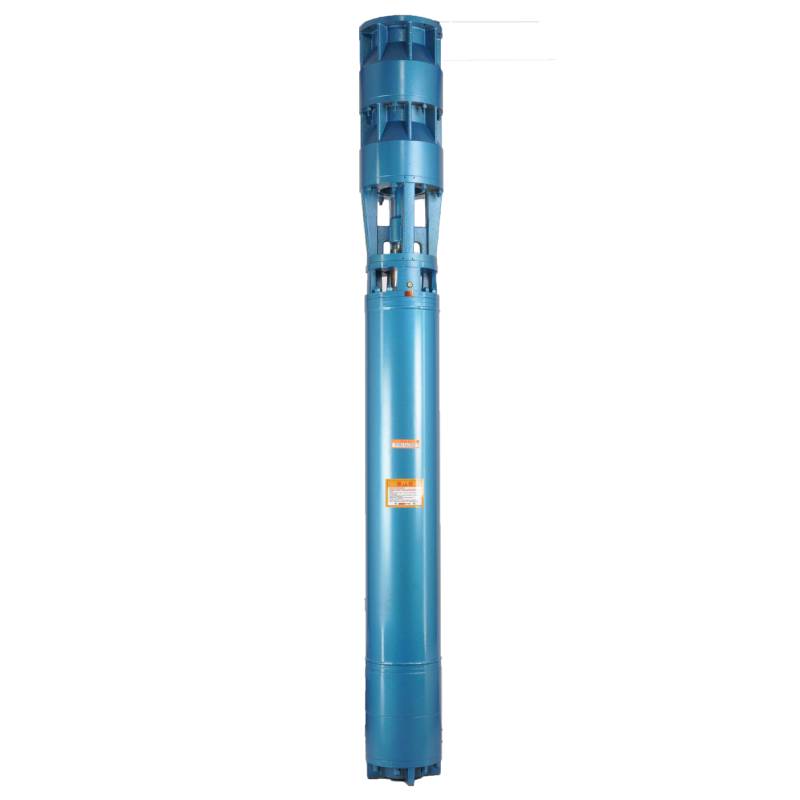
The pump part is mainly composed of pump shaft, impeller, shunt shell, rubber bearing, check valve body (optional) and other components. The motor part is mainly composed of base, pressure regulating diaphragm, thrust bearing, thrust plate, lower guide bearing seat, stator, rotor, upper guide bearing seat, sand ring, water inlet section, lead cable and other components.
Ciri-ciri utama produk termasuk:
- 1.The motor is a water-filled wet submersible three-phase asynchronous motor. The motor cavity is filled with clean water, used to cool the motor and lubricate the bearing. The pressure regulating diaphragm at the bottom of the motor is used to adjust the expansion and contraction pressure difference of the water in the body caused by the temperature rise of the motor.
- 2. In order to prevent the sand particles from entering the motor, two sand seals are installed at the upper end of the motor shaft extension, and a sand control structure is formed by installing the sand ring.
- 3. In order to prevent the pump shaft from jumping when starting, the pump shaft is connected with the motor shaft through a coupling, and the thrust bearing is installed at the bottom of the motor.
- 4. The lubrication method of the motor and the pump bearing is water lubrication.
- 5. The stator winding of the motor adopts high quality submersible motor winding wire with high insulation performance.
- 6. The pump is designed by computer CAD, with simple structure and excellent technical performance.

(1) Penyediaan sebelum pemasangan:
1. Periksa sama ada pam tenggelam memenuhi syarat penggunaan dan skop yang dinyatakan dalam manual.
2. Menggunakan obiect berat dengan diameter sama dengan diameter luar maksimum pam tenggelam, ukur sama ada diameter dalam lubang telaga boleh memuatkan pam tenggelam, dan ukur sama ada kedalaman telaga memenuhi keperluan pemasangan.
3. Periksa sama ada lubang telaga bersih dan sama ada air telaga itu keruh. Jangan sekali-kali menggunakan pam elektrik tenggelam untuk mencuci lumpur pam welor dan air pasir untuk mengelakkan kerosakan pramatang pada pam elektrik tenggelam.
4. Periksa sama ada kedudukan pengapit pemasangan welhead sesuai dan sama ada ia boleh menahan kualiti keseluruhan unit
5. Periksa sama ada komponen pam tenggelam lengkap dan dipasang dengan betul mengikut gambar rajah pemasangan dalam manual Tanggalkan skrin penapis dan putar gandingan untuk melihat sama ada ia berputar secara fleksibel
6. Tanggalkan skru air dan isikan rongga motor dengan air bersih dan tidak menghakis (nota. pastikan anda mengisinya), kemudian ketatkan skru air. Selepas 12 jam suntikan air, rintangan penebat motor hendaklah tidak kurang daripada 150M Q apabila diukur dengan meja goncang 500V.
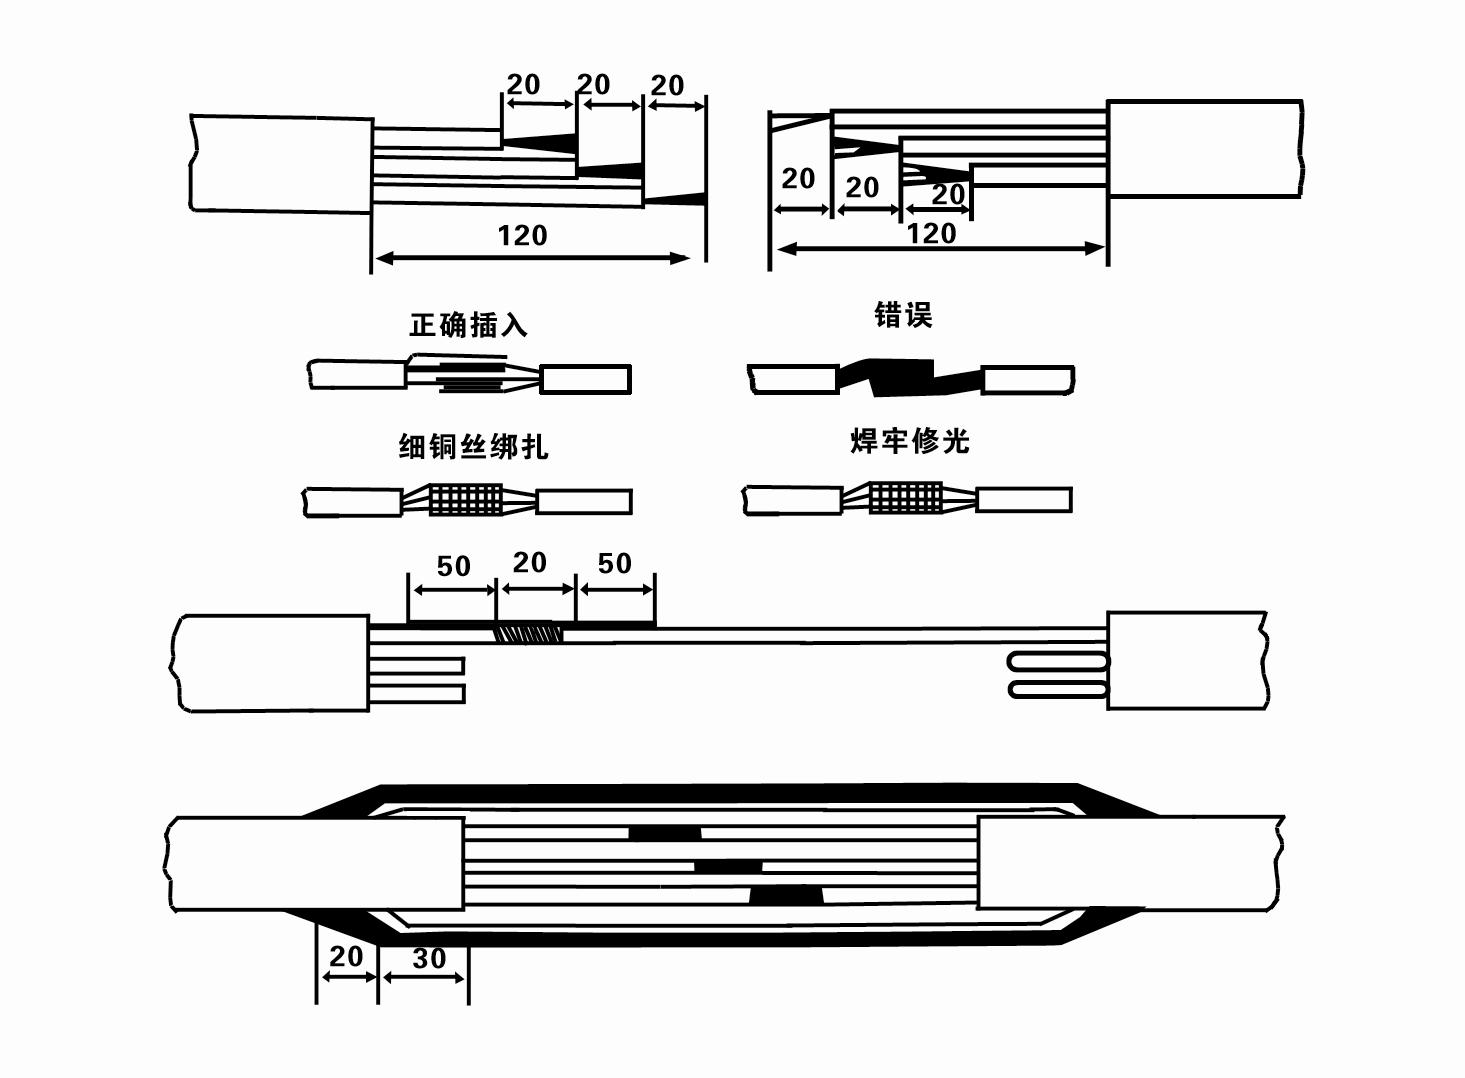
7. Cable joint, cut off a 120mm rubber sleeve from one end of the outgoing cable and the matching cable with an electrician's knifethen stagger the length of the three core wires in a stepped shape, peel off a 20mm copper core, scrape of the oxide layer on theoutside of the copper wire with a knife or sand cloth, and insert the two connected wire ends in palirs.After tying the layer tightly with fine copper wire, solder it thoroughly and firmly, and sand of any. burrs on the surface. Then, forthe three joints, use polyvester insulation tape to wrap them in a semi stacked manner for three lavers. Wrap the two ends of thewrapping layer tightywith nyion thread,and then use a semi stacked method to wrap the tape for three layers. Wrap the outellayer with high-pressure insulation tape for three layers. Finally, fold the threestrands together and repeatedly wrap them for fivelayers with high-pressure tape. Each layer must be tightly tied, and the interlayer joints must be tight and fimm to prevent water frompenetrating and damaging the insulation, After wrapping, soak in water at room temperature of 20 ’c for 12 hours, and measurethe insulation resistance with a shaking table, which should not be less than 100M Ω
Gambar rajah proses pendawaian kabel yang dilampirkan adalah seperti berikut:
8. Gunakan multimeter untuk memeriksa sama ada wayar tiga fasa disambungkan dan sama ada rintangan DC adalah lebih kurang seimbang.
9. Periksa sama ada kapasiti litar dan pengubah telah terlebih beban, dan kemudian sambungkan suis perlindungan beban lampau atau peralatan permulaan. Lihat Jadual 2 untuk model tertentu, dan kemudianTuangkan baldi air ke dalam pam air dari alur keluar pam air untuk melincirkan galas getah dalam pam, dan kemudian letakkan pam elektrik tenggelam tegak dan stabil. Mula (tidak lebih dari satu saat) dan semak sama ada arah stereng adalah konsisten dengan tanda stereng. Jika tidak, tukar mana-mana dua penyambung kabel tiga fasa. Kemudian pasang penapis dan bersedia untuk turun ke dalam telaga. Jika digunakan dalam majlis-majlis khas (seperti parit, parit, sungai, kolam, kolam, dll.), pam elektrik mesti dibumikan dengan pasti.
(2) Peralatan dan alatan pemasangan:
1. Sepasang rantai angkat untuk lebih daripada dua tan.
2. Tripod dengan ketinggian menegak tidak kurang daripada empat meter.
3. Dua tali gantung (tali dawai) yang boleh menanggung berat lebih daripada satu tan (boleh menanggung berat set lengkap pam air).
4. Pasang dua pasang pengapit (splints).
5. Sepana, tukul, pemutar skru, alatan dan instrumen elektrik, dsb.
(3) Pemasangan pam elektrik:
1. Gambar rajah pemasangan pam elektrik tenggelam ditunjukkan dalam Rajah 2. Dimensi pemasangan khusus ditunjukkan dalam Jadual 3 "Senarai Dimensi Pemasangan Pam Elektrik Rendam".
2. Pam elektrik tenggelam dengan kepala kurang daripada 30 meter boleh dinaikkan terus ke dalam telaga menggunakan hos dan tali dawai atau tali rami lain yang boleh menanggung berat penuh keseluruhan mesin, paip air, dan air dalam paip.
3. Pam dengan kepala lebih daripada 30 meter menggunakan paip keluli, dan urutan pemasangan adalah seperti berikut:
①Gunakan pengapit untuk mengapit hujung atas bahagian pam air (motor dan pam air telah disambungkan pada masa ini), angkatnya dengan rantai gantung, dan ikat perlahan-lahan ke dalam perigi sehingga Letakkan pengapit pada kepala perigi dan keluarkan rantai gantung.
② Gunakan sepasang pengapit lain untuk mengapit paip, angkat dengan rantai gantung 15 cm dari bebibir, dan turunkannya perlahan-lahan. Antara bebibir paip dan bebibir pamLetakkan pad getah pada tempatnya dan ketatkan paip dan pam sama rata dengan bolt, nat dan pencuci spring.
③ Angkat sedikit pam tenggelam, keluarkan pengapit di hujung atas pam air, ikat kabel dengan kuat pada paip air dengan pita plastik, dan ikat perlahan-lahan sehingga Pengapit diletakkan di kepala telaga.
④Gunakan kaedah yang sama untuk mengikat semua paip air ke dalam telaga.
⑤Selepas kabel plumbum disambungkan ke suis kawalan, ia disambungkan ke bekalan kuasa tiga fasa.
(4) Perkara yang perlu diberi perhatian semasa pemasangan:
1. Jika fenomena jamming ditemui semasa proses mengepam, pusing atau tarik paip air untuk mengatasi masalah jamming point. Jika pelbagai langkah masih tidak berkesan, silaJangan paksa pam ke bawah untuk mengelakkan kerosakan pada pam elektrik tenggelam dan telaga.
2. Semasa pemasangan, pad getah hendaklah diletakkan pada bebibir setiap paip dan diketatkan sama rata.
3. Apabila pam air diturunkan ke dalam telaga, ia harus diletakkan di tengah-tengah paip telaga untuk mengelakkan pam daripada berjalan di dinding telaga untuk masa yang lama, menyebabkan pam bergetar dan motor menyapu dan terbakar. .
4. Tentukan kedalaman pam air ke dasar telaga mengikut keadaan pasir dan kelodak telaga yang mengalir. Jangan tanam pam di dalam lumpur. Jarak dari pam air ke dasar telaga biasanya tidak kurang daripada 3 meter (lihat Rajah 2).
5. Kedalaman kemasukan air pam air hendaklah tidak kurang daripada 1-1.5 meter dari paras air dinamik ke nod salur masuk air (lihat Rajah 2). Jika tidak, galas pam air mungkin mudah rosak.
6. Lif pam air tidak boleh terlalu rendah. Jika tidak, injap pintu perlu dipasang pada saluran paip air kepala telaga untuk mengawal aliran pam pada titik aliran berkadar untuk mengelakkan motor daripada terlebih beban dan terbakar akibat kadar aliran yang besar.
7. Apabila pam air sedang berjalan, keluaran air hendaklah berterusan dan sekata, arus harus stabil (di bawah keadaan kerja yang diberi nilai, secara amnya tidak lebih daripada 10% daripada arus undian), dan tidak sepatutnya ada getaran atau bunyi. Sekiranya terdapat sebarang kelainan, mesin hendaklah dihentikan untuk mengetahui punca dan menghapuskannya.
8. Apabila memasang, perhatikan tetapan wayar pembumian motor (lihat Rajah 2). Apabila paip air adalah paip keluli, bawa ia dari pengapit kepala telaga; apabila paip air adalah paip plastik, bawa ia dari tanda pembumian pam elektrik.
- 1.After the submersible pump is installed, check the insulation resistance and three-phase conduction from the switch again, check whether the instrument and the connection of the start equipment are wrong, if there is no problem, the trial machine can be started, and observe whether the indicator readings of the instrument exceed the rated voltage and current specified on the nameplate after the start, and observe whether the pump has noise and vibration phenomenon. If everything is normal, it can be put into operation.
- 2. After the first operation of the pump for four hours, the motor should be shut down to test the thermal insulation resistance quickly, and its value should not be less than 0.5 megaohm.
- 3. After the pump is shut down, it should be started after five minutes to prevent the water column in the pipe from being completely reflowed and causing excessive motor current and burnout.
- 4.After the pump is running normally, in order to prolong its service life, it is necessary to check the power supply voltage, running current and insulation resistance regularly to see if they are normal.If the following conditions are found, the equipment should be shut down immediately to troubleshoot.
- (1)Under the rated working conditions, the current exceeds 20% of the rated value.
- (2)The dynamic water level drops to the inlet part, resulting in intermittent water discharge.
- (3)The submersible pump vibrates violently or emits noisy noise.
- (4)The power supply voltage is lower than 340 volts.
- (5)A fuse is burned out.
- (6)The water pipe is damaged.
- (7)The thermal insulation resistance of the motor to the ground is less than 0.5 megaohm.
- These inspections will help to ensure the normal operation of the pump, improve its reliability and stability, so as to ensure its durability and service life.
- 5.unit disassembly:
- - untie cable rope, remove the pipeline part, remove the wire plate.
- - skru ke bawah bolt air, masukkan air ke dalam kebuk motor.
- - remove the filter, loose the fixed screw on the coupling fixed motor shaft.
- - screw down the bolt connected with the motor at the inlet junction, separate the pump and the motor (pay attention to the unit cushion when separating, prevent the bending of the pump shaft)
- - pump disassembly sequence is: (see figure 1) inlet junction, impeller, guide housing, impeller...... check valve body, when removing the impeller, use special tools to loosen the conical sleeve of the fixed impeller first, avoid bending the pump shaft and each part in the disassembly process.
- - motor disassembly process is: (see figure 1) place the motor on the platform, remove the nut, base, shaft head lock nut, thrust plate, key, lower guide bearing seat, double head bolt from the bottom of the motor in turn, then take out the rotor (pay attention not to damage the wire package) and finally remove the connecting section and upper guide bearing seat.
- - unit assembly: Before assembly, the rust and dirt of the parts should be cleaned, and the mating surfaces and fasteners should be coated with sealant. Then they should be assembled in the reverse order of disassembly (the up and down momentum of the motor shaft is about 1 mm after assembly). After assembly, the coupling should be flexible, and then the filter screen test machine.
- 6.The submersible pump should be dismantled and repaired according to Article 5 for each operation year, or less than one year, but the submersible time has reached two years, and the worn parts should be replaced.
1, keluarkan air dalam rongga motor (terutama pada musim sejuk untuk mengelakkan motor daripada membeku), dan ikat kabel dengan baik.
2, store in an indoor room without corrosive substances and gases, with a temperature below 40 °C.
3, penggunaan jangka panjang perlu memberi perhatian kepada pencegahan karat pam tenggelam.
- Pendesak
- Lengan aci
- Lengan aci getah
-
Cincin pengedap
01 Pengambilan air perigi dalam
02 Bekalan air bertingkat tinggi
03 bekalan air gunung
04 air menara
05 Pengairan pertanian
06 pengairan taman
07 pengambilan air sungai
08 air domestik


